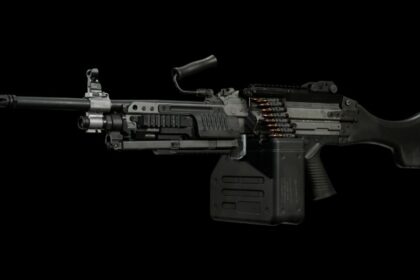
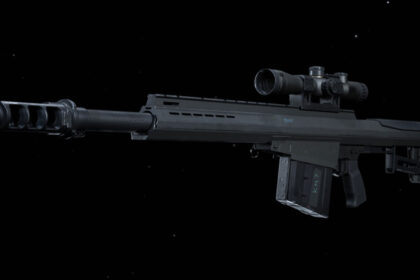
Released in Season 4 of the Battle Pass, the Rytec AMR caused quite a stir – with many people looking to unlock the Rytec AMR sniper for its unique explosive bullets as soon as they possibly could.
Touted as an ‘anti-material’ weapon, the Rytec sniper can be used to take down enemy vehicles or helicopters in Warzone, and can also be used to clever effect in certain multiplayer game modes – outside of just killing people with it.
Let’s face it, many people are turning to the Rytec AMR for its explosive rounds (unlocked at gun level 10) or its thermite rounds (unlocked at gun level 24).
Therefore, when we talk about the best Rytec AMR class for either multiplayer or Warzone, it seems foolish not to include those as a priority.
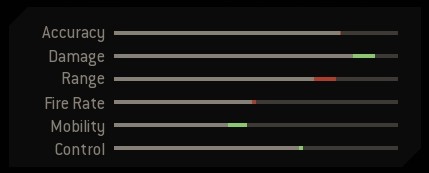
Rytec AMR Stats
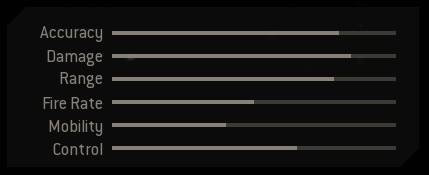
The Rytec AMR’s range is shorter than that of the HDR and the AX-50, meaning players will have to contend with higher levels of bullet drop as they try to make long distance shots. Expect a reasonable amount of recoil, or flinch, too.
However, it can do damage at a somewhat comparable level to these guns, and has a faster fire rate than them both, making it a much better option than the Dragunov – though let’s face it, what gun isn’t at this point?
Designed as an anti-material sniper, the stats stand out best when you look at its damage to vehicles in Warzone:
| Warzone Vehicle | Bullets to Destroy* |
| ATV | 3 |
| Tactical Rover | 4 |
| SUV | 4 |
| Cargo Truck | 8 |
| Helicopter | 6 |
These stats look even better when you realize that trophy systems do not work against the Rytec AMR’s explosives, and that no ‘Missile Incoming’ (or similar) alert is given to your opponents either.
Despite being primarily useful in Verdansk, there are definitely Rytec AMR setups that can be useful for multiplayer – including those explosive and thermite rounds.
Think how useful those bullets could be for exploding cars near to spawn areas, or for preventing enemy teams running down popular lanes…
Best Rytec AMR Warzone Loadout
Here are the best loadout and attachment options for the Rytec AMR in Warzone:
Warzone Attachments
| Type | Attachment | Benefit |
| Ammunition | 25x59mm Explosive 5-R Mag | Explosive bullets |
| Barrel | FTAC Seven Straight | Increased bullet velocity to help combat bullet drop |
| Optic | Variable Zoom Scope | Increased long range accuracy |
| Perk | Fully Loaded | Fully stocked sniper ammo as soon as you pick up your loadout |
| Rear Grip | Rubberized Grip Tape | Reduced recoil |
This Rytec Warzone setup maximizes your sniper’s ability to pick cars, choppers and people apart from as far away as possible. The whole class is designed to get the most out of those explosive bullets.
Warzone Perks
| Slot | Perk | Benefit |
| Perk 1 | Cold Blooded | Avoid enemy thermal optics |
| Perk 2 | Overkill | Gain a second primary weapon to pair with your Rytec AMR |
| Perk 3 | Amped | Faster switching to your secondary weapon |
Secondary Weapon
As we’re recommending that you run Overkill (sacrificing Ghost) with your Rytec AMR loadout, your secondary weapon will actually be another primary weapon.
Combine the Rytec with an SMG like the MP5, Uzi or Fennec, or an Assault Rifle like the Grau or the M4A1, so that you can take on opponents at close ranges too. After all, they’re likely to hunt you down after seeing you on their UAVs, heartbeat sensors, or on their radars after you shoot.
Best Rytec AMR Class for Multiplayer
The best Rytec AMR setup for multiplayer depends a little on the game mode you’re playing.
For example, if you’re playing Search and Destroy then you’ll probably favor explosive rounds due to the ability to kill opponents positioned by cars. If you’re playing Hardpoint or Headquarters, thermite rounds might be extremely useful for cutting off opponents entry or exit points.
The map you’re playing on will also play a part.
However, with those things in mind, we have tried to create a class that will be the most useful across as many multiplayer game modes as possible – still factoring in the fact that most people are using the Rytec AMR for its fun ammunition types.
Multiplayer Attachments
| Type | Attachment | Benefit |
| Ammunition | 25x59mm Thermite 5-R Mag | Thermite bullets that deal damage to their blast radius for up to 10 seconds |
| Barrel | FTAC 448mm Dictator | Faster aim-down-sight and movement speed |
| Optic | VLK 3.0x Optic | Quicker aim-down-sight speed |
| Perk | Sleight of Hand | Faster reload times |
| Rear Grip | Rubberized Grip Tape | Reduced recoil |
This Rytec AMR multiplayer class has been designed to allow fast ADS and movement for quickscoping with those unique ammunition rounds. Without these things, the sniper has a lack of mobility and it’s hard to deal with the huge recoil and flinch.
The thermite rounds should be great for most objective games. If you’re playing Search and Destroy or Team Deathmatch on smaller maps then opt for the explosive rounds to destroy cars and to kill enemies in one shot. If you’re on Team Deathmatch on larger maps, drop the ammunition attachment altogether due to the harsh bullet drop.
Multiplayer Perks
| Slot | Perk | Benefit |
| Perk 1 | EOD | Reduced damage from enemy exposives |
| Perk 2 | Ghost | Avoid enemy killstreaks |
| Perk 3 | Amped | Faster switching to your secondary weapon |
Secondary Weapon
We recommend using the Renetti handgun with the Mk3 Burst Mod so that you have an alternative gun for close-quarters combat.
The Renetti can still kill people in just 1-2 bullet bursts depending on range, but offers much higher accuracy and mobility than the Rytec AMR.
Rytec AMR Review
With all of the debate in the sniper category being focused around the HDR vs AX-50 debate, it’s good to have another option in the mix.
When comparing the Rytec AMR vs the Dragunov, the Rytec is a clear winner – perhaps unsurprisingly to anyone that has used the Dragunov.
If you compare the Rytec AMR vs the HDR or the AX-50 though, things are quite clear in the other direction.
Despite being a fun option to vary up your play, and offering genuine anti-vehicle uses on Warzone, this isn’t going to dethrown the two majorly-used snipers any time soon.
The slow bullet velocity on the Rytec AMR (and the corresponding bullet drop) is just too much of a factor with the explosive and thermite rounds, and if you’re going to use any other form of ammunition then you may as well use the more powerful HDR or AX-50 options. The recoil is also quite high, so despite having a higher fire rate than the stronger options, you can’t utilize this without your aim going all over the place.
The blast radius on the explosive rounds is tiny. If you don’t hit an opponent directly, you probably aren’t going to kill them – even if you put 3-4 explosive rounds next to where they’re standing – unless they’re already seriously wounded.
Our verdict: fun to use and annoying for your opponents, but not particularly viable if you want to play for wins on multiplayer. The guaranteed one shot kill – even if you shoot an enemy in the leg – using explosive rounds is great, but the lack of blast radius means that you’re not going to kill enemies if you don’t shoot them directly.
This is best used as a second loadout gun in Warzone, paired with a stronger primary – though there are definitely better guns you can turn to if you’re lucky enough to call in two loadouts.
Full Rytec AMR Attachment List
Muzzle
| Attachment | Level Unlock | Pros & Cons |
| XRK Tank Brake | 21 | + Recoil stabilization |
| Rytec AMR Supressor | 23 | + Sound suppression + Damage range – Aim down sight speed – Aim walking steadiness |
Barrel
| Attachment | Level Unlock | Pros & Cons |
| FTAC Seven Straight | 4 | + Damage range + Bullet velocity + Recoil control – Aim down sight speed – Movement speed |
| FTAC 448mm Dictator | 15 | + Aim down sight speed + Movement speed – Bullet velocity – Recoil control |
| XRK Harbinger | 27 | + Recoil control – Bullet velocity – Aim down sight speed – Movement speed |
Laser
| Attachment | Level Unlock | Pros & Cons |
| Tac Laser | 28 | + Aim down sight speed + Aiming stability + Aim walking steadiness – Laser visible to enemies |
Optic
| Attachment | Level Unlock | Pros & Cons |
| Scout Combat Optic | 3 | + Aim down sight speed – Zoom Level |
| VLK 3.0x Optic | 7 | + Aim down sight speed – Zoom level |
| Thermal Sniper Scope | 12 | + Thermal target identification – Aim down sight speed |
| Cronen C480 Pro Optic | 20 | + Aim down sight speed – Zoom level |
| Variable Zoom Scope | 26 | + Magnification toggle – Aim down sight speed |
| Merc Thermal Scope | 32 | + Thermal target identification – Aim down sight speed – Mobility |
| Thermal Dual Power Scope | 34 | + Thermal target identification + Magnification toggle – Aim down sight speed – Aiming stability |
Stock
| Attachment | Level Unlock | Pros & Cons |
| XRK Mastodon | 8 | + Aiming stability – Aim walking movement speed |
| FTAC Trekker | 18 | + Aim walking movement speed – Aiming stability |
| STOVL Tac-Wrap | 30 | + Aim down sight speed – Aiming stability |
Underbarrel
| Attachment | Level Unlock | Pros & Cons |
| Bipod | 13 | + Crouch/prone recoil control – Mobility |
Magazine
| Attachment | Level Unlock | Pros & Cons |
| 25x59mm Explosive 5-R Mag | 10 | + Explosive damage + Destroy vehicles quickly – Bullet velocity – Ammo reserve – Recoil control – Fire rate |
| 25x59mm Thermite 5-R Mag | 24 | + Thermite damage – Bullet velocity – Ammo reserve – Recoil control – Fire rate |
Rear Grip
| Attachment | Level Unlock | Pros & Cons |
| Rubberized Grip Tape | 6 | + Recoil control – Aiming stability |
| Granulated Grip Tape | 16 | + Aiming stability + Aim walking steadiness – Aim walking movement speed |
| Stippled Grip Tape | 22 | + Aim down sight speed + Sprint to fire speed – Aiming stability |
Perk
| Attachment | Level Unlock | Pros & Cons |
| Mo’ Money | 2 | + Increased XP |
| Sleight of Hand | 5 | + Improved reload speed |
| Fast Melee | 9 | + Melee speed |
| Recon | 11 | + See enemy nameplates at a greater distance |
| Presence of Mind | 14 | + Hold breath for longer |
| FMJ | 17 | + Deeper bullet penetration through walls |
| Heavy Hitter | 19 | + Melee stun power |
| Frangible – Wounding | 25 | + Delay enemy health regeneration |
| Focus | 29 | + Reduced flinch |
| Frangible – Disabling | 31 | + Crippling power |
| Fully Loaded | 33 | + Max starting ammunition |

