NAT type is a complex topic to work around. In fact, there are two different NAT type types even if it sounds so awkward. This article will focus on how to change NAT type on router for gaming. To be more specific, these are the NAT types you see when you hover over your connection when playing a game.
It would either say, “NAT type: Strict” or “NAT type: 3”. As a gamer, we would want this to be “Open” or “1”. This will be the problem we are going to solve as well as explaining what the differences are among these different NAT types.
What is a NAT Type?

NAT means Network Address Translation. Just by the definition, NAT has something to do with the translation of your IP address. This is because connecting to the internet will directly show your IP address to everyone out there and this is something you would want to mask.
The NAT does exactly that as it modifies your IP address into another one when you connect to a routing device (router). When your information is being translated or modified, it is being done while the information or data is being sent in packets.
This is why you would want less restriction on your router NAT type so that it is more easily available but at the same time, it would be a little riskier or unsecured. If your NAT type is bad, you will be losing packets upon connecting to the host.
This might be the packet loss you have been encountering during the game because your connection to the server is not flowing consistently because of the restrictions.
This topic is incredibly complex. You can even dedicate the next 10 hours reading everything about NAT types and still be confused about all the technicalities involved. On the bright side, this article will only focus on the NAT type that you see in other games on different platforms which is the only thing you need to know about.
NAT Type Differences
NAT types are different for each platform. Sony’s consoles classify NAT types by 1, 2, and 3. Microsoft’s consoles, including the PC, will be classified as open, moderate, and strict.
The best connections would be NAT type 1 and open on your respective platform. The only way to get this kind of NAT type is when your console or PC is directly connected to the internet. This means that your device is not connected to the router.
| NAT Type | Connection Quality |
| NAT 1 or Open | Best Connection |
| NAT 2 or Moderate | Good Connection |
| NAT 3 or Strict | Worst Connection |
So for the differences in NAT type, all you need to know is the connection quality among them. Even if NAT 1 is completely different from an open NAT type, the type of connection quality you should get will be almost the same.
The reason why the connection is getting better is that if your IP address becomes more accessible or visible to others, it helps you connect better with other servers. If you are visible to more game servers, it is more likely that you get one that is more suited to your connection or location.
This will give you a better overall experience with regards to ping, packet loss, and other connection issues. The problem here is that you are sacrificing a bit of security for this. That is how it usually goes as you really need to open up your IP address to get better connectivity with everything on the internet.
Most of the best routers (if not all) will have all the features listed below.
How to Open NAT Type on a Router
Port Forwarding
Port forwarding has been a popular term among gamers ever since they introduced routers. Even now, it still functions the same way and it helps gamers connect easier by helping your router discover where to connect to.
The main idea of port forwarding is to intercept data that is headed towards a computer and redirects it to a different address or port. In gaming, this is crucial to connecting to the game’s server if you are consistently having connection issues before.
Because the concept of port forwarding is helping the transfer of data by making it faster and more available to everything on the internet. It allows a smooth pathway with the port inputted.
Once you know the ports you need to get to (provided by the game itself), your connection should be more streamlined towards their servers and in return, giving you better servers for matchmaking because it is more catered to your location.
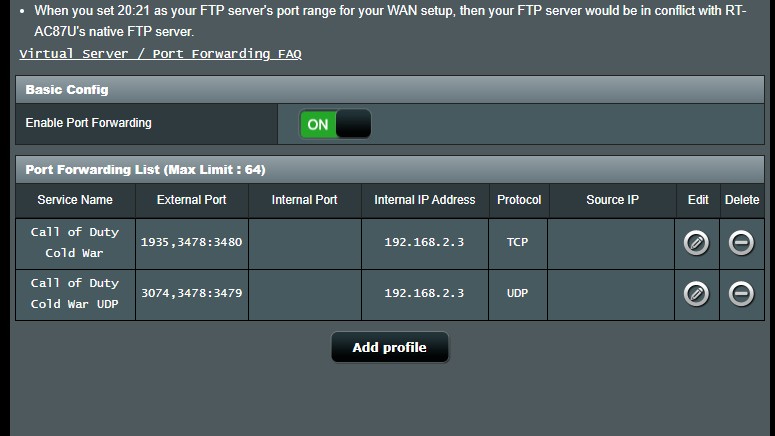
For these ports, you will need to search for the specific ports from the game itself. Usually, the company or developers make it public to help the gamers connect easier to their servers.
Once you searched for the game’s port to port forward, you can go to your router and find the port forwarding tab. In this section, you should follow the instructions where you found the game’s port.
They will give you all the information on what you should input to complete the correct port forwarding settings on your router. It should look like the image above.
Turning on UPnP
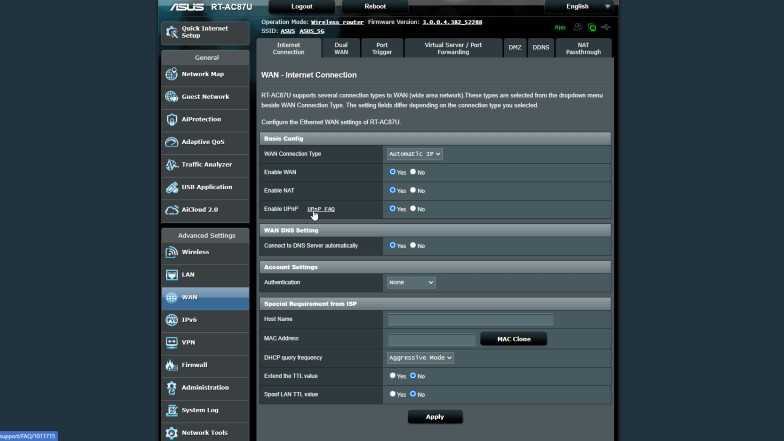
Universal Plug and Play or UPnP help your devices find each other in the same network. You will be able to connect locally with all your devices and link them with each other. This is more popular for Smart TVs and PCs.
Although, the main benefit you get from enabling UPnP is that it enables automatic port forwarding. It does this by sharing the information with each other and automatically connects to the specific service when they are needed.
As long as you run a service, it will remember and automatically connect to the service which allows a much smoother passage of data. Now, this is heavily dependent on the game you are playing. Some games do not offer their own ports for port forwarding.
However, UPnP will allow the game you are playing to automatically send the ports to your computer and then the router will do the rest once the data has been transferred to the computer. If the game has not implemented this but has its own ports, you can find this online and use the method above to manually port forward the game.
Turning on DMZ
DMZ brings in another specific IP address specifically for your device. In this case, it would be your consoles. With the new IP address, it bypasses the local private IP address you have on your network and uses the new public IP address.
This new public IP address will get all inbound packets to come in. Your ports would be open up which should already mean that the NAT type is open. This will allow you to connect to the best servers as your address is much more, if not completely, visible to everything.
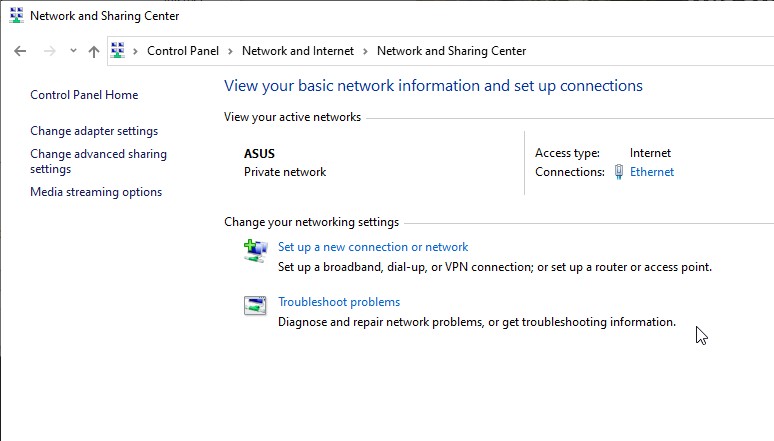
The first step to do this would be going to your Windows Control Panel. You can open it by searching it on the Windows search bar. Open Network and Internet and then, choose Network and Sharing Center.
You will see your active networks and your type of connection. Whether it is through Wi-Fi or an Ethernet cable, you would be able to see a clickable link on your connection under the access type. Click it and it will open a new window.
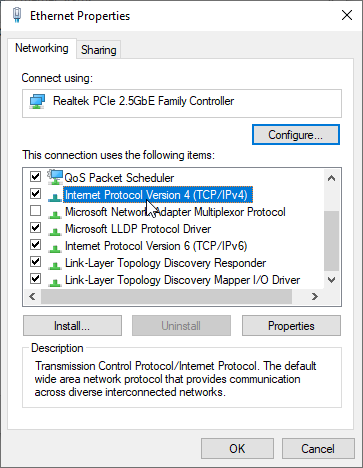
Once opened, choose properties and find “Internet Protocol Version 4 (TCP/IPv4)” under the Networking tab. Double click and you will open the properties of the IPv4. Under the General tab, you should see that everything is connected automatically unless you have changed this before.
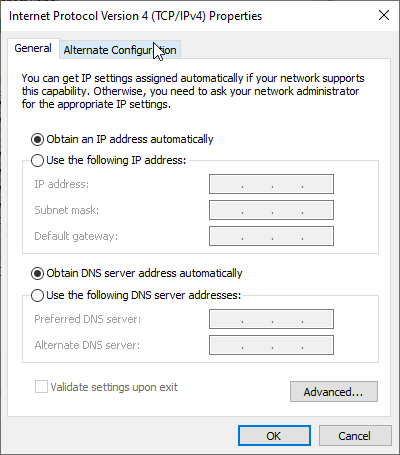
For the IP address, manually input your IP address, Subnet Mask, and Default gateway on the input box. If you do not know this information, you can run CMD first. Search “Command Prompt” on your Windows search bar to easily open the application.
Once CMD is open, type “ipconfig” and press Enter on your keyboard. This will list down your IP’s configuration. Find the things you need to jot down like IP address, Subnet Mask, and default gateway. Input this information on the IPv4 properties and press “Ok”.
Now, you need to access your router through an application or a web browser. It does not matter which one as long as you are on the router’s control panel. This is different for each brand, model, and firmware version so it would be hard to guide you step-by-step on this part.
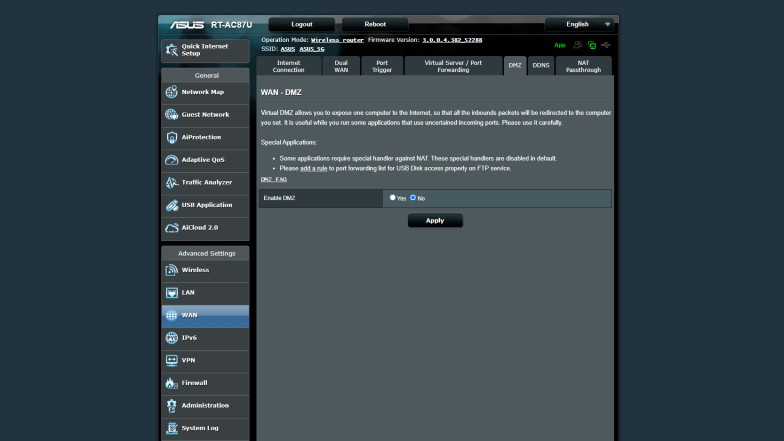
Just find the DMZ option on your router’s control panel and turn it on. It is usually found on the “WAN” tab. Once you turn it on, you should see an IP address input. Like mentioned before, this IP address will be shown publicly because that is the whole purpose of the DMZ.
You should input your IP address here and all the required information that is being asked for. It should be all on your command prompt where you see your IP’s configuration. After saving the settings on your router, you should restart your computer before checking your NAT type on games.
The IP address you put on your DMZ will be more exposed but in return, you should get a better connection to other game servers. There is a smart way of doing this but only if you have a console and a PC. You can check this tip in the next section.
How to Change Your NAT Type on Consoles
For your consoles, it is usually the same method as the ones above. Since all routers have a different interface and features, you should check out your console’s IP address and MAC address just in case. If ever you need this information to find your device on your router, list it on your phone or paper so you can differentiate your device on your router.
Another good tip to know is that when you are setting up the DMZ, it will require a static IP address to use. This IP address will be the one used to connect openly to everything on the internet. This IP address will also be the one susceptible to DDoS attacks and other sorts of hacks.
Is Changing Your NAT Type Safe?

With everything mentioned, you will be more vulnerable to everything on the internet, but in order to be attacked, you will need to be targeted which is going to be unlikely. In this case, it is up to you if you really want to play with better connections in exchange for security.
From experience, I have not had any issues through attacks when I opened my NAT type. In my case, it was crucial for me to do this method to play Call of Duty with friends. With an extremely bad NAT type, we could not even see each other online to send invites. On rare occasions that we do find each other, one of us gets kicked as the game starts.
So it can be incredibly frustrating to have these kinds of issues. The same goes for connecting to terrible servers or getting absurd packet loss. It is up to you if you want to risk it because you will definitely be more vulnerable.
The best way to mitigate this is by setting your DMZ IP address as the IP address on one of your consoles. This will allow you to secure any private data on your PC as your console’s IP address will be the one visible to everyone.
As long as you do not have any sensitive information on your console, it can act as the DMZ host which can be set on your router. Again, each router is different so make sure to find this feature on your own router by checking the tabs.
Conclusion
With all this information in mind, it is ultimately up to you if you want to open up your NAT type. It was invented to do what it is doing now which is masking your IP address for security purposes.
If you feel that you do not need the added security, you can proceed to open up your NAT type for better connections in gaming. Just make sure to take care of everything else and avoid anything suspicious when browsing the web.
There are other things you can do to optimize your router for gaming. It all starts with learning how to set up a router for gaming since some of these problems do not even happen to other gamers.

