There are many ways that you can improve your game in Rocket League. But, before you get to work on practicing, tweaking certain game settings can speed up the process of improvement.
This guide discusses the best custom settings for Rocket League, drawing inspiration from the most-used settings by pros, as well as a few personal recommendations.
Which Settings Should Be Adjusted?
There are seven main categories of settings in Rocket League. This includes Gameplay, Camera, Controls, Interface, Video, Audio, and Chat.
Each category contains subsets of options that you can adjust to change how the game looks and feels.
Adjusting some of these settings is purely based on personal preference as they don’t really help you improve your game. However, categories such as Camera and Controls significantly affect the overall experience, so I will be focusing on them.
Gameplay
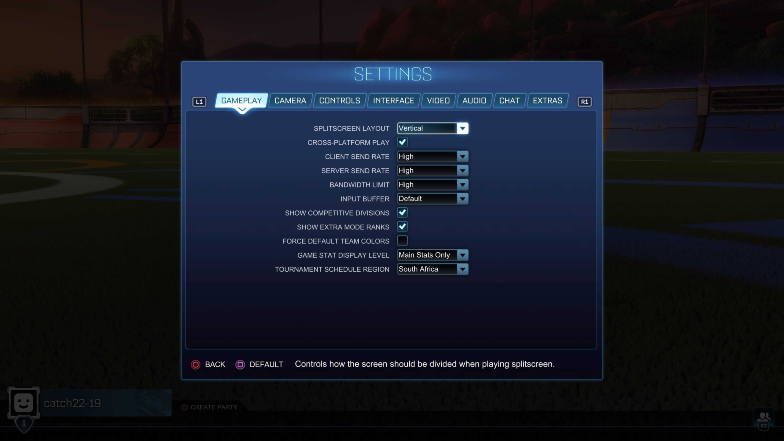
You can leave everything as is here. If you’re bothered by random information and stats popping up during games, you can adjust the Game stats display level to show “Main stats only”.
Camera
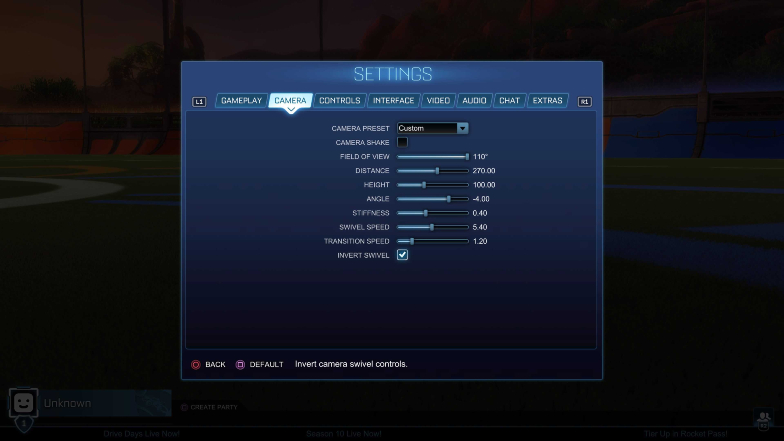
Here, you can work with small ranges. This means that if I recommend a particular figure, you can adjust it to be slightly higher or lower based on your testing and what you prefer.
Camera Shake: Off
Camera shake does add a bit of realism to your game as objects and your surroundings move according to what’s happening in the game. It’s great for immersion but bad for everything else.
By turning it off, your vision is not constantly obstructed by unnecessary visual effects and blur and as such, you can be more precise in control of your car.
Field of View: 110 degrees
The higher the figure here, the more you can see on the pitch at once. A wider field of view means that more items fit into the screen at a time, which is important because you need to know what’s happening around you on and off the ball.
At the same time, you don’t want a field of view so wide that important details become too small to recognize easily. You can tweak this slightly to your taste, but most pros go with 110.
Distance: 270
This refers to the measurement of the space between the base of your car and the camera. 270 is the right amount of a broad view in most situations.
Height: 100
This refers to the measurement of the space between the roof of your car and the camera. If you attempt aerial shots often, then you want to make sure that you don’t have this setting too high or too low.
On average, pros work with 100, give or take 10 points.
Angle: -4
This refers to the angle that the camera is pointed toward your car. -4.00 gives you a good upper overview and enough room to look ahead of the car. Give or take one point for this if you must adjust.
Camera Stiffness: 0.40
When you accelerate at a high speed, the camera locks into your car and follows closely. Adjusting the camera stiffness controls how “locked-in” the camera is in this state, with a lower figure causing it to be loose and a higher figure causing it to be tighter.
This is one of the more flexible settings in this list in terms of what to pick. You can play around with it a bit and see what works for you.
Swivel Speed: 5.4
This setting controls the speed of camera movement. Somewhere between 5-7 is generally good for the right amount of speed and accuracy.
Transition Speed: 1.20
This setting controls the speed of transitions between the ball camera and the car camera.
Invert Swivel: Adjust to Preference
Controls
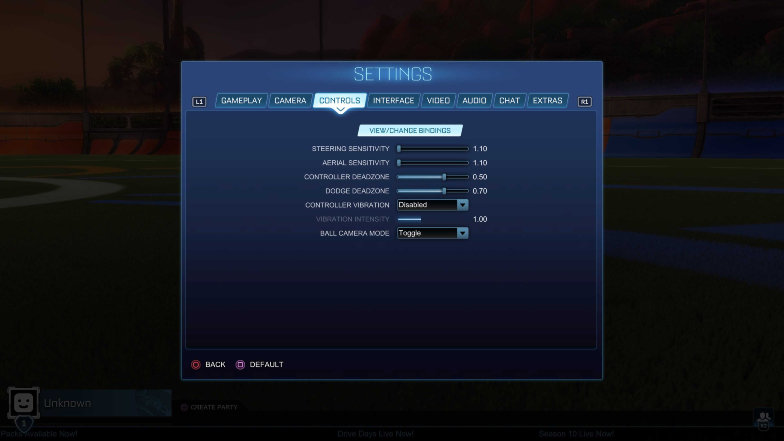
When it comes to controls, it is even more important to practice a lot when you adjust any settings and make sure that they work for you. That said, there are recommendations that work for most people in this category as well.
Steering Sensitivity: 1.1
This setting controls the sensitivity of your joystick when steering your car. When you tune it to higher levels, steering will feel faster and more sensitive, and vice versa.
As a beginner or average player, I recommend keeping it at around 1.1. However, if you’re an advanced player, you might benefit from turning it up closer to 1.9.
Aerial Sensitivity: 1.1
Aerial sensitivity works in a similar manner to steering sensitivity, except this applies when your car is in the air.
The same logic applies here. The lower, the better is generally recommended unless you’re an advanced player.
Controller Deadzone: 0.5
This is the most sensitive setting in this category, so the slightest of changes can actually make a huge difference in-game.
The controller deadzone determines the sensitivity of your analog sticks. The speed and length to which you turn the stick in any direction significantly affect how quickly the game registers that movement on your car and turns it in the desired direction.
So, if you pull the joystick left very slightly on a highly sensitive controller deadzone setting, it is more register that movement than if you set it to a medium or low level. 0.5 is a decent middle ground.
Dodge Deadzone: 0.7
The same logic as the controller deadzone applies here, with the difference being that this setting determines how much you need to pull the analog stick in a particular direction for the game to register a dodge.
0.7 indicates that you need to pull the stick 70% of the way, and that’s generally a safe zone for most players.
Vibration: Disabled
Many people like to leave this setting on in action games, perhaps because it adds a little bit of immersion. However, it can mess up your coordination in a fast-paced game like Rocket League, so I recommend disabling it.
It’ll save your controller’s battery life too anyway.
Ball Camera Mode: Toggle
The “Toggle” option will allow you to switch between ball camera mode and free-view camera angles in-game. Each angle has unique use cases, so being able to switch is important.
Interface
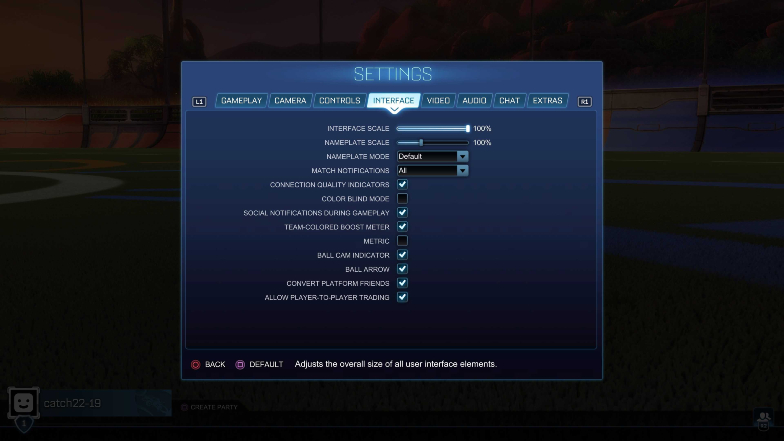
These settings can be left as is, but I personally like to make these tweaks:
Nameplate Scale – 200
Having larger name tags can be useful for identifying opponents from a far distance.
Match Notifications: Time Update Only
When too many notifications pop up, you can get easily distracted. Time Updates alone are enough.
Ball Arrow: On
This can be particularly helpful for beginners as it points an arrow toward your ball even if the ball camera is off.
Video
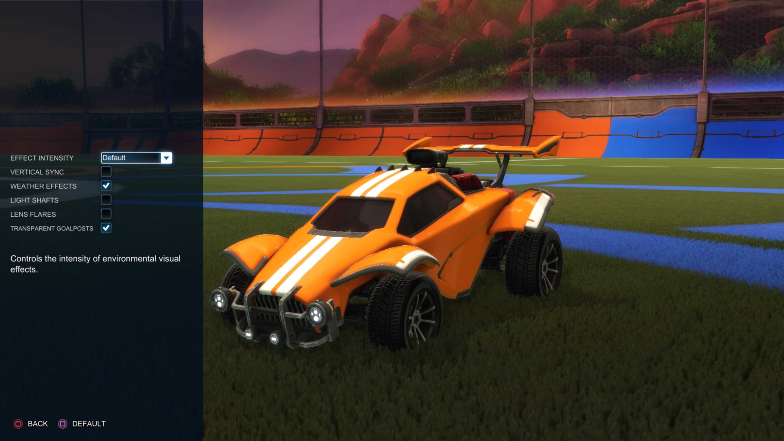
If you’re running the game on a potato PC, then you need to pay extra attention to getting it right in this section. We have a separate guide for that, so be sure to check it out!
If you’re on a PC and your device meets the recommended requirements, then these video settings are the way to go (Note: only a few of these settings are available on the console version):
- Resolution: 1920×1080 (or according to your monitor display)
- Display Mode: Fullscreen (“Borderless” is nice but has been known to cause input lag)
- VSync: Off (Looks nicer and smoother but also causes input lag. Turn back on if you experience screen tearing)
- Render Quality: High (Lower settings offer smoother gameplay and lower pixel quality while higher quality offers sharper pixels alongside good gameplay)
- Render Detail: Custom
- Max FPS: Uncapped or a level above your monitor’s max output.
- World Detail: Performance (more focus on better gameplay than unnecessary background effects)
- Particle Detail: Performance (same as above)
- Effect Intensity: Low Intensity (effects such as flashing lights are kept at a tolerable level to avoid distraction)
- High-Quality Shaders: Off (can cause lag if turned on)
- Ambient Occlusion: Off
- Depth of Field: Off
- Bloom: Off
- Light Shafts: Off
- Lens Flares: Off
- Dynamic Shadows: Off
- Motion Blur: Off
- Weather Effects: Off
- Transparent goalposts: On (important for defending so you can see out of your net when you’re inside it)
Rocket League is not exactly a ground-breaking game in terms of graphics, so many of the extra graphical features that you will lose by turning these settings off are not that big of a deal. The sacrifice is definitely worth it for smoother gameplay – every millisecond gained counts toward a win.
Audio & Chat
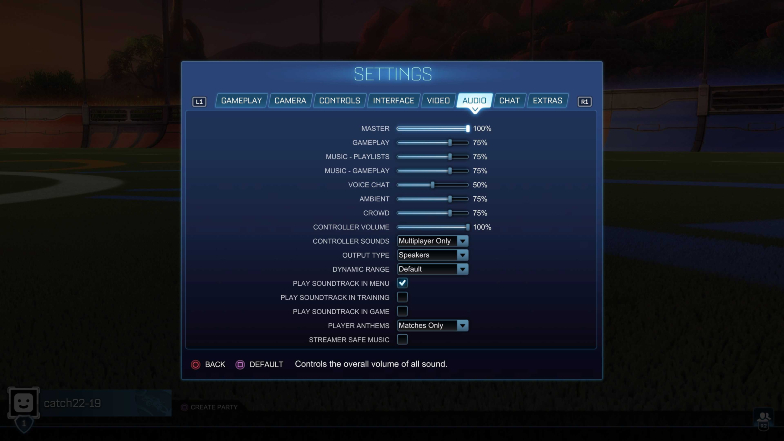
Audio and chat settings should be adjusted according to your preferences.
What Next?
While you can experience immediate improvements when you switch to these recommended settings, it is important to stick with them for a fair bit if you don’t.
If you’re looking for more tips to help you with the game, you can hop on our guide for leveling up fast next. It’s a good read!

