
If you’re playing on one of the tougher difficulties or online, reading the defense is a very important skill to master.
A lot of people online have years of Madden experience under their belt so reading and beating their defensive coverage will give you a massive edge online. The same goes for All-Madden AI: if you don’t execute the plays that can beat each defense, you’ll be giving up a lot of possessions and find it hard to score points.
Read on to learn how to beat each cover defense in Madden 22 by reading it and executing the right plays.
The Most Common Cover Defenses in Madden 22
Whether you’re playing online or offline, these are the defensive coverages you’ll be facing most often:
- Cover 1
- Cover 2 Zone
- Cover 2 Man
- Cover 3
- Cover 4
- Cover 6
Let’s go over each and see how you can recognize and beat them. But before that, remember that it’s also important for you to know how to read defenses in Madden 22 as that will make everything a whole lot more predictable.
Cover 1 Defense
A lot of players wonder how to beat man coverage in Madden 22. Cover 1 is a man-to-man coverage where each defensive player is assigned an offensive player to guard, which is why this is particularly tricky.
This defense is usually very aggressive and, more often than not, it’s combined with a blitz to collapse the pocket quickly and put the quarterback under pressure.
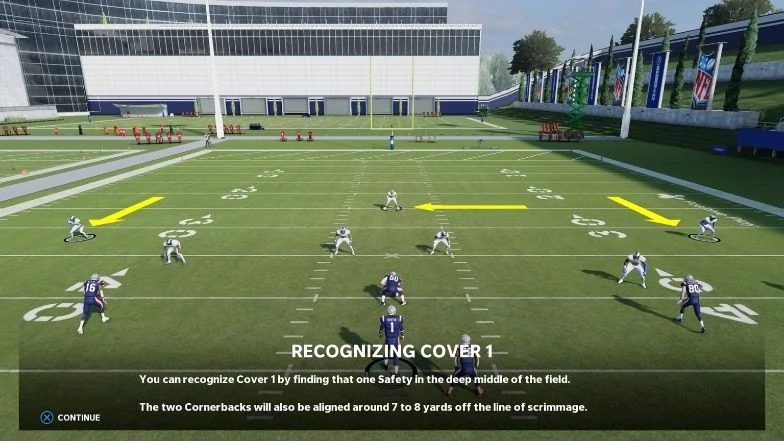
Recognizing Cover 1 is easier than recognizing many other coverages. The giveaway is the single safety in the middle of the field (that’s where the name Cover 1 comes from).
The cornerbacks can also be either pressed up the line of scrimmage or playing a few yards off. To make sure the defense is in Cover 1, you can always motion one of your receivers by selecting him with Circle/B and sending him to the other side of the field with your Left Stick. If a defender follows, they’re in Man coverage.
How to Beat the Cover 1 Defense in Madden 22
Crossing routes where the receivers run across the field are great ways to defeat man coverage. Any play that has Mesh, Switch, Cross, and similar routes is good as a counter against Cover 1.
Additionally, since Cover 1 only has a single safety playing deep, you can beat it if you have speedy receivers that can outrun their cornerbacks. Run Verticals and Double Move routes if the cornerbacks are pressed against the line of scrimmage and you have quick receivers. They’ll often be able to get open for a massive play.
The only thing to be careful about is the fact that the defense will likely be blitzing which means you don’t have a lot of time to fire a pass and hit a receiver running a long route.
Cover 2 Zone Defense
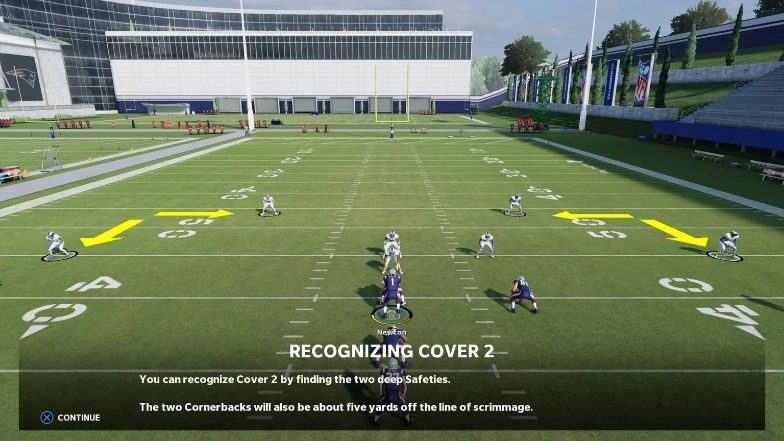
Cover 2 is a basic zone coverage that has two safeties that guard the half field and five other defenders (linebackers and cornerbacks) playing zone underneath.
You’ll recognize Cover 2 by looking at the safeties in the back and two cornerbacks at around 5 yards off the line of scrimmage.
How to Beat the Cover 2 Zone Defense in Madden 22

When facing the Cover 2 defense, one of your key goals should be to exploit the spaces between the cornerbacks and safeties. Flood, Smash, and similar pass concepts are great counters against this defense. So is anything else that forces the cornerback to make a decision whether to drop deep or sink down (Strong Flood plays are incredibly effective here).
You can also hurt Cover 2 with Seams and Verticals since they attack the space behind the safeties and create a mismatch.
Cover 2 Man Defense
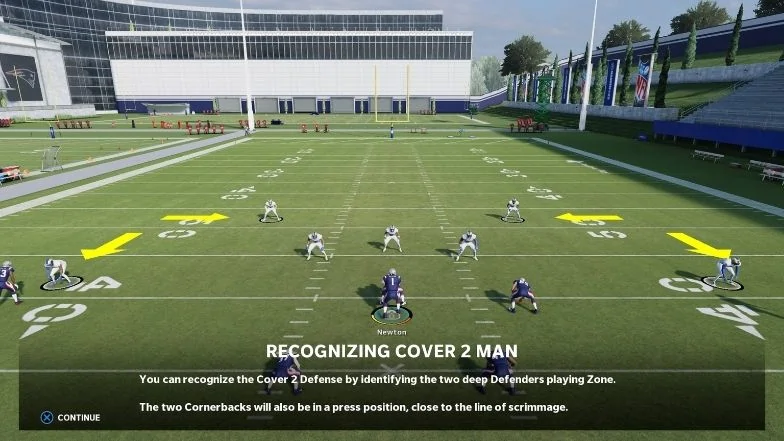
Cover 2 Man has the same two safeties as Cover 2 Zone but the rest of the defense is playing Man coverage.
At first glance, this defense looks quite similar to the Cover 2 Zone but the position of the cornerbacks will usually be a tell. In Man coverage, they’ll be pressed up against the line of scrimmage, mirroring your wide receivers. Again, you can always motion your receivers to see if the defenders follow and you’ll instantly know whether you’re facing a man-to-man defense.
How to Beat the Cover 2 Man Defense in Madden 22
Like with Cover 1, you’re looking for mismatch situations. Any play or pass concept that creates mismatches on the field can help you against Man coverage.
The Texas pass concept creates a mismatch by combining a deep route from the TE with a shorter route from the running back, putting pressure on the middle linebacker.
Bunch formations that have three receivers on one side of the offensive line can also be great against Cover 2 Man. Your primary receiver here will usually be running a Drag route across the field with another receiver running a few yards deeper, creating a mismatch in the middle.
As mentioned, Double Moves might also be effective here since quick receivers can get separation from their defenders in Man Coverage and put a strain on the safeties.
Cover 3 Defense
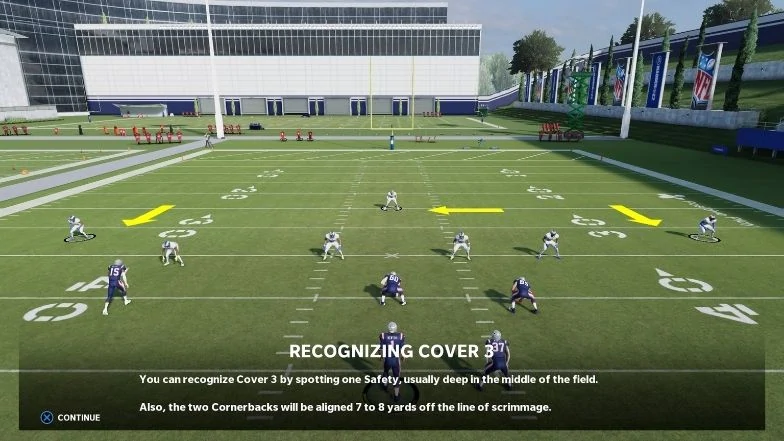
Cover 3 is a zone defense with one safety and two cornerbacks eliminating the deep thirds of the field. It’s one of the most popular zone defenses that you’ll find in all of the best defensive playbooks in Madden 22.
There are variations to this defense so the underneath zones aren’t always guarded by the same personnel. Usually, it’s a strong safety and another cornerback (Nickel).
You can recognize a Cover 3 defense by the safety in the middle of the field and the two cornerbacks playing 7-8 yards off the line of scrimmage.
How to Beat the Cover 3 Defense in Madden 22

If you’re wondering how to beat cover 3 in Madden 22, as soon as you look, you can see an obvious weak spot even when you just look at the way the players are set up before the snap: the two seams between the free safety and the cornerbacks on each side.
You can exploit this space with Seams, Verticals, Cross, and Dig routes.
The Cover 3 defense can also be attacked with any play that has Curl Flats and HB Screens that both put a strain on the Flat defender and the outside cornerbacks.
Cover 4 Defense
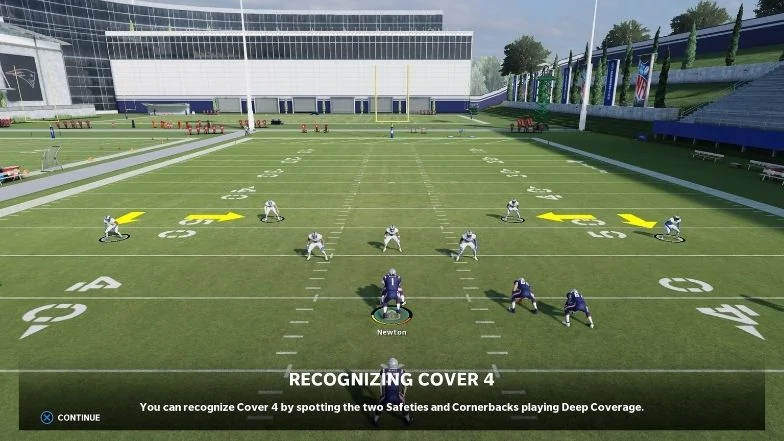
Cover 4 features two safeties and two cornerbacks splitting the deep field into quarters (it’s also known as “Quarters” coverage). The goal of this coverage is to prevent deep passes by putting more defensive backs on the field and having them drop further back.
You’ll recognize Cover 4 by the two safeties and two cornerbacks standing deep. Unlike Cover 2 – which also has two safeties and two cornerbacks – the cornerbacks in Cover 4 will usually be around 8 yards off the line of scrimmage or spread out wider and start running back as soon as the action starts.
How to Beat the Cover 4 Defense in Madden 22

As you can imagine, this deep coverage leaves a lot of space underneath. You can attack this space with Slants, Stick, Curl Flats, and other short passing plays and routes. Stick passes are particularly effective since they create a mismatch on the outside underneath zone defender.
Other pass concepts that attack the middle of the field and put pressure on the three linebackers can also be effective. This includes Drive and Dig routes.
Cover 6 Defense
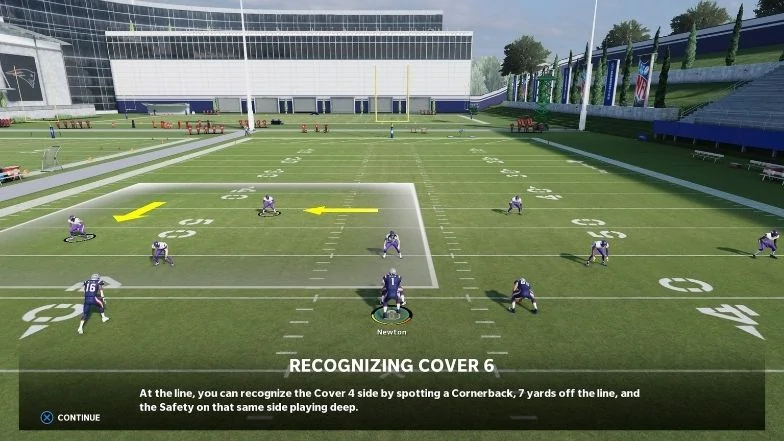
Cover 6 is a combination of Cover 4 and Cover 2 where the field is split into two halves, one of which looks like a Cover 4, the other one like Cover 2. When you set realistic game sliders in Madden 22, you’ll notice that this defense is among the most efficient when it comes to stopping the passing game.
The giveaway here is the position of the two cornerbacks. One of them will be closer to the line of scrimmage (like a cornerback would be in Cover 2), while the other one drops deeper, closer to the two safeties (like in Cover 4).
How to Beat the Cover 6 Defense

Since the two halves of the defense are set up differently, both of them can be attacked with different pass concepts.
The Cover 2 side, where the cornerback presses up closer to the line of scrimmage, leaves a visible space behind said cornerback, below the safety (known as the “honey hole”).
This space can be attacked with Smash, Flood, Corner, and similar concepts, just like in Cover 2.
The strong side (Cover 4 side) leaves space in the flat, the space underneath the cornerback. This means that it can be attacked with Curl Flats, Strong Flood, Stick, Shallow Cross and similar pass concepts that target this space.
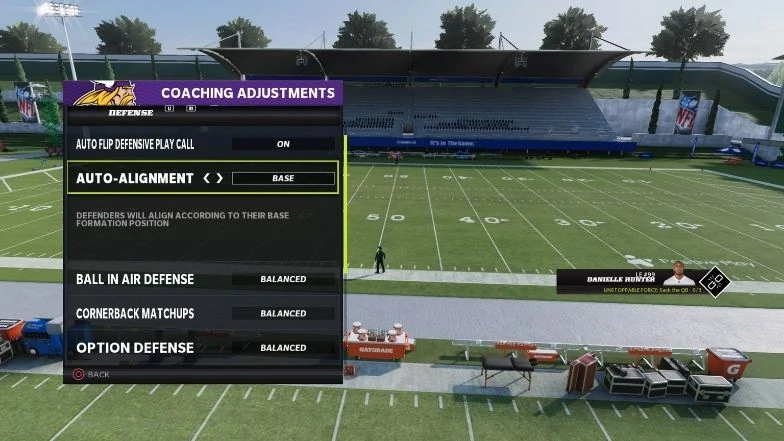
What to do when the defense uses Base Align?
In online play, a lot of Madden Ultimate Team players will use Base Align to disguise their defenses.
Base Align essentially lines up the defenders to the base defensive formation, regardless of the offensive set that the opponent runs. Since defensive players change their positions when aligned, this will disguise the defense and none of the reads we covered above will make too much sense. Simply put, the formation you see on the screen won’t be what the defense is running.
So, how to beat a cover defense if you don’t know what cover they’re playing?
Unfortunately, the only thing you can do before the snap is motion a receiver to see if they’re playing Man or Zone. Most of your adjustments will come after the snap.
Once the ball is snapped, watch what happens to the safeties and cornerbacks. For example, if one of the safeties in what looks like a Cover 4 starts dropping down as soon as the ball is snapped – that’s not a Cover 4. It’s more likely a Cover 3 that’s been base-aligned.
The Conclusion
Knowing how to beat each cover defense in Madden 22 isn’t that hard. You just need practice through repetition and constant play-calling to remember which plays are good against which defenses.
However, in MUT, where everyone uses Base Align, reading coverages isn’t as simple (or even possible).
That’s why you need to learn not just how to recognize coverages but also which spaces on the field each coverage leaves vulnerable. That way, even when an opponent uses Base Align, you can read the field quickly and make an instant read on what they’re doing and where you should throw the ball.


