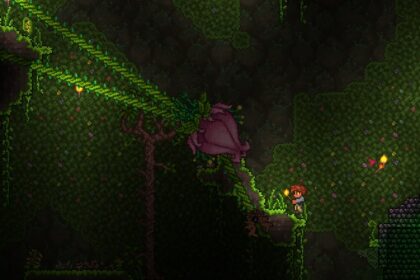
Being the final boss in Terraria, the Moon Lord will pose a challenge for most players – regardless of game experience. Because the Moon Lord is the final boss, there is much more equipment accessible to you than at other points in the game.
This means that there are many methods you can use to defeat the Moon Lord, as well as a variety of different viable class setups available. This guide will walk you through the best Terraria Moon Lord strategy and the optimal armor, weapons, and accessories for each class setup in defeating the Moon Lord.
However, even with all the extra equipment available, the Moon Lord will still be a colossal challenge. Therefore, it’s important to understand the best strategies to defeat the Moon Lord in Terraria.
What is the Moon Lord?
Spawnable after defeating Golem, the Moon Lord is the final boss in Terraria. Also widely accepted as the most difficult boss in Terraria, knowing the best strategy to use against this boss is crucial.
There are two ways to spawn the Moon Lord, but one of them is only accessible to you after having defeated the Moon Lord at least once already.
The first (and initially only) way to spawn the Moon Lord is through the Lunar Event. After defeating Golem, four enemies will appear outside the dungeon. Upon killing these enemies, the Lunatic Cultist will spawn – killing it will summon the four Celestial Pillars at points throughout the map.

You must destroy these four pillars in order to summon the Moon Lord. Destroying the fourth pillar will create a message in chat: “Impending doom approaches…”. This message appearing indicates that there is exactly one minute until the Moon Lord spawns.

It’s highly recommended that you make adequate preparation before destroying the final Celestial Pillar, as the one minute between destroying it and the Moon Lord spawning isn’t sufficient for preparation time.
The pre-Moon-Lord Lunar Events can prove a significant challenge themselves due to the consistent spawning of enemies around the Celestial Pillars.
While not spawnable using a Voodoo Doll, the Moon Lord is still spawnable with an item: the Celestial Sigil – an item craftable at an Ancient Manipulator using 20 of each of the Lunar Fragments.
Boss Arena
The key to defeating Skeletron, the Wall of Flesh, the Moon Lord, or pretty much any boss in Terraria is having a good area to fight on: a boss arena. This is particularly true for the Moon Lord because of its intense difficulty, damage-dealing abilities, and mobility.
When built properly, boss arenas provide a range of benefits to your boss fight. Additionally, because of the availability of many more traps than prior to Golem, the boss arena can provide an extra damage source.
Boss arenas should be made of platforms of any variety, as you can pass through these with ease, and they are very inexpensive – especially if you opt for wood platforms (costing 1 wood per 2 platforms).
Due to the Moon Lord being such a challenging boss, it’s important to ensure your boss arena is larger and more equipped than that of arenas for previous bosses. It’s recommended that your boss arena be at least 50 tiles wide and have at least 4 layers, to allow for maximum mobility.
I recommend leaving a 10 tile gap between each of the layers – provided you have the mobility equipment to be able to jump/fly that high easily (which, at the final boss, you should).
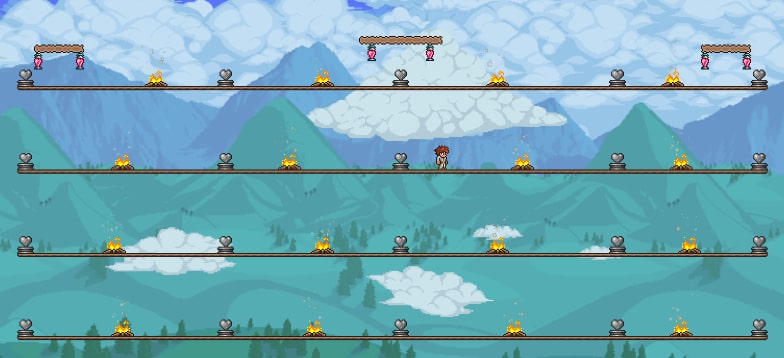
Also, you should spread a few rows of solid blocks evenly across the arena, at a height of 5 tiles. These rows should be 5-8 blocks wide and will provide shelter against the Moon Lord’s dangerous beam attack.
Scattered across your arena should be heart lanterns and campfires. Both of these placeables will increase your health regeneration and can be walked through (like a wall), meaning they won’t inhibit your movement.
Another way to increase health regeneration is to place pools of honey in bubble blocks. Bubbles act as walls but have the ability to contain liquids. The accumulation of these three factors will greatly increase passive health regeneration without being too costly or difficult to access.

Statues are an essential part of creating your Moon Lord boss arena. Although more difficult to set up than the passive health regeneration methods, they can provide more instant and immediately accessible health and mana restoration.
Heart statues can be used for immediate health restoration. To do this, link wire to all of the heart statues, then run the wire to a method of activation, such as a pressure plate or timer.
There is a 10 second cooldown period on the spawning of hearts from heart statues; however, given the lengthy nature of the Moon Lord boss fight, this shouldn’t be an issue, especially if multiple heart statues are used.
Some enemy statues can also be used to spawn hearts and mana stars. This is because some enemies have a chance to drop hearts and mana stars when killed. So by spawning enemies, then killing them a lot, over time, many hearts and mana stars will appear.
Setting this up is slightly more complicated than the heart statue method but is still relatively straightforward. It’s worth noting that, to optimize this method, crab statues are the best option. Also, a raven staff is a necessity to make this work.
Place 2 crab statues in a small, enclosed area and link them up to a 1-second timer. Then use your raven staff to summon 2 ravens in the enclosed space. Ravens are important as they are summonable allies that can’t move through blocks.

When ready, simply activate the timer – crabs will spawn, being immediately killed by the ravens. The number of hearts and mana stars will build up as time passes, making for a perfect way to restore a large chunk of health instantly. Placing one or two of these structures on your boss arena can have a significant, positive impact on your survivability.
Finally, to maximize the utility of your Moon Lord arena, you can add some traps to deal additional damage. Some of the highest damage output traps in the game can be found in the Jungle Temple and collected using a Picksaw (or better).
Spiky ball and spear traps are the most effective traps for your Moon Lord boss arena as they provide a consistent source of damage. Both of these traps can be found in the Jungle Temple, and setting them up is easy. Simply place them in a couple of places around your arena and wire them up to an activation method – the same way as the statues.
Putting time into your boss arena is very important, as an insufficient arena will almost certainly lead to failure – particularly against the Moon Lord.
Melee Class Setup
Armor
The Chlorophyte Mask and the Valhalla Knight’s breastplate and greaves is the best armor combination for the melee class setup. Although not a set, this armor combination is optimal due to the massively increased defense and health regeneration (mainly from the Valhalla set pieces) and the 16% increased melee damage from the Chlorophyte Mask.
Alternatively, Beetle Armor is much less complicated to obtain and – while not being as great an option – still provides sufficient defense to defeat the Moon Lord. There are two beetle chest variants: the Beetle Scale Mail and the Beetle Shell.
The Beetle Shell is the best option for additional defense, whereas the Beetle Scale Mail is best if you require extra damage.
Weapons
There are various weapon options available for melee users; however, the best choice is always the Solar Eruption. Crafted from 18 Solar Fragments, the Solar Eruption deals massive DPS (damage per second), can pass through blocks, and deals piercing damage (damage that continues after the attack has finished) for 5 seconds.
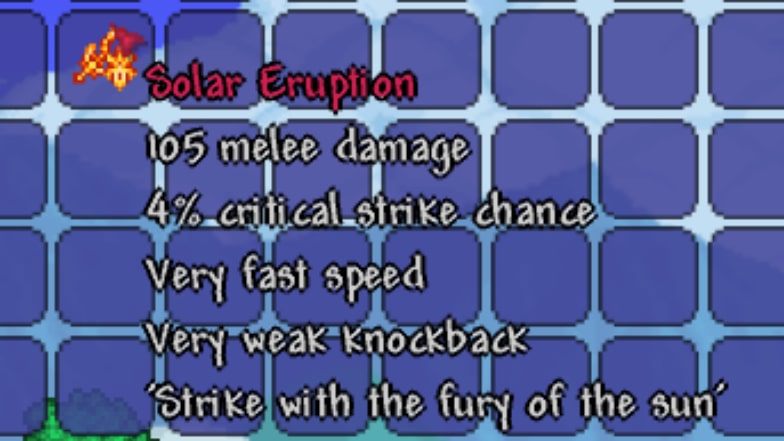
The Daybreak and Influx Weaver are also good choices but are more suited if you find that you need a bit of extra range, as their power isn’t nearly as great as that of the Solar Eruption.
Accessories
Providing many valuable stats, the Fire Gauntlet is essential if playing with the melee class setup. It’s crafted at a tinkerer’s workshop and requires a Magma Stone and a Mechanical Glove.
While these aren’t the most straightforward items to obtain, the Moon Lord is the game’s final boss: it isn’t supposed to be easy.
The fire gauntlet’s stats are double the knockback of your weapons, 12% increased damage and attack speed, and 10% increased weapon size. Additionally, for weapons such as whips, the Fire Gauntlet provides autoswing.
Wings are an essential accessory for every class setup. The recommended wings are Fishron Wings, Betsy’s Wings, or Empress Wings, as these are the best wings available pre-Moon Lord. However, although weaker, Steampunk Wings are also a viable option.
The Celestial Shell is the best all-rounder accessory. It boosts many different stats and should always be equipped once obtained – including when battling the Moon Lord.
Shields that provide knockback immunity are crucial when fighting the Moon Lord, stopping you from being thrown about by the Moon Lord’s attacks. The Frozen Shield is the best accessory for knockback immunity. However, the Ankh Shield and other similar accessories are viable too.
The Star Veil or Cross Necklace are great accessories for damage avoidance. Doubling the immunity time after taking damage, these accessories give the potential to avoid the damage of some attacks entirely.
Ranged Class Setup
Armor
Despite the set bonus being pretty much useless for fighting the Moon Lord, the Shroomite Armor set is still the best set for the ranged class setup.
A complete set of Shroomite Armor requires 54 Shroomite bars. Shroomite Armor has three headpiece options that are optimum for the different ammunition types: arrows, rockets, and bullets. The Shroomite Headgear, Helmet, and Mask are best for each ammo type, respectively.

If necessary, the chest piece can be replaced by the Valhalla Knight’s Breastplate to provide increased survivability.
None of the alternative ranged armor sets are viable for the Moon Lord fight – the Shroomite set is simply the best for the ranged class setup.
Weapons
There are two weapon factors to consider when playing with the ranged class setup: the type weapon itself and the ammunition used. There are three types of ammo (arrows, rockets, and bullets) and different variations for arrows and rockets.
The strongest gun for fighting the Moon Lord is the Vortex Beater. You should use this with either Crystal or Chlorophyte Bullets. Crystal Bullets provide the highest DPS.
On the other hand, Chlorophyte Bullets are more useful for the second stage as they home in on targets. This allows you to focus more on dodging the Moon Lord’s attacks while still dealing damage.
The Phantasm is the best bow to use against the Moon Lord. Using this alongside Holy Arrows provides DPS higher than any other primary weapon. Having said this, your accuracy will be affected by the low velocity of Holy Arrows.
Therefore, unless using an upgrade, the best option for arrows is Ichor Arrows or Venom Arrows, as these have high velocity; the high velocity will make it easier to aim.
An excellent alternative to the Phantasm is the Aerial Bane. It deals additional damage to airborne enemies – which is fantastic against the Moon Lord – and shoots several explosive arrows. You should also use the Aerial Bane with Ichor or Venom Arrows.
As far as launchers go, the best one available is the Electrosphere Launcher. The Electrosphere Launcher uses rockets to fire a ball of energy that will deal continuous damage for approximately 8 seconds. You can spawn infinite energy balls, but the balls can’t overlap.
Accessories
The Stalker’s Quiver is an essential accessory for a ranged class setup that uses arrows. It increases arrow damage by 10% as well as arrow speed.
Alternatively, the Recon Scope increases all ranged damage by 10% and improves view range for guns (you can zoom out using right click). This makes it the better option if opting for a gun or launcher.
Like the other class setups, a Celestial Shell and wings are crucial. Shields and the Cross Necklace or Star Veil are also highly recommended.
Magic Class Setup
Armor
When fighting the Moon Lord, Spectre armor is the best set choice for magic users. There are 2 headpieces available for the Spectre Armor set – one that decreases damage output in exchange for healing and one that increases magic damage output – both of which are viable against the Moon Lord.

To craft a complete set (with one of the headpieces), you’ll need 54 Spectre bars; crafting a full set including both headpieces requires 66 Spectre bars. Despite both headpieces being viable, the Spectre Mask (increased damage) is the most recommended one, as the 40% decreased magic damage has a big impact on your ability to fight the Moon Lord.
Weapons
Magic users have arguably the largest pool of weapons available – particularly at this point in the game. Because of this, there are many viable weapon options to use when fighting the Moon Lord.
The Nebula Blaze, Razorpine, Blizzard Staff, Razorblade Typhoon, and Nebula Arcanum are all potential choices.

With a honing effect and high DPS, the Nebula Blaze is a good choice against the Moon Lord; however, it has very high mana usage. The Razorpine and Blizzard Staff both have lower mana costs than the Nebula Blaze, as well as have higher DPS. Having said this, they don’t have the honing effect that the Nebula Blaze has.
The Razorblade Typhoon is a very mana-efficient, high damage weapon that has the ability to target several enemies at once. Unfortunately, the Razorblade Typhoon significantly lacks single-target DPS.
If you manage to keep the Moon Lord in the same area without it moving too far away, the Nebula Arcanum is a fantastic option due to its incredibly high DPS and ability to deal damage without being aimed.
Unlike the other class setups, it’s recommended to carry 3 of these weapons in your Moon Lord fight as they will make up for each other’s weaknesses.
Accessories
The Mana Flower is crucial to success in defeating the Moon Lord as a magic user. It decreases mana usage by 8% and enables you to automatically consume mana potions from your inventory when your mana is depleted.
This auto-consumption function is hugely important as it allows you to focus solely on the fight without having to worry about hot-keying when your mana becomes low.
Another accessory that is arguably better than the Mana Flower is the Mana Cloak. It provides the same abilities as the Mana Flower (auto-consumption of mana potions and 8% reduced mana usage) and spawns three stars upon the wearer taking damage.
These stars damage enemies and, upon reaching an obstruction, will transform into a mana star that will move towards you – restoring 50 mana when reaching you.
Using the Mana Cloak works especially well alongside the Celestial Emblem – an accessory that, on top of increasing magic damage by 15%, also increases the pickup range of mana stars (including those spawned by the Mana Cloak).
Summoner Class Setup
Armor
Spooky armor is the optimum armor choice for your Moon Lord battle as a summoner. A full set of Spooky armor increases the maximum number of minions spawnable at one time by 4 and provides a 58% increase in minion damage. Additionally, your movement speed will be increased by 20% when wearing the full set.
750 Spooky Wood (available from the Pumpkin Moon event) is required to craft the entire set.
Weapons
Like magic users, the summoner class setup also has a wide range of weapons viable for use against the Moon Lord.
The Terraprisma is an excellent choice for fighting the Moon Lord; however, it can be challenging to obtain – being dropped by the Empress of Light.
The Stardust Dragon Staff is a weaker but still viable alternative to the Terraprisma. This is much easier to acquire than the Terraprisma and can still deal enough damage to defeat the Moon Lord.
It’s worth mentioning that the Staff of the Frost Hydra is a summonable sentry that can contribute extra damage to the Moon Lord. While unlikely to significantly impact your damage output, it’s still worth having.

The Stardust Cell Staff is another weapon worth mentioning due to the minions’ ability to follow and continue attacking enemies that are off-screen.
Accessories
For summoners, equipping the Papyrus Scarab accessory is highly recommended. It increases the damage of all summoning weapons by 15%, the knockback of summoning weapons by 2, and the number of minions spawnable at one time by 1.
It’s worth using this accessory alongside the Hercules Beetle and Necromantic Scroll as, when stacked, it will total an increase of 35% damage, 4 knockback, and 2 minions.
As per the other class setups, a Celestial Shell and wings are mandatory for success in fighting the Moon Lord. Shields and the Cross Necklace or Star Veil are highly recommended too.
Buffs and Potions
There are many buffs and potions in Terraria, some of which are crucial in defeating the Moon Lord.
Super healing potions heal a significant 200 health, and having a few in your inventory is essential for the Moon Lord battle. They do, however, require some valuable resources to craft (1 of each celestial fragment per potion). Don’t be put off by this – they are worth spending the resources on.
To help with survivability, regeneration, endurance, lifeforce, and ironskin potions are highly recommended, as they provide increased health regeneration, damage reduction, health pool, and defense, respectively.
Swiftness potions are ideal for extra mobility, increasing maximum movement speed by 25%, and being very easy to craft.
Wrath potions are universally great, increasing damage output from all weapons by 10%. Rage potions increase the critical strike chance by 10%, so they work well alongside wrath potions.
There are also potions that aid each class setup individually. These are summoning, magic power, and archery potions. Summoning potions increase the maximum number of minions by 1, magic power potions increase the damage of magic weapons by 20%, and archery potions increase the damage of arrow-firing weapons by 20% (as well as increasing the velocity of arrows).
On top of this, Ale or Sake can be consumed to increase melee damage output and attack speed by 10%.
The Well Fed, Plenty Satisfied, or Exquisitely Stuffed buffs are also good additions to your lineup when fighting the Moon Lord. They can be provided by several different food items such as Golden Delight, Seafood Dinner, Cooked Marshmallow, and Fruit Salad.
Extra Tips
Nurse Strategy
The Nurse NPC has the ability to fully heal you after taking any amount of damage. This is an ability that can, and should, be utilized against the Moon Lord. The fact that the Nurse is able to heal herself and take reduced damage (as all town NPCs do) means that she is very unlikely to die during the fight.
To fully utilize this, the auto-pause setting should be turned on (a setting that will pause the game if talking to an NPC or opening your inventory), and a strong summoning item should be used.
Simply make an NPC-suitable house for the Nurse where you wish to fight the Moon Lord and stay inside the house with the Nurse – spawning your summoning weapon outside.
This will allow you to fully heal whenever necessary while dealing consistent damage with the summoning weapon. Ultimately this will kill the Moon Lord, though patience will be required since the summoning weapon is the only source of damage.
Regenerative Tank
Despite the Moon Lord being the final boss in Terraria, it is possible to succeed in defeating it without dodging any of its attacks using a particular armor setup. With a Valhalla Knight’s Breastplate, Squire’s Great Helm, and Cross Necklace, alongside all mentioned buffs, you can heal the damage dealt by the Moon Lord while avoiding too much danger.
The legpiece slot can be filled in with any high-defense legpiece, though the Valhalla Knight’s Greaves are arguably the most suited to this strategy.
To succeed in defeating the Moon Lord using this method, place down a pool of honey, grapple into it, and gradually chip away at the Moon Lord’s health.
Due to the fact you’ll be pretty much immobile the entirety of the fight, equipping damage-mitigating and health-regenerating accessories such as the Celestial Shell, Star Veil/Cross Necklace, and Frozen Shield is highly recommended.
All defensive accessories used in the Regenerative Tank setup should be reforged to have the “Warding” prefix, as this will further increase survivability.
Mount
Mounts should be considered for most boss fights due to their special effects like increased mobility and damage.
This is especially true for the Moon Lord fight, where good mobility is almost mandatory to success (unless using the Regenerative Tank strategy).
The Cosmic Car Key is a great option because, despite its relatively slow speed, it provides infinite flight. Switching between wings and the Cosmic Car Key is a good strategy if performed well as it creates a balance between flight speed and consistency.
Conclusion
In conclusion, the Moon Lord can be a very difficult boss; however, there are strategies and class setups that will make this challenge much easier. However, it’s important to remember that the Moon Lord can pose a challenge for even the most experienced players and that you may not succeed the first time; persistence is key!

