The Wall of Flesh is the final pre-hardmode boss. It is, therefore, incredibly difficult because of the very limited equipment available to you pre-hardmode. It has two eyes – at the top and the bottom of the Wall of Flesh – that shoot lasers at you. Additionally, it has a mouth between the two eyes that will deal massive damage at melee range.
Defeating the Wall of Flash will permanently activate hardmode in that world, unlocking a vast amount of new content, including bosses, equipment, mounts, and building materials.
This Terraria Wall of Flesh guide will walk you through the different strategies for defeating the Wall of Flesh including the required equipment, setups, and potions.
What is the Wall of Flesh?
The Wall of Flesh is the final pre-hardmode boss. It’s undoubtedly the most difficult pre-hardmode boss because of its substantial damage, quick movement, and difficulty accessing.
It consists of two eyes that shoot lasers at you. These eyes are at the top and bottom of the Wall of Flesh. As well as that, there is a mouth between the two eyes that deals huge amounts of damage at melee range.
The Wall of Flesh also has many small mouths called The Hungry. These are attached by long veins and will move towards you while dealing a lot of damage. The Hungry progressively deal more damage and gain extra resistance to attacks as the Wall of Flesh’s main body takes damage. Therefore, it’s good practice to target The Hungry before anything else.
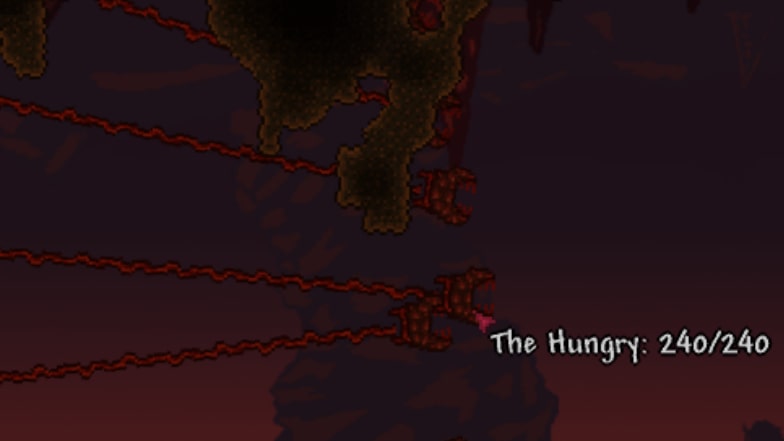
This boss is unique in that it doesn’t move around freely – it’s in a fixed vertical position and will only move towards you horizontally, in one direction. While this is beneficial in some ways, it also restricts your movement, as the wall will continue moving in its set direction regardless of whether or not you are present.
Summoning the Wall of Flesh can be very challenging, too, as it can only be summoned in the Underworld (otherwise known as Hell). The Underworld can be tough to get to in the early game – especially on large worlds.
Therefore, making a Hellevator (a tunnel straight down to the Underworld) and having a Magic Mirror handy is highly recommended to travel between the two relatively quickly.

You’ll need a Guide Voodoo Doll to spawn the Wall of Flesh. Getting a Voodoo Doll in Terraria can be tough, as the enemy that drops the Guide Voodoo Doll is pretty rare. Voodoo Demons are guaranteed to drop a Guide Voodoo Doll when killed. It’s important to ensure that the Voodoo Doll won’t fall into lava, as this will consume the Voodoo Doll.
To spawn the Wall of Flesh, a Guide must be present in your world. Additionally, you must have a Guide Voodoo Doll and a pool of lava available – preferably in the Underworld. Simply throw the Guide Voodoo Doll into the lava. This will kill the Guide and spawn the Wall of Flesh. The Guide will respawn at the next Terraria day, so don’t worry about killing it.
Boss Arena
The key to success in defeating Skeletron, defeating the Moon Lord, and everything in between is a sufficient boss arena (sometimes known as a boss platform). While the style of boss arena varies depending on the boss, it’s crucial to understand what kind of boss platform is most suitable for the boss you are facing.
Additionally, because you can only fight the Wall of Flesh in the Underworld, you must make your Wall of Flesh boss arena in that location.
A properly-built boss arena will provide many benefits to aid your boss fight and are pretty much a necessity for fighting any boss of significance – notably the Wall of Flesh.
Typically, a boss arena consists of many platforms (of any type) laid out in a way that allows maximum player mobility. However, due to the Wall of Flesh’s limited movement capabilities, there is much less leniency on how you can build your boss arena.
It’s worth noting that the lava of the Underworld means that blocks are often a better choice than platforms as this will remove the possibility of going through a platform and into lava.

The best layout for your Wall of Flesh arena is a long, horizontal line of blocks that covers 750-1000 tiles. It’s important to clear as much of the area as possible to ensure seamless movement across the arena. Making regular, 1-tile holes in the arena is recommended to drain lava from Lava Slimes.
Scattering Campfires and Heart Lanterns along your arena is highly recommended as these will increase health regeneration. These placeables act like walls and can be walked through, meaning they won’t inhibit your movement. Also, if you’re a magic user, Stars in Bottles are great because they increase mana regeneration.
Melee Class Setup
Using the melee class setup against the Wall of Flesh isn’t recommended due to the Wall of Flesh’s high damage output at melee range. However, if played correctly, it can be done. It’s important to ensure you have the appropriate equipment and playstyle. Additionally, having 400 health is pretty much a requirement when fighting the Wall of Flesh.
Armor
There are three main armor options for a melee user when fighting the Wall of Flesh. The first and most effective armor set for this fight is the Molten Armor set. Pre-hardmode, the Molten Armor set has the highest defense and melee damage-boosting stats.
Furthermore, it grants immunity to the “On Fire!” debuff, which can prove convenient in the Underworld, where this is a very common affliction. It’s worth noting, however, that Molten Armor is the most difficult armor to obtain pre-hardmode.
Shadow Armor can also prove useful against the Wall of Flesh, primarily if you’re using a Sword or Spear, because of the extra melee attack speed it provides. It’s also easier to obtain than Molten Armor.
Alternatively, Crimson Armor is the most efficient armor set for a more defensive build. It dramatically increases life regeneration and defense and is easier to get than Molten Armor. As well as this, Crimson Armor provides a slight melee damage boost.

Weapons
Unusually, the most significant factor in picking a melee weapon for the Wall of Flesh fight is whether or not it has any ranged abilities. For example, the best melee weapon to use against the Wall of Flesh is, by far, the Starfury.
The Starfury has the longest range among all pre-hardmode weapons and can attack the Wall of Flesh’s mouth, eyes, and The Hungry with its piercing effect. However, for this to work, your boss arena must be low enough to stop the stars from the Starfury getting blocked in the terrain above the Underworld.
Its maximum range is just enough to attack the Wall of Flesh if it’s slightly off-screen. This means that the stars can take out The Hungry without them ever reaching you, which is vital as The Hungry can do massive damage – particularly later in the boss fight.
A lesser but still effective alternative to the Starfury is the Sunfury. The Sunfury is a flail that pierces at medium range. This can make it suitable for fighting the Wall of Flesh and an effectual tool for killing The Hungry.
Ranged Class Setup
The ranged class setup is arguably the most effective setup to use against the Wall of Flesh. Ranged attacks mean that you can deal plenty of damage while minimizing the risk of taking damage yourself. While having 400 health is highly recommended, it’s not a necessity as a ranger.
Armor
Only one set of armor should be used against the Wall of Flesh as a ranger. This is the Necro Armor set. It provides a significant boost in damage output as well as ranged critical strike chance. On top of this, it grants a 20% chance not to use ammo.
This is substantial because ammo is a valued resource pre-hardmode, so any opportunity not to use it is excellent. Additionally, it means that you’ll be able to maintain your damage output in combat for longer.
It’s worth noting that, despite the difference in appearance, the Necro Helmet and Ancient Necro Helmet can be used interchangeably, with no compromise to effects or the set bonus. The Ancient Necro Helmet is a rare (0.22% chance) drop from Angry Bones and Dark Casters in the Dungeon accessible after defeating Skeletron.
If a Gi is available, the Necro Breastplate can be replaced with it to boost damage and movement speed in place of the Necro Set Bonus. The increased movement speed is a valuable bonus for the Wall of Flesh fight.
Weapons
Ranged users typically have three weapon choices: bows, guns, or blasters. They each have different strengths and weaknesses compared to one another.
The best bow – and arguably best ranged weapon overall – to use against the Wall of Flesh is the Hellwing Bow. It has a rapid-fire ability, piercing effect, and can also shoot damage-dealing bats in the direction it is fired.
On top of this, all these abilities work with the lowest-tier (but most accessible) arrow in Terraria – Wooden Arrows. Therefore, ammunition for this weapon is very easy to acquire. The Bees Knees is a bow of similar properties but is weaker overall.
As for guns, the Phoenix Blaster is the best available gun for the Wall of Flesh fight. The Minishark is also viable, but the Phoenix Blaster deals more overall damage. While there are many different bullet types available in Terraria, the most effective choice for fighting the Wall of Flesh is Meteor Shot.

The Star Cannon is easily the most effective blaster for fighting the Wall of Flesh and deals more damage than any of the weapons mentioned previously. However, it’s challenging to get ammunition for it, as it uses Fallen Stars. This means that using the Star Cannon is an effective but unsustainable way of fighting the Wall of Flesh.
Magic Class Setup
Using magic can be an effective way to fight the Wall of Flesh; however, it’s important to be mana-efficient. Magic-users have the widest range of weapons available to them, pre-hardmode, and can take advantage of this in the fight. Despite having good range, due to the low defense values of magic users, having 400 health is mandatory.
Armor
The aptly-named magic set is the best armor set for fighting the Wall of Flesh. It consists of a Robe and a Wizard Hat. There are different kinds of robes corresponding to the different gems available in Terraria; however, the Diamond Robe is the best Robe available.
While all Robes give mana-usage reduction and increased maximum mana, the Diamond Robe provides the highest values for these effects. The Wizard Hat gives increased magic damage.
It’s worth noting that, when playing as a magic user, it’s important to be especially wary of the Wall of Flesh’s attacks, as the set’s total defense is only 7.
An alternative to this “glass cannon” playstyle is using Jungle Armor or Meteor Armor. Both armor sets increase magic damage and provide much greater defense than the magic set; however, they don’t decrease mana consumption or increase total mana. This compromise could be detrimental to your boss fight if not taken into consideration when battling the Wall of Flesh.

Meteor Armor comes with a set bonus that synergizes extremely well with the Space Gun, a weapon mentioned in the next section. This means that if you intend on using the Space Gun to fight the Wall of Flesh, you should always use Meteor Armor.
Weapons
There’s a wide range of weapons available to magic users in Terraria – even pre-hardmode. This means that if one weapon isn’t very easily accessible to you, there are alternatives.
That being said, the best overall magic weapon for fighting the Wall of Flesh is the Demon Scythe. Its projectiles have the ability to hit the Wall and The Hungry multiple times per scythe fired. Additionally, it has a very fast use time and high base damage output. The Demon Scythe is, however, a rare drop, so it’s worth considering other alternatives.
One such alternative that’s much easier to obtain is the Water Bolt. The Water Bolt is able to hit all three parts of the Wall of Flesh at a time if cast into the ceiling due to its ricochet ability. It can only be found in the Dungeon, hidden as a book on a shelf.
The Book of Skulls is another rare but effective magic weapon you can use against the Wall of Flesh. It has a 10.5% drop rate from Skeletron. The Book of Skulls also has the ability to hit all three parts of the Wall of Flesh before the projectile disappears.
When paired with Meteor Armor, the Space Gun is very effective against the Wall of Flesh because the armor set bonus of Meteor Armor means that the Space Gun won’t use mana. It has a fast fire rate and piercing abilities meaning that – when accompanied by Meteor Armor – it is a highly efficient way of killing the Wall of Flesh.
However, due to its single-target projectiles and lower damage than the other viable magic weapons, you may need to make your boss arena larger than initially recommended.
Summoner Class Setup
Playing as a summoner can be very difficult pre-hardmode due to the limited available equipment. However, this doesn’t mean it can’t be done. With the correct armor, weapons, accessories, and playstyle, you can defeat the Wall of Flesh as a summoner. When playing as a summoner, having 400 health is crucial.
Armor
There are two viable summoner armor set options for defeating the Wall of Flesh. Neither one is inherently better than the other; the set you choose is up to playstyle preference.
The first set you might choose is Bee Armor. A full set of Bee Armor greatly increases minion damage and provides two extra minion slots. This can be very helpful as they will grant additional damage to the Wall of Flesh and allow you to defeat The Hungry with relative ease. Obtaining the resources needed for this armor set requires defeating Queen Bee a minimum of twice.
Alternatively, if you’d prefer whip buffs over the extra minion slots, you can choose Obsidian Armor. The Obsidian Armor set only provides one additional minion slot; however, it greatly increases minion damage output and gives many whip buffs – including range.
As mentioned, weapon range is one of the primary factors in defeating the Wall of Flesh; therefore, any range bonus is invaluable.
Weapons
The Vampire Frog Staff is the best summoning weapon available pre-hardmode and should be your first choice for fighting the Wall of Flesh. It has high damage and attack rate. Additionally, a sentry weapon from the Tavernkeep NPC is recommended for additional damage.
While getting Defender Medals in Terraria can be tough, it’s worth the extra challenge to aid your Wall of Flesh fight. The Explosive Trap Rod and the Ballista Rod are the best options for this battle.
Using the Snapthorn is a viable option to attack any of The Hungry that gets too close; however, it’s not recommended because it will cause your minions to target that specific Hungry rather than the Wall of Flesh.
Accessories
There are four universally essential accessories that you should use against the Wall of Flesh. You can fill the final accessory slot with any accessory of your choice; however, it’s recommended to use one that provides extra defensive or health regeneration properties, such as the Sweetheart Necklace.
The first two mandatory accessories synergize well with each other. These are the Lightning Boots (or similar variants) and the Cloud in a Bottle (or similar variants). Mobility granted by these accessories is crucial for success when fighting the Wall of Flesh, as they will help you dodge the lasers that the two eyes shoot.

Furthermore, the Magiluminescence can be used to further increase movement speed as the effect stacks with Lightning Boots, although this isn’t a necessity.
Pre-hardmode, there are only truly two offensive accessories: the Shark Tooth Necklace and the Stinger Necklace. The Stinger Necklace provides the same benefits as a Shark Tooth Necklace, but with two added abilities: releasing bees upon receiving damage and granting the “Honey” buff for 5 seconds (the Honey buff increases health regeneration).
The bonus that both accessories give is 5 armor penetration, which is incredibly useful in fighting the Wall of Flesh. If possible, you should opt for the Stinger Necklace over the Shark Tooth Necklace due to the extra abilities it provides.
Finally, the Obsidian Shield is a necessity – mainly if playing with the melee class setup. It gives 2 defense and, most notably, provides total immunity to knockback. Taking lots of knockback can be a major issue against the Wall of Flesh, so immunity to it is indispensable.
Potions
Potions are an integral part of any boss fight in Terraria; however, this is especially true for landmark bosses such as the Wall of Flesh and the Moon Lord. It’s important to know which potions are useful in particular situations, as well as how long they last and how many you’ll need. There are a vast number of potions in Terraria, with a wide variety of different effects and abilities.
Defensive Potions
Endurance and Ironskin potions are essential for survivability in Terraria. Ironskin Potions last 8 minutes and provide an additional 8 defense. While only lasting for 4 minutes, Endurance potions reduce all damage by 10%, which is hugely vital for fighting high damage-out enemies like the Wall of Flesh.
Similarly, Regeneration and Lifeforce Potions are also excellent for survivability. Both potions last for 8 minutes and have a beneficial effect on your health. Regeneration Potions grant health regeneration at a flat rate of 2 health per second, while Lifeforce Potions increase maximum health capacity by 20%. Assuming you have the recommended 400 health, a Lifeforce Potion would temporarily increase this number to 480.
Heartreach Potions are also recommended but not mandatory. Because The Hungry always drop a Heart when killed, increased Heart pickup range can be helpful. This potion will increase the Heart pickup range by 2.625 tiles and lasts for 8 minutes.
Offensive Potions
Offensive potions are just as important as defensive potions when fighting the Wall of Flesh; however, most offensive potions are class-dependent. That being said, it’s still crucial to ensure you have sufficient damage output for the class you are playing, and using offensive potions is a great way to do this.
Rage and Wrath Potions have universal beneficial damage-output effects and both last 4 minutes. The Wrath Potion increases damage from all weapons by 10%, while the Rage Potion increases critical strike chance by 10%. This combination will improve your damage to the Wall of Flesh substantially.
The Archery Potion is invaluable if using a bow. It lasts for 8 minutes and increases the velocity and damage of all arrow-firing weapons by 20%. It’s worth noting that, unlike other items, the Archery Potion provides a 20% buff of the overall damage output – including bonuses from armor sets and accessories.
Ale and Sake are consumables that grant the “Tipsy” effect. This gives increased melee attack speed and damage but has a compromise. The compromise, however, is minor – reducing defense by 4 for the duration of the potion. Ale lasts 2 minutes, whereas the duration of Sake is double that at 4 minutes.
The Magic Power and Mana Regeneration Potions are great options for magic users. They do as their names suggest, with the Magic Power Potion increasing magic weapon damage output by 20% and the Mana Regeneration Potion increasing the regeneration of mana. Magic Power Potions last 4 minutes, whereas Mana Regeneration Potions last for 8 minutes.
Misc Potions
There are three miscellaneous potions that work well against the Wall of Flesh. The Swiftness Potion increases maximum movement speed by 25% for 8 minutes. When combined with the Lightning Boots and Cloud in a Bottle, this makes for very good mobility – which is essential when fighting the Wall of Flesh.
Calming and Titan Potions are excellent for keeping The Hungry at bay. With different effects that synergize well, they are essential for your Wall of Flesh fight. When consumed, the Calming Potion decreases the spawn rate of enemies by 17% and the maximum number of enemies allowed on your screen at one time by 20%. This is very effective against The Hungry because, without this potion, they can get overwhelming. Calming Potions last for 8 minutes.
Titan Potions are another great way of keeping The Hungry under control. They will allow you to deal an extra 50% knockback to any non-knockback-immune enemy.
This makes them very effective for ensuring The Hungry aren’t getting too close and dealing massive damage to you. A single Titan Potion also lasts 8 minutes, which is another reason Titan Potions synergize so well with Calming Potions.
Other Strategies
While making a boss arena is the most common and arguably easiest strategy for defeating the Wall of Flesh, it’s not the only one. There are other strategies that work just as well but may be slightly more difficult to perform.
Mouth-Only Tunnel
A strategy that has been known to work for some players is the mouth-only tunnel strategy. It entails building a 3-7 block high tunnel along the vertical middle of the Underworld – where the Wall of Flesh’s mouth would spawn. This is effective because it prevents you from being shot by the Wall of Flesh’s lasers as they can’t travel through solid blocks.
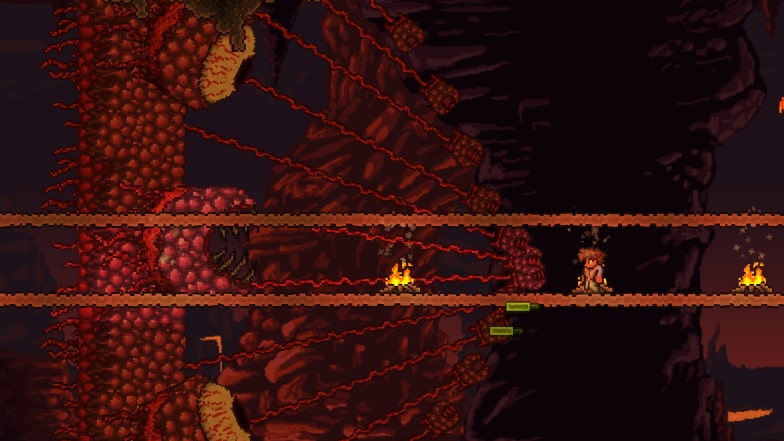
The best way to pursue this strategy is by ensuring you have a full regenerative build. This includes wearing Crimson Armor and scattering Campfires and Heart Lanterns across the tunnel – approximately every 20 blocks. Additionally, balloon blocks filled with Honey will also work for regeneration, but it’s important to ensure they aren’t too frequent as this will interfere with mobility.
A solid weapon choice for this strategy is the Diamond Staff – the best of the gem staffs. You should also ensure you have maxed your mana stars as much as possible pre-hardmode.
Boulders/Explosives
Boulders are a type of trap that, when activated, will deal massive damage to enemies, players, and NPCs. The Wall of Flesh is no exception. To utilize Boulders in your Wall of Flesh battle, set up a few where your battle is going to begin. Using wire, connect them to a pressure plate so that when your run begins, you can step on the pressure plate, and the Wall of Flesh will be hit by several Boulders for a good amount of damage.
Alternatively, you can set up explosives at the beginning of the run. Explosives will often deal more significant damage than the Boulders if set up correctly. Thrown Dynamite will work just as well and will deal massive damage. However, it’s worth noting that when you’re throwing Dynamite at the Wall of Flesh, you must be holding it. This means that you cannot use any other weapons at the same time.
No Bridge
Another strategy some players found useful is entirely dismissing using a boss arena. Because the bottom of the Underworld is covered in lava, you can avoid creating a boss arena by using particular potions.
The combination of Water Walking, Obsidian Skin, and Featherfall Potions allows you to traverse the lava pools and Underworld buildings easily, without taking any damage from lava or falling. While building a boss arena is preferred, if you wish to do it another way, this is the best method.
Water Walking Potions allow you to walk on water, honey, or lava – despite the name only including water. However, it doesn’t diminish the effects of each, meaning that, on honey, you will still be slowed, and on lava, you will still take damage. When using a Water Walking Potion, you can still sink into the liquid by pressing the key you have assigned to going down (this is most commonly “S”). Water Walking Potions last 10 minutes.
You can mitigate the damage of walking atop lava by using an Obsidian Skin Potion. This grants immunity to Hellstone, Meteorite, lava, and “On Fire!” for its duration. Obsidian Skin Potions last 6 minutes.
Featherfall Potions decrease your gravity and fall speed by 1/3 for 10 minutes. This can be useful in negotiating the rugged terrain of the Underworld. Additionally, this effect synergizes well with the Water Walking Potion and the Obsidian Skin Potion.
If using this strategy to defeat the Wall of Flesh, it’s important to ensure you have many of each type of potion in your inventory and that you are very familiar with your world’s Underworld terrain. Because of the different durations of each potion, it’s essential to keep an eye on them running out.
Conclusion
To conclude, fighting the Wall of Flesh is no easy task; however, it’s achievable if you do it the right way. There are several strategies to fighting the Wall of Flesh but the most common and effective is building an appropriate boss arena and ensuring you have the right equipment corresponding to your preferred class setup.

