
The Arc Lash sorcerer build is one of the strongest builds in Diablo 4. It offers insane mobility, survivability, and sustained damage.
It has some glaring weaknesses, such as low single-target damage, but there are alternatives to strengthen it.
This comprehensive guide will be beginner-friendly, so it’ll be easier to follow.
As a disclaimer, this build has been created by Northwar and popularized by other streamers, like Kripparian or Palsteron.
I made a couple of tweaks to the build after the insane nerf to the build in patch 1.0.2d.
Video Showcase
Note: Still looking for insane upgrades on the amulet/ring/focus for more DPS and pants/chest for survivability. Also missing the Harlequin Crest for the build
Build Overview
The build originally revolved around the Arc Lash’s insane lucky hit chance modifier. This insane lucky hit chance modifier allows an additional skill to come into play without actually casting it.
This is where the Ball Lightning skill comes in. With Ball Lighting being allocated to your enchantment slot, it gains “Lucky Hit: Critical Strike have up to a 25% chance to spawn a static Ball Lightning.”
Since the lucky hit chance was insanely high for Arc Lash, Ball Lightning is cast multiple times through your Arc Lash attacks.
Your playstyle revolves around freezing your enemies and smashing them with Arc Lash. The Ball Lightning procs allow you to damage the enemies even more and keep the damage consistent while you dodge the enemies’ attacks.
Fire Bolt takes the last enchantment slot, providing a big DPS increase through burning. It also makes it easier to build since any stat with “against burning targets” works well for you.
It doesn’t take much to get the build activated because the aspects are quite easy to get (available through dungeons).
| Pros | Cons |
| Top-tier DPS vs. 6+ mobs | Melee |
| Easy to build | Difficult to scale |
| One of the fastest runners | Low single-target damage (this build version does strengthen it a lot) |
| Tanky |
Skills
Basic

- Fire Bolt 1/5
- Arc Lash 5/5 – Enhanced and Glinted Arc Lash nodes
We are putting one point in Fire Bolt into the enchantment slot. This allows all your skills to apply the burning effect. This is extremely important.
We max out Arc Lash along with the two supporting nodes, Enhanced Arc Lash and Glinting Arc Lash. The cooldown reduction through double-swiping stunned targets is insane.
This needs the Raiment of the Infinite unique, along with high critical strike chance and cooldown reduction to create an unlimited cast of spells as long as the targets survive long enough for you to hit them a few times.
Core
Nothing at all!
Defensive
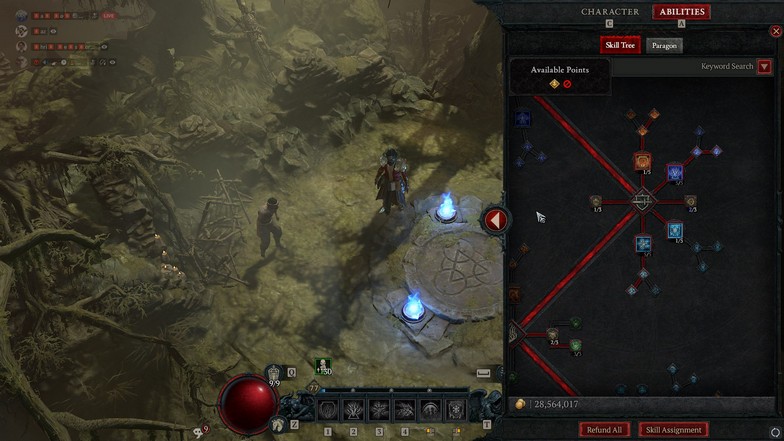
- Flame Shield 1/5 – Enhanced and Shimmering Flame Shield nodes
- Teleport 5/5 – Enhanced and Shimmering Teleport nodes
- Ice Armor 1/5
- Frost Nova 5/5 – Enhanced and Mystical Frost Nova nodes
- Glass Cannon (passive) 1/3
- Elemental Attunement (passive) 1/3
We have a ton of defensives for the build. Take note that it only has one point in Glass Cannon (one point is from the items).
We are maxing out Teleport and Ice Nova to reduce the cooldown. With enough CDR or cooldown reduction (roughly 35-40), you’ll have unlimited Teleports and Ice Novas.
Ice Barrier adds a shield or barrier, making you tankier. Not only that, it activates some of the aspects that give you a ton of damage.
Flame Shield gives you an emergency save-life button for sticky situations.
You can remove a few points on Teleport if you don’t have Raiment of the Infinite yet.
Conjuration
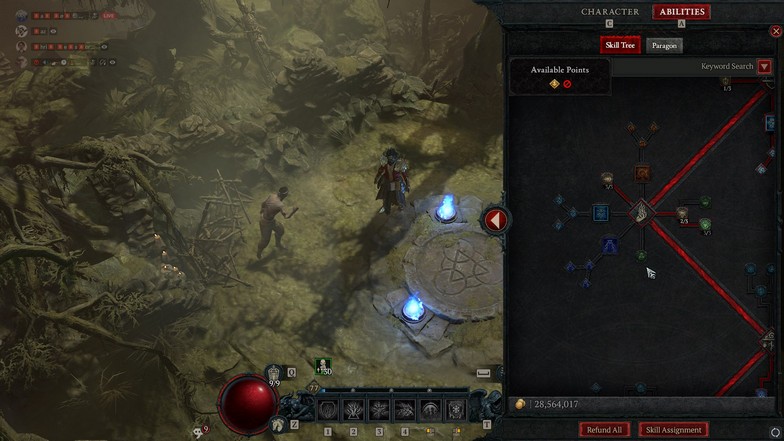
- Precision Magic (passive) 3/3
- Align the Elements (passives) 2/3 – Protection node 3/3
For conjuration skills, we are only taking passives. The lucky hit is important to max out to get more Ball Lightning procs.
The other two are for survivability, mostly against elites.
Mastery
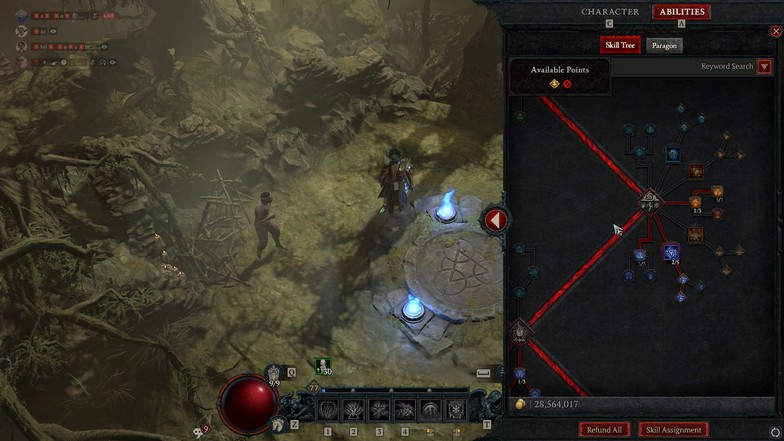
- Ball Lightning 2/5 – Enhanced and Wizard’s Ball Lightning nodes
- Inner Flames (passives) 1/3 – Devouring Blaze node 3/3
- Static Discharge (passive) 3/3
For mastery skills, we are taking the burning passive points for more critical strikes and damage. Ball Lightning is only at 2/5. Since the nerf, I removed a few points here and added them to Teleport.
If you don’t have Raiment of the Infinite, you can put the skill points on Ball Lightning.
Ultimate and Key Passive

- Unstable Currents (ultimate) 1/1 – Prime and Supreme nodes
- Coursing Currents (passives) 1/3 – Electrocution 3/3 and Conduction 3/3
We are taking Overflowing Energy for the key passive. It allows Unstable Currents and most of its attached nodes to be powerful and have a higher uptime.
Enchantment: Ball Lightning and Fire Bolt
Gearing
Aspects
Offensive aspects:
- Rapid Aspect: Basic Skills gain “X” attack speed
- Aspect of Control: You deal “X” more damage to immobilized, stunned, or frozen enemies
- Storm Swell Aspect: You deal “X” increased damage to vulnerable enemies while you have a barrier
- Conceited Aspect: Deal “X” increased damage while you have a barrier active
Amulet aspect (50% bonus) – Rapid Aspect or Aspect of Control
Others:
- Aspect of the Inner Calm: Deal “X” increased damage for each second you stand still, up to 30%
- Wind Striker Aspect: Critical Strikes grant “X” movement speed for 1 second, up to 6 seconds
- Aspect of Retribution: Distant enemies have an 8% chance to be stunned for 2 seconds when they hit you. You deal “X” increased damage to stunned enemies.
You can choose among the others whichever you need for your build.
The Aspect of the Inner Calm improves your single-target damage, especially against bosses. We’ll talk more about this in the gameplay section.
Defensive aspects:
- Aspect of Might: Basic Skills grant 20% damage reduction for “X” seconds (need a high roll)
- Aspect of Disobedience: You gain “X” increased armor for 4 seconds when you deal any form of damage, stacking up to “X”
Both give you a ton of survivability. If you don’t have an aspect slot remaining, get Aspect of Disobedience.
Uniques

- Raiment of the Infinite – After using Teleport, close enemies are pulled to you and stunned for “X” seconds, but Teleport’s cooldown is increased by 20%
- Esu’s Heirloom – Your Critical Strike Chance is increased by “X” of your movement speed bonus
- Harlequin Crest – Gain “X” damage reduction. In addition, gain +4 ranks to all skills
All of these uniques give you an insane boost to either DPS, survivability, and mostly utility. However, farming these uniques will be an extremely hard grind.
Raiment provides an insane quality of life to the build. Your teleports are used offensively, pulling everyone close together for a huge stun. Since they are getting pulled, it is much easier for you to do tons of damage with Arc Lash and Ball Lightning procs.
It also offers a ton of damage because of all your aspects. You don’t have to rely on frozen enemies because the teleport can stun and activate your offensive aspects and stats.
Esu’s Heirloom provides a ton of movement speed and a ton of damage. Critical strike chances are hard to come by, but you want to stack as much as possible. Esu’s Heirloom does just that while improving your overall movement speed.
You also have to remember that Esu’s Heirloom gives you an insane movement speed buff when you evade. That short second can proc all your critical strikes because of the buff.
Harlequin Crest gives you a ton of survivability, cooldown reduction, and +4 ranks to all skills. The +4 ranks to all skills give you an insane utility boost and a decent damage boost.
Every level that goes into your defensive skills, such as Teleport and Frost Nova, reduces the cooldown. It allows you to jump to every mob stack with a Teleport and Frost Nova combo.
Jewels
- Skulls or +Armor on jewelry
- Emerald or +critical strike damage on weapons
- Ruby or +maximum life on armor
Stats

Finding the best stats on an item is incredibly hard. There are so many stats or rolls an item can have and everything won’t drop perfectly for you.
For this section, we’ll show you some stat priorities you want for your items, regardless of the gear slot. However, some items do have specific rolls that are tied to that slot, so we’ll go over them first.
Make sure to enable advanced tooltip information in the settings first.
High priority
- Helm: Cooldown reduction
- Weapon (wand): High DPS, Lightning crit damage or/and critical strike damage
- Weapon (focus): High DPS AND Cooldown reduction x2 (imprinted base and another extra roll)
- Rings: Critical strike chance AND Lightning crit damage or/and critical strike damage
- Amulet: Cooldown Reduction and Movement speed (if you have Esu’s Heirloom)
Note: Get all Cooldown Reduction stat rolls on every item possible (amulet, focus, and helm)
Good offensive stats

- Critical strike chance
- Critical strike damage
- Vulnerable damage
- Lightning critical strike damage
- Damage to burning enemies
- Damage to close enemies (great with Raiment of the Infinite)
- Attack speed
- Basic skill attack speed
- Lucky hit chance
- Intelligence
Devouring Blaze passive bonus on amulet if possible (hard to find with Cooldown reduction roll)
Note: these are ranked in order, but the top offensive stats are usually rolled on rings and weapons. For the other pieces, you’ll find rolls on the bottom of the priority list, but they will still be good.
Good defensive stats

- Damage reduction against close enemies
- Damage reduction against burning enemies
- Damage reduction
- Total armor %
- Maximum Life
- Damage reduction against distant enemies
Note: most of these stats will be on your pants, chest, or amulet
Skill bonuses that give +1 to +3 to skills are commonly seen on pants, helmets, amulets, and chests. If you have completed the build’s items, sacrificing your pants’ defensive rolls can hurt your survivability when you add +3 ball lightning or +3 teleport/frost nova to your pants.
Gameplay
The gameplay revolves around your Frost Nova cooldown. You want to hit as many enemies as possible and swipe at them with Arc Lash until they die.
Teleporting in the middle of the enemies is fine because the build is incredibly tanky. You’ll clear mobs faster with this playstyle.
Keep your Ice Shield up when you are teleporting in. Save Flame Shield for big incoming damage. You can also save Flame Shield or Teleport when you get crowd-controlled.
In fact, you can tank all the CC the enemies have and just dispel them with Teleport or Flame Shield.
When you see a couple of monsters (1-3) run at you, kite them toward a big group of monsters. It is much slower clearing 1-3 mobs with Arc Lash. Get them into the mob and blast them down together.
When you are fighting bosses, you want to spam teleport on them. It builds up the stagger if you have Raiment of the Infinite.
You want to save your ultimate (Unstable Currents) for when the boss is already staggered. This activates most of your offensive aspects, and the boss will melt. If you have a lot of DPS, you can use the ultimate immediately.
Don’t be afraid to use Unstable Currents against single elites with a few mobs. The Overflowing Energy key passive will surely keep your Unstable Currents up frequently.
As you can see from the build showcase, you’ll see that Unstable Currents can have a 100% uptime when you are fighting a ton of mobs. The showcase doesn’t even have cooldown reduction on the amulet yet.
Others
Elixirs boosts up the build’s power by a lot. Make sure to use attack speed or critical strike chance & damage for your elixir buffs. If you have problems with survivability, get maximum life or armor buffs.
If you are progressing nightmare dungeons, you want to run or craft sigils with critical strike chance, lightning damage, or attack speed and movement speed bonus affixes.
You’ll be surprised how strong the build can get with these additional stats. You can even beat dungeons 10-15 levels higher than your character.
Paragon
For the build’s paragon, I still followed Northwar’s paragon board for the build.
Rush through all the glyph sockets and board attachment nodes.
Place Territorial (activate the bonus) on the first board.
Apply Elemental Summoner and go for the glyph socket (attach Territorial)
Go for the nearest attached board and attach Burning Instinct. Socket in the Tactician and go for the next board.
Apply Ceaseless Conduit and socket the Exploit glyph. Attach the next board and add Searing Heat. Socket the Control glyph.
If you are lacking damage, go for the rare cluster nodes, such as damage to burning enemies, elites, and stunned enemies.
For survival, go for damage reduction from burning and elites.
Once you reach the max level, you can copy Northwar’s paragon board for the build.


