Whether you’re creating your own custom player or designing a brand new playbook with all your favorite plays and formations, having the ability to get creative and create things that you won’t see on TV on Sundays has consistently been one of the most enjoyable parts of the Madden franchise over the years for fans.
Creating your own football team in Madden can be a very fun and rewarding experience as you watch and/or control a team that’s entirely your own, from everything down to the name and logo, take the field, score points, and hopefully even bring home the win.
Over the years, different entries into the Madden NFL video game series have seen varying levels of customization that’s available to the player, with some having very limited customization while others allow you to create your own teams, plays, and sometimes even fans.
Unfortunately for some of the more creative Madden players out there, Madden 24 does not include the ability to create a brand new team with a custom name, uniform, logo, stadium, etc. However, there is a work around via relocation teams that you can use to insert a brand new fictional team into Madden 24’s Franchise Mode and attempt to lead them to the promised land.
So if you’re looking to spice up your franchise league in Madden 24 and make your playing experience a bit more unique by adding a new team then you’re in luck, as in today’s article will go over how to add a custom team in Madden 24.
What is a Relocation Franchise?
Unfortunately, Madden 24 does not have an option for a truly in depth team creation mode that you may be used to from Madden games from years past.
While that means you won’t be able to create a team from scratch with custom elements such as jerseys and logos, there is a workaround you can use to have the ability to play as a brand new team in the game’s Franchise Mode: relocation teams.
Relocation teams in Madden 24’s Franchise Mode are a set of pre made fictional team names, uniforms, and logos that are free to be chosen when you relocate a pre existing team to a new city, as you’re able to rebrand the team when you make the move.
Doing this will erase the pre existing team you’re moving from the league while replacing them with an entirely new logo and team name, as well as a brand new set of uniforms for both home and away games. It may not be as open for creativity as the team creation options of past games, but it is the best available alternative in Madden 24.
Creating your Franchise Mode League and Settings
Before you can relocate your team in Franchise Mode, the first step will be creating a new Franchise Mode save with the correct settings to actually allow for a relocation.
The first step of this is to select “Franchise” from the game’s main menu screen. Once you’ve done that you’ll want to select “Create New League” in the bottom left hand corner of the screen, indicated by a plus symbol with a circle around it.
The game will then prompt you to choose whether you’d rather use the real life NFL roster, the roster from the beginning of the preseason, or the currently active roster you have saved (as well as if you’d like to play online or offline).
Your choice of roster and internet connectivity will not effect your ability to relocate, so you’re free to choose whichever options you’d like here.

After choosing your roster and online/offline settings, you’ll be prompted to choose the team you want to play as. Since we’ll soon be replacing the team with a brand new relocation team your choice isn’t too important, but ideally you should choose a team that you won’t be too sad to see gone.
Once you’ve chosen your team, it’s important that you choose to play as the role of owner, as that’s the only role that has the ability to relocate the team. To do this you’ll need to select the third option down of “Change Role”, followed by scrolling to the right and selecting “Owner”.

The game will then allow you to select the archetype for your new custom owner character from “Former Player”, “Lifelong Fan”, and “Financial Mogul”.
Each choice has it’s own pros and cons, but this selection won’t have an effect on your ability to relocate your team (although the “Financial Mogul” option may make it easier to afford it), so you can choose whichever option you like.
Now that you’ve ensured you’re playing as the role of owner, you’ll need to ensure that your league settings actually allow for team relocation. To do this you’ll need to select the fourth option down of “League Settings”.
Selecting this will bring up a screen with all the available settings for the creation of your Franchise Mode league. From here, you’ll want to scroll about a quarter of the way down the settings until you see an option titled “Relocation Settings”.
To ensure that you’ll be allowed to relocate your team this setting needs to be set to one of three options: “Users Only”, “Everyone (Can Relocate), or “All Users Only”.
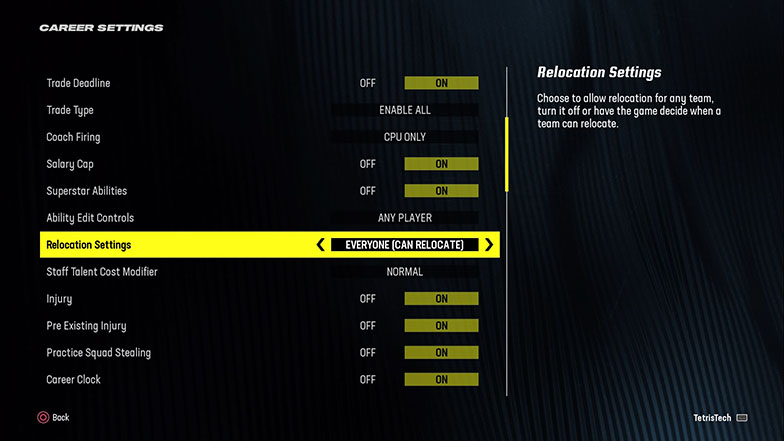
The “Users Only” and “All Users Only” options will only allow teams controlled by a player to relocate, while the “Everyone (Can Relocate)” setting will allow both user controlled and CPU controlled teams to choose to relocate as the name suggests.
Now that you’re playing as the owner and your settings allow for relocation, you’re ready to start your new Franchise Mode league.
Changing the League Settings in an Already Created League
If instead of creating a league from scratch you’d rather relocate your team in an already existing Franchise Mode league, you can change those settings from within the league.
To do this, you’ll need to use L1 and R1 (or LT and RT) to toggle over to the “Options” tab of the Franchise Mode’s main menu.
Once in the options tab you’ll want to select the top most option of “Franchise Settings” followed by choosing “League Settings” from the three pop up options that follow.

Selecting this will bring up a screen with all the available settings for your Franchise Mode league. From here, you’ll want to scroll about a quarter of the way down the settings until you see an option titled “Relocation Settings”.
To ensure that you’ll be allowed to relocate your team this setting needs to be set to one of three options: “Users Only”, “Everyone (Can Relocate), or “All Users Only”.
The “Users Only” and “All Users Only” options will only allow teams controlled by a player to relocate, while the “Everyone (Can Relocate)” setting will allow both user controlled and CPU controlled teams to choose to relocate as the name suggests.
If you’re playing in this already existing Franchise Mode league as a player or a coach, you’ll need to switch roles to owner before you can relocate the team.
Relocating Your Team
Starting the Process
Now that you’ve got your league created if it wasn’t already, you’re playing as the correct role of owner, and your settings are all as they need to be, you’re ready to get underway with the process of relocating your team.
The entire process of relocating your team takes one full season in Franchise Mode, so it’s best if you begin that process before Week 5 in order to have the relocation process finished for the next season, although it’s not absolutely necessary.
When you’re ready to begin your team’s relocation, your first step will be to use L1 and R1 (or LT and RT) to navigate to the “Home” tab of the Franchise Mode main menu, where you’ll need to select the fourth option down of “Manage Team” followed by “Stadium” from the pop up options that follow.
This will then present you with a screen showing you information on your current stadium. The left side of the screen will show you the stadium’s current ratings in various categories (such as parking and concessions), the top middle of the screen will show you your stadium’s current overall rating, fan happiness, and size; and the right side of the screen will show auto generated comments from “fans” discussing your stadium.
Your main focus will be on the bottom middle of the screen where you’ll have three options: “Upgrade Stadium”, “Rebuild Stadium”, and the main focus for us today of “Relocate”.

You’ll need to select the bottom most option of “Relocate” which will prompt you to confirm that you’d like to move the team to a different city. For today’s purposes you’ll need to choose “Confirm”.
This will then create a pop up screen informing you that the relocation process has begun and to keep an eye on your activity list (the list of tasks that appear in “Home” tab of the main menu of Franchise Mode) to be able to choose your new city.
Once you’ve read and dismissed that notification, you’ll see that the area that previously had stadium options is now occupied by an “Under Construction” graphic. This means that you’ve done all you can for now and are free to move on until the next task appears.
Choosing Your City (Week 5)
Once you reach Week 5 of the regular season you’ll see a new prompt in the “Home” tab of the Franchise Mode main menu titled “Start Relocation” at the top of your list of tasks, which you’ll need to select followed by selecting “View Available Cities” from the two options that pop up.
This will then bring you to a screen that allows you to toggle through all the cities that area available for relocation.
The relocation city options include: London, Mexico City, Toronto, San Antonio, Orlando, Salt Lake City, Brooklyn, Memphis, Chicago, Sacramento, Columbus, Portland, Austin, Dublin, Houston, Oklahoma City, St. Louis, San Diego, and Oakland.
Each option will come with a small blurb describing the city’s viability for hosting a relocation team, as well as the city’s market size and personality. If you choose St. Louis or Oakland as your new destination for your team, you won’t be able to choose a new team name or logo, so those cities should be avoided for the purpose of creating a new team in Madden 24.
Each city has it’s own unique options for your team’s new name and logo, so it’s important that you’re 100% comfortable with your selection in city, as once you make your choice you won’t be able to go back.
The available team names and logos for each city are as follows:
| Relocation City | Available Team Names | Market Size | Personality |
| London | Bulldogs, Monarchs, Black Knights | Huge | Loyal |
| Mexico City | Diablos, Golden Eagles | Huge | Hardcore |
| Toronto | Huskies, Mounties, Thunder Birds | Huge | Loyal |
| San Antonio | Dreadnoughts, Express | Average | Loyal |
| Orlando | Orbits, Sentinels, Wizards | Decent | Front Runner |
| Salt Lake City | Elks, Flyers, Pioneers | Small | Loyal |
| Brooklyn | Beats, Bulls, Barons | Huge | Hardcore |
| Memphis | Hounds, Egyptians, Steamers | Small | Laid Back |
| Chicago | Tigers, Blues, Cougars | Huge | Hardcore |
| Sacramento | Condors, Miners, Redwoods | Decent | Laid Back |
| Columbus | Aviators, Caps, Explorers | Decent | Front Runner |
| Portland | River Hogs, Snowhawks, Lumberjacks | Average | Hardcore |
| Austin | Bats, Armadillos, Desperados | Decent | Front Runner |
| Dublin | Celtic Tigers, Antlers, Shamrocks | Decent | Laid Back |
| Houston | Oilers, Gunners, Voyagers | Huge | Loyal |
| Oklahoma City | Lancers, Nighthawks, Bisons | Average | Loyal |
| St. Louis | N/A (Must retain current team name and logo) | Average | Laid Back |
| San Diego | Crusaders, Red Dragons, Aftershocks | Large | Laid Back |
| Oakland | N/A (Must retain current team name and logo) | Large | Front Runner |
After you’ve pressed X (or A) to confirm your selection for your relocation city, that selection will be finalized and the game will return you to the main menu of Franchise Mode where you’re now free to continue playing until you’re prompted with your next step in the relocation process.
Choosing Your New Team Name and Logo (Week 6)
Once you reach Week 6 of the regular season you’ll see a new prompt in the “Home” tab of the Franchise Mode main menu titled “Choose Name” at the top of your list of tasks which you’ll need to select to begin the process of deciding on your team’s new branding.
Upon selecting “Choose Name”, the game will present you with your current team name and logo. On the left side of the screen you’ll see a bar representing the fan interest in the logo you have selected.
You can use either left and right on the d-pad or toggling the left stick to the left and right to cycle through all the available team names for the relocation city you’ve selected.
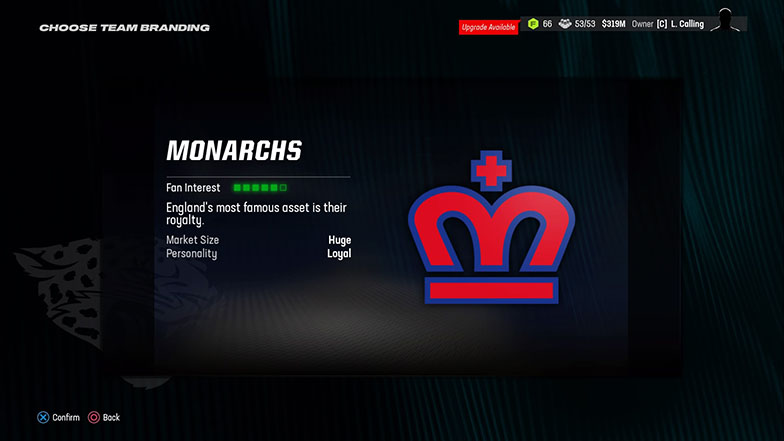
Each team branding option will include a small blurb on the left side of the screen containing the reasoning that links each potential option to the city you’ve selected, as well as showing you how interested the fans are in each option.
Once you’re confident in the decision of which new team name and logo you’d like to move forward with you can press X (or A) when that name and logo is on screen to confirm your decision.
After you’ve pressed X (or A) to confirm your selection for your new team name and logo, that selection will be finalized and the game will return you to the main menu of Franchise Mode where you’re now free to continue playing until you’re prompted with your next step in the relocation process.
Choosing your New Team Uniform (Week 7)
Once you reach Week 7 of the regular season you’ll see a new prompt in the “Home” tab of the Franchise Mode main menu titled “Choose Uniform” at the top of your list of tasks which you’ll need to select to begin the process of deciding on your team’s new uniforms for both home and away games.
Upon selecting “Choose Uniforms” the game will present you with a screen that allows you to scroll through all three of the available uniform options (starting on Style #1) as well as information about how the fans feel about each potential uniform choice.
The right side of the screen will mainly be taken up by auto generated “fan tweets” about their opinions on the specific jersey style you have on screen, showing three total opinions. Below that will be a fan popularity poll, showing the percentage of “fans” that like each particular option for the style of jerseys.
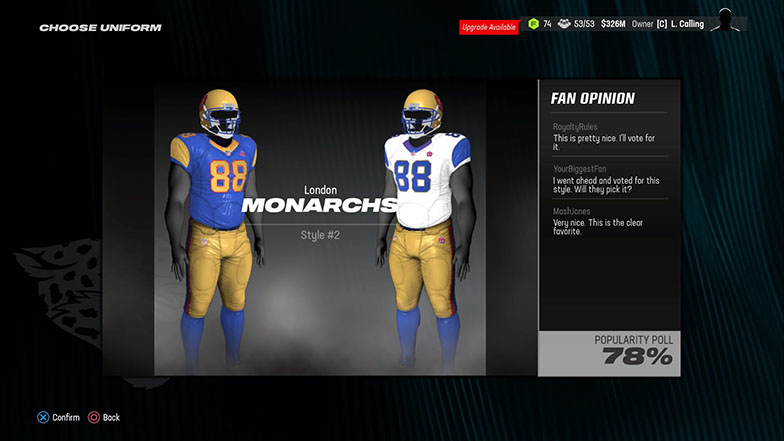
You can use either left and right on the d-pad or toggling the left stick to the left and right to cycle through all the available jersey styles for both home and away for whichever new team name and logo you’ve selected.
Once you’re confident in the decision of which new home and away jerseys you’d like to move forward with you can press X (or A) when that particular jersey style is on screen to confirm your decision.
After you’ve pressed X (or A) to confirm your selection for your new home and away jerseys, that selection will be finalized and the game will return you to the main menu of Franchise Mode where you’re now free to continue playing until you’re prompted with your next step in the relocation process.
Choosing Your New Team Stadium (Week 8)
Once you reach Week 8 of the regular season you’ll see a new prompt in the “Home” tab of the Franchise Mode main menu titled “Choose Stadium” at the top of your list of tasks which you’ll need to select to begin the process of deciding on your team’s new stadium that you’ll be playing in for all home games.
Upon selecting “Choose Stadium”, you’ll be prompted with a screen that lets you scroll through all the available options for your new stadiums, as information on each stadium as well as fan opinions of the various choices.
You’ll have a total of ten stadium options available to you, with both a “deluxe” and “basic” version of each of the five stadium variations: Canopy, Futuristic, Hybrid, Sphere, and Traditional.
Below the images of each stadium option will be more in depth information on the logistics of each stadium option. The main and biggest information listed there will be the stadium’s total build cost as well as how much you’ll be paying for it weekly. This is where it would come in handy if you previously picked the “Financial Mogul” archetype for your owner character, as this will allow you to have no issue with affording any of the options.
Below the cost information you’ll see: the stadium’s seating capacity, the total number of suites in the stadium, the stadium’s size rating, the percent of the stadium’s funding being covered by the city, and both the city’s market size and personality being reiterated.
On the right side of the screen will be three auto generated fan tweets of their opinions on each potential stadium, allowing you to get a general sense of how the fans feel about each of the options.

You can use either left and right on the d-pad or toggling the left stick to the left and right to cycle through all the available stadium options that are available for you to choose.
Once you’re confident in the decision of which new stadium you’d like your team to play their home games in you can press X (or A) when that particular stadium option is on screen to view the proposal for that stadium.
The proposal will show you further information on the stadium, such as a breakdown of how many suites are in each level as well as what level each of the facilities (such as the parking, concessions, and team store) will be at upon construction.
If you’d still like to choose this stadium after reading the information within the proposal you can simply press X (or A) to confirm your choice.
After you’ve pressed X (or A) to confirm your selection for your new stadium, that selection will be finalized and the game will return you to the main menu of Franchise Mode where you’re now free to continue playing throughout the season in your Franchise Mode league.
Final Word
Once you’ve finished the process of selecting your team’s stadium, congratulations, as you’ve finished the relocation process and have successfully moved your team to a new city while giving them an entirely new team name, logo, uniform, and stadium in the process.
As of this moment your team will still be displaying their old name and logo, as well as playing in the old uniforms, stadium, and city that you just moved them away from. This is because you’ll have to finish out the current Franchise Mode season before the changes take effect and you’re able to see your team’s new branding and city in action.
Once you reach the first stage of the offseason titled “Staff Week” (immediately following Super Bowl Week) you’ll see that the move has been completed, and your team is now in their new city and stadium while representing their new team name, logo, and uniform. (You’ll earn a trophy for the relocation process too!)
It may not quite be the in depth “Create a Team” feature that some players remember from Madden games of years past, but it is the best alternative in Madden 24 and it still allows you to get your creative juices flowing as you choose all the details that will go into the branding and identity of your newly relocated team.
Choosing to relocate your team can also give you an extra sense of personalization to your Franchise Mode experience, as it can be players wearing the uniforms you chose holding up the Lombardi Trophy at the end of the season instead of representing one of the real life teams you already see on TV every Sunday.
If you’re still not feeling it and would rather use an existing team, our guide on the best teams to use in Franchise Mode will help you decide which one to pick. Check it out!