The best skills in PGA Tour 2K23 can be a bit subjective. Since there are about 42 skills with three different tier levels, there are so many ways you can combine these skills to create a player build.
Some skills rely on synergy, archetypes, and playstyle to make them effective. There are also skills that can be useful at any time in the course.
While these skills aren’t a big factor in terms of gameplay, you will need every bit of help to master the game of golf in PGA Tour 2K23.
In this post, we will tackle each of these skills to find out which ones are the best skills that can help your game, and rank them in a tier list.
Types of Skills
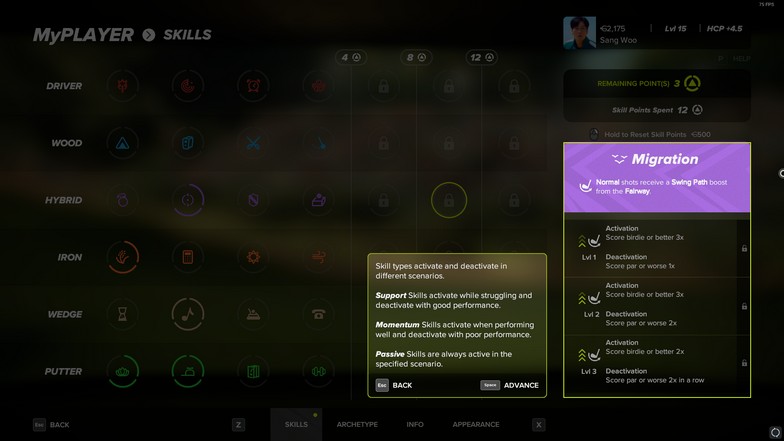
While skills can be categorized by clubs, it is better to categorize them on usage.
There are three different skill types:
- Support skills – activate while struggling and deactivate with good performance
- Momentum skills – activate when performing well and deactivate with poor performance
- Passive skills – always active in the specified scenario
Support skills aren’t really good because it banks on you having a bad game to activate.
Passive skills are only available at the max tier of every club, but they are all good.
Momentum skills will be the best ones to have since it helps you keep your rhythm up.
All Skills in PGA Tour 2K23
All the skills in PGA Tour 2K23 are divided into clubs. Each club has its own skill path, and each skill will have 3 different levels. Each level will need a skill point, so it will become more expensive to level it up.
You only have 50 skill points you can allocate once you reach level 50. Leveling up is one of the main ways of improving your player fast because you will be earning coins, getting club fittings, and skill points.
Driver
| Skill Name | Details | Level 1 | Level 2 | Level 3 |
| Trailblazer | Normal shots receive a Swing Path boost off the tee. | Activation: Miss 3 Fairway(s) in Regulation Deactivation: Hit 1 Fairway in Regulation | Activation: Miss 3 Fairway(s) in Regulation Deactivation: Hit 2 Fairway in Regulation | Activation: Miss 2 Fairway(s) in Regulation Deactivation: Hit 2 Fairway in Regulation |
| FIR Finder | Normal shots receive a Shaping boost off the tee. | Activation: Hit 3 Fairway(s) in Regulation Deactivation: Miss 1 Fairway in Regulation | Activation: Hit 3 Fairway(s) in Regulation Deactivation: Miss 2 Fairway in Regulation | Activation: Hit 2 Fairway(s) in Regulation Deactivation: Miss 2 Fairway in Regulation |
| Tee Time | Normal shots receive a Timing boost off the tee | Activation: Have poor timing 4x Deactivation: Hit 1 Fairway in Regulation | Activation: Have poor timing 4x Deactivation: Hit 2 Fairway in Regulation | Activation: Have poor timing 3x Deactivation: Hit 2 Fairway in Regulation |
| Off the Deck | Normal shots receive a Lie Range boost off the fairway. | Activation: Have good swing timing 3x Deactivation: Score par or worse 1x | Activation: Have good swing timing 3x Deactivation: Score par or worse 2x | Activation: Have good swing timing 2x Deactivation: Score par or worse 2x in a row |
| Aero Dynamics | Normal shots receive a Flight boost off the tee | Activation: Hitting into a headwind 15 MPH or greater Deactivation: Hit 1 Green in Regulation | Activation: Hitting into a headwind 10 MPH or greater Deactivation: Hit 2 Green in Regulation | Activation: Hitting into a headwind 5 MPH or greater Deactivation: Hit 2 Green in Regulation in a row |
| Tee ‘n Crush-Its | Normal shots receive a Power boost off the tee | Activation: Hit a carry distance of 325.0 YDS or greater Deactivation: Score par or worse 1x | Activation: Hit a carry distance of 300.0 YDS or greater Deactivation: Score par or worse 2x | Activation: Hit a carry distance of 285.0 YDS or greater Deactivation: Score par or worse 2x in a row |
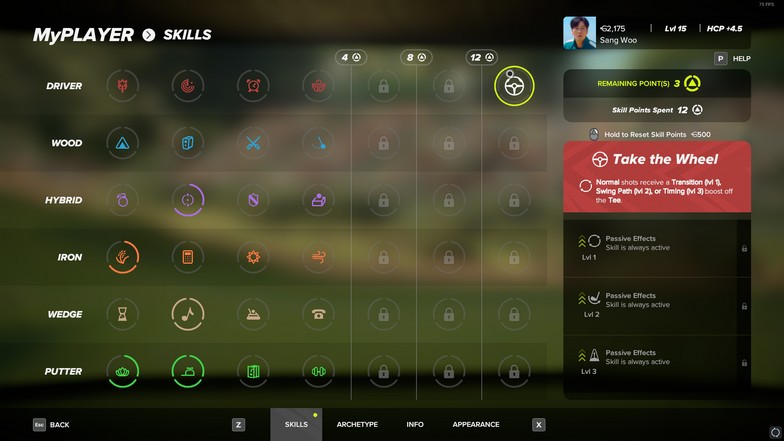
| Take the Wheel | Normal shots receive a Transition (level 1), Swing Path (level 2), or Timing (level 3) boost off the tee | Passive Effects: Skill is always active | Passive Effects: Skill is always active | Passive Effects: Skill is always active |
Wood
| Skill Name | Details | Level 1 | Level 2 | Level 3 |
| Off Grid | Normal shots receive a Lie Range boost from the heavy rough | Activation: Miss 4 Fairways in Regulation Deactivation: Hit 1 green in regulation | Activation: Miss 3 Fairways in Regulation Deactivation: Hit 2 green in regulation | Activation: Miss 3 Fairways in Regulation Deactivation: Hit 2 green in regulation in a row |
| Range Finder | Normal shots receive a Transition boost from the fairway | Activation: Hit 4 Fairways in Regulation Deactivation: Miss 2 green in regulation | Activation: Hit 3 Fairways in Regulation Deactivation: Miss 2 green in regulation | Activation: Hit 4 Fairways in Regulation Deactivation: Miss 2 green in regulation in a row |
| Cut It Close | Normal shots receive a Power boost from the heavy rough | Activation: Have poor timing 4x Deactivation: Hit 1 green in regulation | Activation: Have poor timing 3x Deactivation: Hit 2 green in regulation | Activation: Have poor timing 3x Deactivation: Hit 2 green in regulation in a row |
| Human Metronome | Normal shots receive a Timing boost from the tee | Activation: Have good swing timing 4x Deactivation: Have poor swing timing 1x | Activation: Have good swing timing 3x Deactivation: Have poor swing timing 2x | Activation: Have good swing timing 3x Deactivation: Have poor swing timing 2x in a row |
| The Greatest | Punch shots receive a Shaping boost from the heavy rough | Activation: Miss 4 greens in regulation Deactivation: Hit 1 green in regulation | Activation: Miss 3 greens in regulation Deactivation: Hit 2 green in regulation | Activation: Miss 3 greens in regulation Deactivation: Hit 2 green in regulation in a row |
| Momentum | Normal shots receive a Swing Path boost from the fairway | Activation: Score birdie or better 4x Deactivation: Score par or worse 1x | Activation: Score birdie or better 3x Deactivation: Score par or worse 2x | Activation: Score birdie or better 3x Deactivation: Score par or worse 2x in a row |
| Forester | Normal shots receive a Transition (level 1), Swing Path (level 2), or Timing (level 3) boost from the fairway | Passive Effects: Skill is always active | Passive Effects: Skill is always active | Passive Effects: Skill is always active |
Hybrid
| Skill Name | Details | Level 1 | Level 2 | Level 3 |
| Gusto | Normal shots receive a Flight boost from the heavy rough | Activation: Hitting into a headwind 15 MPH or greater Deactivation: Hit 1 Green in Regulation | Activation: Hitting into a headwind 10 MPH or greater Deactivation: Hit 2 Green in Regulation | Activation: Hitting into a headwind 5 MPH or greater Deactivation: Hit 2 Green in Regulation in a row |
| Spin Class | Normal shots receive a Spin boost from the fairway | Activation: Hit 4 Fairways in Regulation Deactivation: Miss 1 green in regulation | Activation: Hit 3 Fairways in Regulation Deactivation: Miss 2 green in regulation | Activation: Hit 3 Fairways in Regulation Deactivation: Miss 2 green in regulation in a row |
| Survivor | Normal shots receive a Timing boost from the heavy rough | Activation: Score bogey or worse 3x Deactivation: Score par or better 2x | Activation: Score bogey or worse 2x Deactivation: Score par or better 2x | Activation: Score bogey or worse 1x Deactivation: Score par or better 2x in a row |
| Unorthodox | Normal shots receive a Power boost from the bunker | Activation: Have good swing timing 4x Deactivation: Score bogey or worse 1x | Activation: Have good swing timing 3x Deactivation: Score bogey or worse 2x | Activation: Have good swing timing 3x Deactivation: Score bogey or worse 2x in a row |
| Back On Track | Normal shots receive a Lie Range boost from the heavy rough | Activation: Have poor timing 4x Deactivation: Have good swing timing 1x | Activation: Have poor timing 3x Deactivation: Have good swing timing 2x | Activation: Have poor timing 3x Deactivation: Have good swing timing 2x in a row |
| Migration | Normal shots receive a Swing Path boost from the fairway | Activation: Score birdie or better 3x Deactivation: Score par or worse 1x | Activation: Score birdie or better 3x Deactivation: Score par or worse 2x | Activation: Score birdie or better 2x Deactivation: Score par or worse 2x in a row |
| In Between | Normal shots receive a Transition (level 1), Swing Path (level 2), or Timing (level 3) boost from the fairway | Passive Effects: Skill is always active | Passive Effects: Skill is always active | Passive Effects: Skill is always active |
Iron
| Skill Name | Details | Level 1 | Level 2 | Level 3 |
| Agrostologist | Normal shots receive a Lie Range boost from the heavy rough | Activation: Score bogey or worse 3x Deactivation: Score par or better 1x | Activation: Score bogey or worse 3x Deactivation: Score par or better 2x | Activation: Score bogey or worse 2x Deactivation: Score par or better 2x in a row |
| Calculator | Pitch shots receive a Shaping boost from the fairway | Activation: Land within 7.0 YDS of the pin Deactivation: Miss 1 green in regulation | Activation: Land within 10.3 YDS of the pin Deactivation: Miss 2 green in regulation | Activation: Land within 13.3 YDS of the pin Deactivation: Miss 2 green in regulation in a row |
| Beach Bum | Splash shots receive a Timing boost from the bunker | Activation: Have poor timing 4x Deactivation: Have good swing timing 1x | Activation: Have poor timing 3x Deactivation: Have good swing timing 2x | Activation: Have poor timing 3x Deactivation: Have good swing timing 2x in a row |
| Too Breezy | Normal shots receive a Flight boost from the fairway | Activation: Hitting into a headwind 15 MPH or greater Deactivation: Hit 1 Green in Regulation | Activation: Hitting into a headwind 10 MPH or greater Deactivation: Hit 2 Green in Regulation | Activation: Hitting into a headwind 5 MPH or greater Deactivation: Hit 2 Green in Regulation in a row |
| Let’s Roll | Normal shots receive a Roll boost from the heavy rough | Activation: Miss 3 green in regulation Deactivation: Score par or better 1x | Activation: Miss 3 green in regulation Deactivation: Score par or better 2x | Activation: Miss 2 green in regulation Deactivation: Score par or better 2x in a row |
| Blacksmith | Normal shots receive a Power boost from the fairway | Activation: Score birdie or better 3x Deactivation: Score par or worse 1x | Activation: Score birdie or better 3x Deactivation: Score par or worse 2x | Activation: Score birdie or better 2x Deactivation: Score par or worse 2x in a row |
| Metalhead | Normal shots receive a Transition (level 1), Swing Path (level 2), or Timing (level 3) boost from the fairway | Passive Effects: Skill is always active | Passive Effects: Skill is always active | Passive Effects: Skill is always active |
Wedge
| Skill Name | Details | Level 1 | Level 2 | Level 3 |
| Arenologist | Splash shots receive a Timing boost from the bunker | Activation: Have poor timing 3x Deactivation: Have good swing timing 1x | Activation: Have poor timing 3x Deactivation: Have good swing timing 2x | Activation: Have poor timing 2x Deactivation: Have good swing timing 2x in a row |
| Perfect Pitch | Pitch shots receive a Spin boost within 101 YDS of the pin | Activation: Score birdie or better 4x Deactivation: Score par or worse 1x | Activation: Score birdie or better 3x Deactivation: Score par or worse 2x | Activation: Score birdie or better 2x Deactivation: Score par or worse 2x in a row |
| Bump n’ Run | Chip shots receive a Roll boost from the heavy rough | Activation: Score bogey or worse 3x Deactivation: Score par or better 1x | Activation: Score bogey or worse 3x Deactivation: Score par or better 2x | Activation: Score bogey or worse 2x Deactivation: Score par or better 2x in a row |
| Dialed In | Chip shots receive a Timing boost within 25 YDS of the pin | Activation: Land within 7.0 YDS of the pin Deactivation: Have poor swing timing 2x | Activation: Land within 10.3 YDS of the pin Deactivation: Have poor swing timing 3x | Activation: Land within 13.7 YDS of the pin Deactivation: Have poor swing timing 3x in a row |
| Floptastic | Flop shots receive a Shaping boost from the heavy rough | Activation: Miss 3 green in regulation Deactivation: Score par or better 1x | Activation: Miss 3 green in regulation Deactivation: Score par or better 2x | Activation: Miss 2 green in regulation Deactivation: Score par or better 2x |
| Double Major | Normal shots receive a Power boost from the fairway | Activation: Hit 4 Fairways in Regulation Deactivation: Miss 1 green in regulation | Activation: Hit 3 Fairways in Regulation Deactivation: Miss 2 green in regulation | Activation: Hit 3 Fairways in Regulation Deactivation: Miss 2 green in regulation in a row |
| Higher Degree | Normal shots receive a Transition (level 1), Swing Path (level 2), or Timing (level 3) boost from the fairway | Passive Effects: Skill is always active | Passive Effects: Skill is always active | Passive Effects: Skill is always active |
Putter
| Skill Name | Details | Level 1 | Level 2 | Level 3 |
| Zen Garden | Receive a Putt Path boost on the green | Activation: Miss 2 putts in a row from within 5 ft Deactivation: Sink 1 putt from within 5 ft | Activation: Miss 2 putts in a row from within 5 ft Deactivation: Sink 2 putt from within 5 ft | Activation: Miss 2 putts in a row from within 5 ft Deactivation: Sink 2 putt in a row from within 5 ft |
| Short-stuff | Receive a Putt Path boost on the green | Activation: Sink 2 putts in a row from within 5 ft Deactivation: Score par or worse 1x | Activation: Sink 2 putts from within 5 ft Deactivation: Score par or worse 2x | Activation: Sink 2 putts from within 5 ft Deactivation: Score par or worse 2x in a row |
| Pathfinder | Receive a Putt Weight boost on the green | Activation: Miss 2 putts in a row between 5ft – 10ft Deactivation: Sink 1 putt between 5ft – 10ft | Activation: Miss 2 putts between 5ft – 10ft Deactivation: Sink 2 putt between 5ft – 10ft | Activation: Miss 2 putts between 5ft – 10ft Deactivation: Sink 2 putt in a row between 5ft – 10ft |
| Goal Weight | Receive a putt weight boost on the green | Activation: Sink 2 putts in a row between 5ft – 10ft Deactivation: Score par or worse 1x | Activation: Sink 2 putts between 5ft – 10ft Deactivation: Score par or worse 2x | Activation: Sink 2 putts between 5ft – 10ft Deactivation: Score par or worse 2x in a row |
| Greenskeeper | Receive a Roll boost on the green | Activation: Miss 2 green in regulation in a row Deactivation: Score par or better 1x | Activation: Miss 2 green in regulation Deactivation: Score par or better 2x | Activation: Miss 2 green in regulation Deactivation: Score par or better 2x in a row |
| Easy Reads | Receive a Putt Path boost on the green | Activation: Land within 2.0 YDS of the pin Deactivation: Score par or worse 1x | Activation: Land within 3.7 YDS of the pin Deactivation: Score par or worse 2x | Activation: Land within 3.7 YDS of the pin Deactivation: Score par or worse 2x in a row |
| For Dough | Receive a Roll (level 1), Putt Weight (level 2), or Putt Path (level 3) boost on the green | Passive Effects: Skill is always active | Passive Effects: Skill is always active | Passive Effects: Skill is always active |
Best Skills – Tier List
S-Tier
All Passive Skills
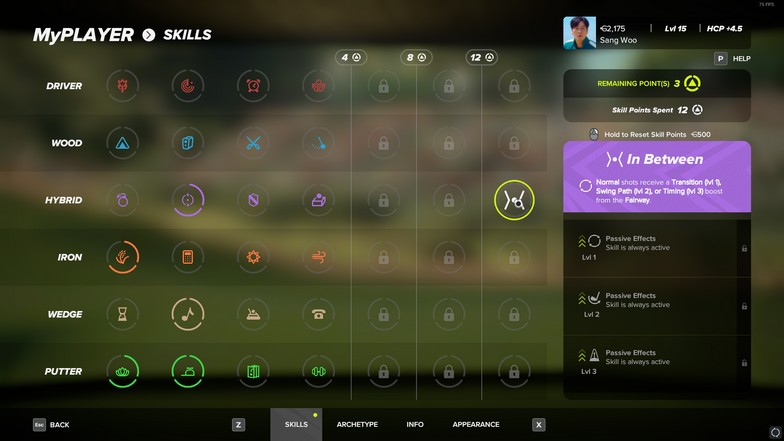
- Take the Wheel (Driver)
- Forester (Wood)
- In Between (Hybrid)
- Metalhead (Iron)
- Higher Degree (Wedge)
- For Dough (Putter)
All the passive skills are at the end of the skill tree for each club. You will need to allocate a lot of skill points to be able to place them, so you won’t be able to take every single one.
You can probably get 4 passive skills up to level 3, but you should hold off until you see all the skills in the tier list.
The best passive skills should be the Iron, Wedge, Putter, and Driver. These are the most used clubs in the game, and you will be getting your skill points worth by getting them.
Blacksmith – Irons
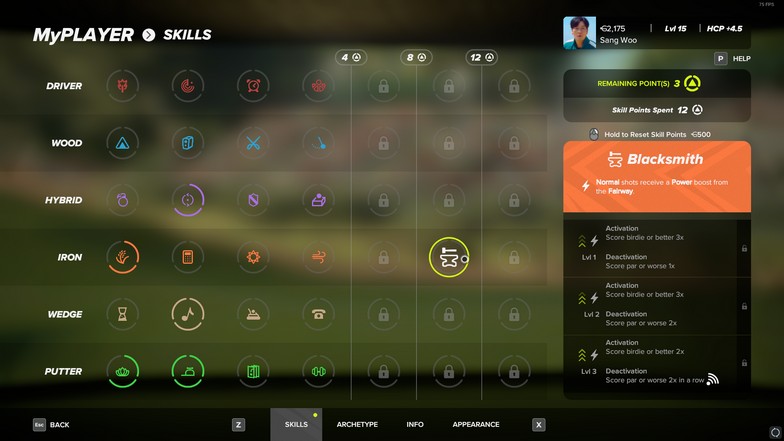
Normal shots receive a Power boost from the fairway
On Level 3:
- Activation: Score birdie or better 2x
- Deactivation: Score par or worse 2x in a row
Blacksmith is good because the buff gives you a power boost on the fairway for your irons. Irons are one of the most used clubs in the game because it is so versatile.
This is the best skill you can get that isn’t a passive skill in the game. It will help you get to the green quicker on 4-par and 5-par holes.
Dialed In – Wedge
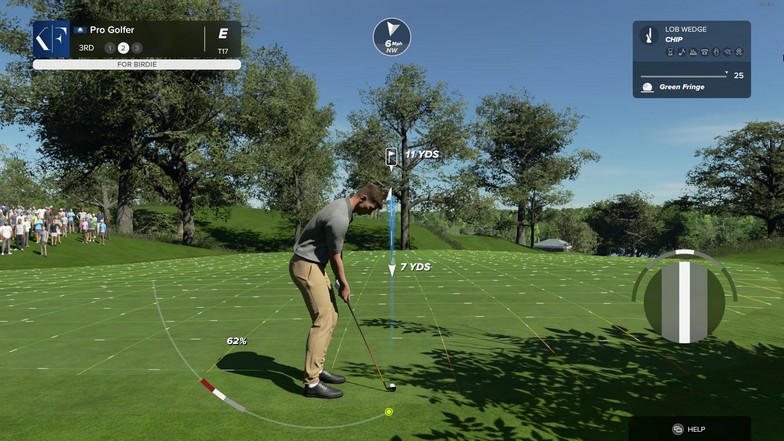
Chip shots receive a Timing boost within 25 YDS of the pin
On Level 3:
- Activation: Land within 13.7 YDS of the pin
- Deactivation: Have poor swing timing 3x in a row
Doing chip shots is also a normal occurrence in the game. Every time you overshoot your shot on the green because of the wind or a slightly slow or fast release, you will be chipping to the green.
Tee ‘n Crush-Its – Driver
Normal shots receive a Power boost off the tee.
On Level 3:
- Activation: Hit a carry distance of 285.0 YDS or greater
- Deactivation: Score par or worse 2x in a row
Tee ‘n Crush-Its is amazing because it allows you to pack more power into your driver. Par 5 holes are the easiest holes to pull out an eagle or birdie.
Getting the Power boost off the tee is crucial to you reaching the green in two strokes. It could also benefit you a lot on long Par 4 holes with the same reasoning.
Activation is easy to accomplish as well.
Goal Weight – Putter
Receive a putt weight boost on the green.
On Level 3:
- Activation: Sink 2 putts between 5ft – 10ft
- Deactivation: Score par or worse 2x in a row
Any useful boosts to your putting will work wonders. Learning how to putt is one of the hardest things in the game because of how technical it is.
If you make a mistake, you will lose points that easily. Goal Weight is on S-Tier because its activation is insanely easy. Even if you score a par and deactivate the effects, you can get it back up again.
Migration – Hybrid
Normal shots receive a Swing Path boost from the fairway.
- Activation: Score birdie or better 2x
- Deactivation: Score par or worse 2x in a row
A Swing Path boost for the hybrid is another useful skill to have in your arsenal. They are not used as often as the irons, but the activation allows you to keep the boost up for a long time.
In situations where you drive the ball 290-300 yards off the tee, you can use a hybrid if the hole is about 490-520 yards away from the tee.
You will often encounter these holes, which makes the skill extremely useful in this situation. It allows you to become more consistent in getting to the green.
A-Tier
Short-stuff – Putter
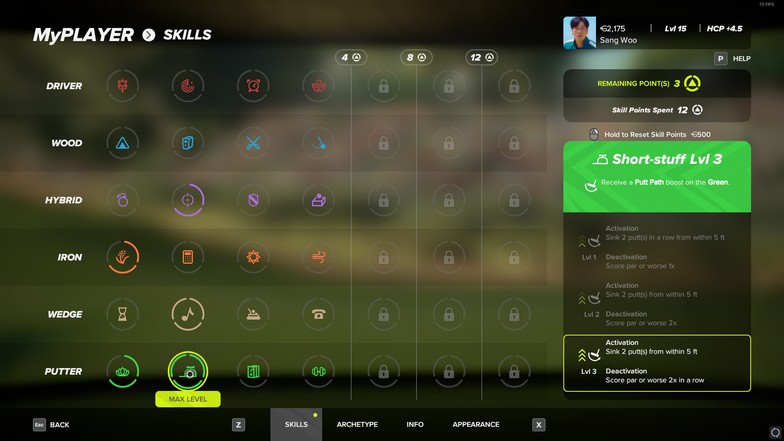
Receive a Putt Path boost on the green
On Level 3:
- Activation: Sink 2 putts from within 5 ft
- Deactivation: Score par or worse 2x in a row
With the same reasoning as the Goal Weight skill, you want to boost your putting skills to score more easily.
The activation does require you to sink 2 putts within 5 ft, which is harder to do. You will need to get the ball close to the hole every time you get to the green.
Perfect Pitch – Wedge
Pitch shots receive a Spin boost within 101 YDS of the pin
On Level 3:
- Activation: Score birdie or better 2x
- Deactivation: Score par or worse 2x in a row
Perfect Pitch is a useful skill to have on par-4s. You would want a spin boost to help you get the ball closer to the hole.
You can apply backspin to the ball and let the ball stop upon landing. With a boosted spin boost, the ball will stop quicker.
Spin Class – Hybrid
Normal shots receive a Spin boost from the fairway.
On Level 3:
- Activation: Hit 3 Fairways in Regulation
- Deactivation: Miss 2 green in regulation in a row
Spin Class is only on the A-Tier because it is one of the best skills in the early tree. You will have to allocate skills points on the first four skill trees to get the best ones.
With Spin Class, you get a much-needed Spin boost to help you reach the fairway with your hybrid. You just need to remember to switch to your hybrid instead of the wood when you want to apply spins to your shot.
Activation is easy as well, so you will most likely get the skill effect active throughout the course.
Easy Reads – Putter
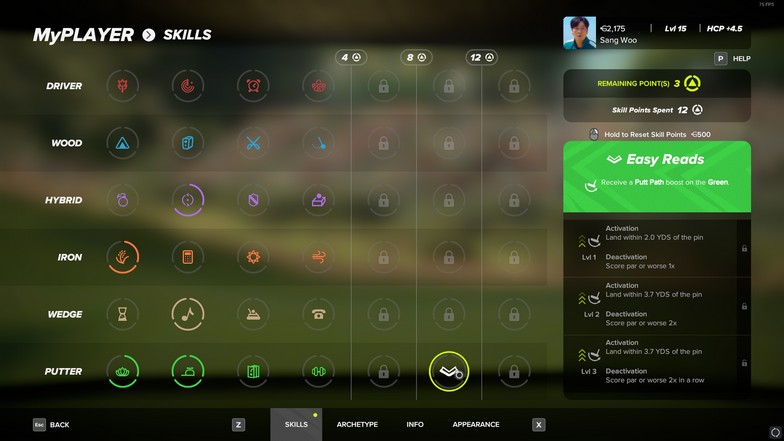
Receive a Putt Path boost on the green.
On Level 3:
- Activation: Land within 3.7 YDS of the pin
- Deactivation: Score par or worse 2x in a row
Easy Reads gives you another skill that can boost your putting skills. Activation is a bit tricky, but you only need to land it once.
Once you gain enough experience, activating this skill will become much easier.
The Putt Path boost is big enough to get an A-tier. Deactivation is a bit easier to control as well since you need 2 pars in a row.
Too Breezy – Iron
Normal shots receive a Flight boost from the fairway.
- Activation: Hitting into a headwind 5 MPH or greater
- Deactivation: Hit 2 Green in Regulation in a row
Like the Aerodynamics skill of the driver, a flight boost can help you drive the ball in longer distances. This is good when you hit a heavy rough on the fairway because the distance between the hybrid or wood isn’t that far from using the iron.
However, the way you can use this skill is by adding backspin and a higher loft to make the ball stop quicker upon landing.
B-Tier
Calculator – Iron
Pitch shots receive a Shaping boost from the fairway.
On Level 3:
- Activation: Land within 10.3 YDS of the pin
- Deactivation: Miss 2 green in regulation
Getting a Shaping boost isn’t all that good. However, this skill can be really useful if you encounter situations where you need to curve the ball (draw or fade).
Activation and deactivation requirement allows you to keep the skill up at all times because they are quite easy to do.
What makes the Calculator skill reach the B-Tier is purely because it is easily available on the skill tree. You will most likely get this skill to unlock the other tiers.
Aerodynamics – Driver
Normal shots receive a Flight boost off the tee.
- Activation: Hitting into a headwind 5 MPH or greater
- Deactivation: Hit 2 green in regulation in a row
Aerodynamics’s flight boost, while adding some loft, can get you a lot of additional yards for your drive.
The skill is attainable on the 4th skill tree path unlock. The activation makes it a bit situational because the headwind isn’t always there. The skill’s boost would give it an S-Tier if not for the activation and deactivation requirements.
Momentum – Wood
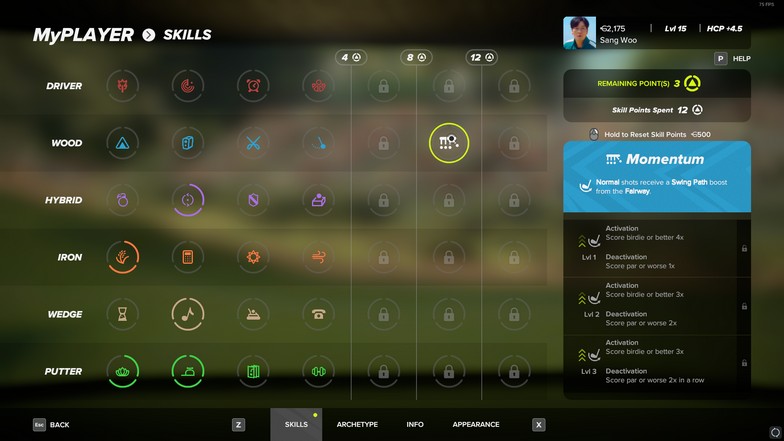
Normal shots receive a Swing Path boost from the fairway
On Level 3:
- Activation: Score birdie or better 3x
- Deactivation: Score par or worse 2x in a row
Swing Path will always be hard to time perfectly. Even if you get used to it, getting skills that boost the attribute will help you become more consistent.
When you are using the wood, you are mostly using it to get to the green already. With a more consistent shot, you will get closer to the hole.
The activation for this skill is easy, but the deactivation will get you as well. Because of this, it is only on the B-Tier.
Other Skills
Other skills will highly depend on what you need to improve in your game. Most of the skills listed are good on their own, but you can make a few combinations that can help other skills to become even better.
How to Get Skill Points
The only way to get skill points is by playing the game and leveling up. You will get these rewards and reach up to a total of 50 skill points. Since each skill has three different tiers, you would want to choose the right skills for your build.
How to Create Skill Builds
The best way to create skill builds is by revolving your skills around the best archetype for your play style.
Each archetype has a weakness, and your game should probably have some weaknesses as well. You can choose the Powerhouse archetype, which is weak in accuracy and timing.
Even without the Powerhouse archetype, you might be having trouble already with the swing timings. You can effectively choose skills that allow you to improve on your weaknesses.
Choose skills that synergize well with what you want to improve on. Most of these should be momentum skills because you don’t really want to activate skills that depend on you performing badly.


