Despite yearly gameplay changes, there are still tons of gameplay tips and tricks that are consistently effective in FIFA. If you can master them, you’ll be able to compete at the game’s highest levels.
Now, I’m not necessarily speaking of gamers that want to compete with professional FIFA players – that could take years of practice.
What this guide tries to accomplish is to improve the ability of relatively average players enough to compete with the elite players that you’ll find in FIFA’s most popular game mode, Ultimate Team.
If you’re looking to get better at FIFA and upgrade to the Elite division of Ultimate Team with consistently excellent finishes in the weekend league, then this one’s for you.
Game Settings
Before you get into the gameplay itself, a few minor tweaks in the settings section could actually make a world of difference. This applies especially to the visual presentation and controller settings of the game.
Controller

In Controller settings, turning off FIFA Trainer is one of the first things that many people do, but you’re missing out on some really useful bonuses if you do that while you’re still trying to improve your game.
If you turn the trainer on, you can adjust the trainer options in-game to show specific data. A particularly useful one is the setting that puts a flag on top of any player that runs offside. This can help to significantly reduce instances of making a wrong pass to such a player.
Additionally, you can also turn on the timed finishing indicator. This is very handy while you’re still learning how to use timed finishing (more on this in the attacking section).
The green meter on top of the player’s head helps you to time your shots better and if you practice with it for long enough, you’ll be able to use timed finishing without the trainer.
Visual

In “Visual” settings, turning on the player name indicator makes it easier to know who’s on the ball immediately after they receive a pass.
This can come in handy when your player is under pressure and you have to make a decision immediately after you receive the ball. If, for instance, you see that the player receiving the pass is a 5-star skiller, then you know you can use a 5-star skill to get out of the situation.
The fact that some players in FIFA do not have in-game faces also shows the importance of having this indicator.
Additionally, you also want to make sure that the radar is turned on. Even with the widest camera angles, it’s impossible to see the position of every player on the pitch at once, so the radar at the bottom is useful for tracking that.
Many times, I notice my opponent bring out their keeper in the radar long before he actually appears on screen, so I’ve already made the decision to chip or not before I encounter him.
Camera

Speaking of camera angles, the default camera settings on FIFA sure look nice, but they’re not the most efficient in my opinion.
The best camera angle for me is one that allows you to see as much of the pitch at once while still providing close enough details for the player in possession.
To achieve that, I recommend using the co-op camera. Adjust the camera settings to maximum camera height (20) and minimum zoom (0).
Obviously, you may find that you prefer something a bit different, but the point is to make sure that you tweak these settings until you find what works for you.
Gameplay

A lot of times, I’ve heard gamers complain that they can’t seem to buy a win playing online against human opponents despite the fact that they regularly demolish A.I in offline modes such as Career Mode.
One explanation for this is that when you play A.I very often, you learn to recognize the patterns of play that have been ingrained into the code. After all, all of the decisions that AI-controlled players make on the pitch have been pre-programmed.
Regardless, playing against A.I can be a good way to get some practice in preparation for competitive online gaming. Squad battles in Ultimate Team, for instance, present a fair number of varied challenging matches.
If you’re going to be playing against A.I in offline modes such as Career, adjusting the game sliders can be a pretty effective way of making the game less predictable and thus closer to what you’d get playing a human opponent.
Tactics

In FIFA Ultimate Team, tactics are an extremely important part of the game even for the most skilled gamers. Let’s talk about that for a minute.
Playing with the Meta
Every year, there are a handful of tricks that are considered “META” (most effective tactics available) and no matter what type of team you’re setting up, having players and tactics that fit this meta will generally put you in a good position to win more games.
One FIFA meta that seems consistent each year is that you need to have fast players. Now, you can get away with slower players in the early stages of Ultimate Team, but the need to have them grows as better cards are released with each promo every couple of weeks.
Apart from player ability, the effectiveness of specific tactics over others also comes to the fore in FUT. Now, this is not to say that you can not win games regularly without using these meta tactics, but it is something to consider if you’re in a rut and are looking to try something different.
While you’re trying to improve, I would recommend trying various tactics instead of chasing the meta. When you find something that works and you’re at a good level, you can also try out some meta tactics.
Main Tactic
In FUT, your main tactic is pretty much just for squad-building and team chemistry. Obviously, you want to try and fit in your best players in the starting XI, but when it comes to modifying how the team plays, your in-game tactic is where it’s at.
In-game Tactics

To adjust your in-game tactic, go to the “Custom tactics” section on your squad page. Here, you can edit your “Ultra-defensive”, “Defensive”, “Attacking”, and “Ultra-attacking” formations and custom tactics.
You can then select any of these formations and tactics in-game with the d-pad buttons. As you cycle through each option, the indicator at the bottom corner of the screen shows what you’ve chosen.
Now, there are several ways to set up your team tactically, but this guide is focusing on the gameplay aspect of improving your game.
Set-pieces

There are a few tips that are pretty effective for scoring direct free-kicks and direct corner kicks in FIFA.
For indirect set pieces, the easiest trick in the book is to aim for a tall player with excellent jumping ability.
You can control this player’s movement before playing the set piece by switching to him with the L1/LB trigger and guiding him to the area you want to play the ball into.
Hit the ball at a slightly low end of the “inside curl” and aim for two-and-a-half or three-and-a-half bars of power depending on the distance between the ball and its target.
Creating scoring chances from set-pieces even applies to throw-ins. If you have a player on the team with the “Giant Throw” trait, throw-ins can be just as good as free-kicks.
Penalties
Scoring penalties in FIFA 23 is easier than it’s ever been.
All you have to do is wait until the reticule (the moving circle) is green and as small as possible around the ball, power your shot, and direct it into any corner that you want.
Defending
You can probably get away with some schoolboy defending in the lower ranks, but defending well is very crucial to racking up wins in the highest divisions of FUT. Use these tips to improve your defense.
Defensive Shape
Most of the time, you’ll only be controlling one player when your team is defending. An exception applies to situations where you’re using the second-man press.
This means that you have to rely heavily on the A.I to help you out in defense. While A.I defending can be overpowered if you have players that fit the meta, you still have to make the right decisions to ensure that they perform optimally.
One such decision is choosing the player to control. If you switch too often between players while you’re chasing the opponent within your own half, there is the tendency for your defenders to be dragged out of position, leaving space for the opponent to exploit.
For instance, take note of the positions of the defenders in the sample scenario below. The right-back (blue shirt) has been lured out of position and the attacker in red is making a dangerous direct run in behind him.

To avoid this and keep the shape of your defense as compact as possible, I recommend tracking the player in possession with your defensive midfielder. Try to win the tackle with that player without switching to your defenders.
Now, if the opponent manages to keep the ball until they’re directly in front of your defenders, then you can take the risk of switching to your defender and trying to win the ball with them.
However, you still have to be very patient and jockey until you see a good opportunity to make a tackle. Don’t be too aggressive running all over the place and making miscalculated tackles. Do not drag your defenders, especially your center-backs, out of position.
Jockeying

Speaking of timing your tackles, mastering the art of jockeying in FIFA will take your defensive game to the next level.
To jockey, hold the L2/LT button and then direct the player you’re controlling to any direction the player in possession turns to.
Jockeying allows you to time your tackles to perfection when you’re close to the player in possession, and it allows you to cut passing lanes if you’re not so close to them.
To cut passing lanes, simply jockey the player you’re controlling into the space between the player in possession and the most likely passing option for them.
It is especially important to use this method of defending when you’re trying to win the ball within your own half.
While you’re practicing perfecting your jockeying, prioritize winning a high percentage of the tackles that you commit to. This means waiting until the last moment to make a tackle sometimes.
Tackling
There are two options for tackling – the stand tackle and the slide tackle. More often than not, I would recommend using the stand tackle over the other option due to the risk involved. If you miss a stand tackle, you have a better chance of recovering quickly than if you miss a slide tackle.
Tackling is the most proactive form of defending in FIFA, which also leads to it being the riskiest. Apart from the risk of letting the opponent through on goal with a mistimed tackle, you can also commit a foul which can be costly depending on the position of the ball.
Before you make a tackle, jockey with your defensive player to find the best angle and force your opponent into an inconvenient position (e.g showing them to their weaker foot or into wide areas of the pitch). Do not make the tackle unless there is a clear opportunity to win the ball.
In fact, I would recommend holding off on tackles for as long as you can if you have little to no cover behind you. Jockey until support comes from your teammates, and then the risk of making the tackle might be more worthwhile.
Pressing
There are a few instances where triggering a second-man press or a partial team press can come in handy when defending in FIFA.
For the second-man press, it is a great option for isolating the opponent’s attacker on the flanks. They have less space to work with in that position, and defending with an extra man puts even more pressure on them.
To initiate the second-man press, simply hold the R1/RB button. If you call the wrong player, quickly release the button, change direction, and try again.
You can also increase your chances of winning possession from the opponent by manually marking the player in possession and then triggering a partial team press (PTP) to send two extra players to mark the attacker’s passing options.
This is done by double-tapping the R1/RB button and then holding it on the second tap. With multiple players now marking the passing options, you have a higher chance of success if you make a tackle.
An example is shown in the image below. The opponent’s attacker, Antoine Griezmann, receives a pass inside my 18-yard area.
The defender that I’m controlling is indicated by the red marker, and I immediately trigger a partial team press to Griezmann’s most likely passing options making runs into the box.
The defenders leading the partial team press are indicated with the green marker.

In this next sequence, you’ll notice that the two extra attackers are now marked by my players and Griezmann has to try and go it alone while fighting off the attention of the defender that I’m actually controlling.

Even if you don’t make the tackle, there is an increased likelihood of forcing the player to make a mistake with the partial team press.
The move is also very useful when you’re playing against someone that relies heavily on patient possession football.
It can be hard to win the ball from these types of players, and the press will force more urgency into their play and also make them go long more often, increasing your chances of winning possession.
Finally, using the partial team press is also useful for stopping cut-back attacks. In FIFA 23, for instance, it is a common style of play for opponents to run down the flanks and cut back to an attack that would just be wide open inside your 18-yard area.
The partial press cuts that out with a high success rate, limiting the passing options that the player has and forcing them to try and do it all on their own or turn back.
PTP is also a high-risk, high-reward approach. When you trigger it too often, you will leave a lot of space that the opponent can exploit behind.
Keeper Movement

There are two facets of keeper movement in FIFA. The first is sweeping, and the second is line movement.
Sweeping
Sweeping with your keeper is a pretty popular defensive move in FIFA. All you have to do is hold the triangle/Y button and your goalkeeper will come off his line to stop the onrushing attacker.
However, choosing the right time to bring out your keeper is something that takes practice. If you don’t time it correctly, the attacker can just chip your keeper for an easy goal.
There’s a trick to this that can fool opponents. If you start to bring your keeper out, then the opponent is likely to decide to chip. However, you can pull the keeper back after showing yourself to the attacker so that when they chip, he’s already on his way back and can catch the ball.
Line Movement
Controlling your goalkeeper’s movement on the line can be a pretty good way to stop big chances from going into the net. This is partly because the move is not as common as regular sweeping, so it can catch your opponent off-guard.
To move your keeper on his line, press R3 and drag RS to whichever direction you want your keeper to go. If you correctly predict where you expect the opponent to shoot the ball, the chances of making the save are significantly increased.
The more you practice this move, the better you’ll get at it. Your instincts will naturally improve and the accuracy of your predictions will increase as well.
Apart from 1v1 situations, moving your keeper can also be useful for defending corner kicks and power shots. If you move your keeper off the line to the center of your six-yard box, there is an increased likelihood of them catching the ball played from a corner kick.
However, if you’re doing this, you also need to be careful about players that will try to take advantage and score the corner directly.
For power shots, you have more time to think and decide where you move your keeper due to the load-up time of the shot. Considering the fact that these shots are extremely powerful and harder to stop, that extra bit of space that you can cover could be crucial to preventing a goal.
Generally, keeper movement is yet another high-risk, high-reward defensive move in FIFA. I say this because if the opponent is very composed and sees you moving your keeper (especially in 1v1s), they can simply go in the other direction and score into an open net.
Attacking
Even if you’re very skilled defensively, you will play games where things just seem to fall apart in that regard. In FUT, this can happen for various reasons including congested servers (leading to bad gameplay), equally skilled opponents, or just bad luck.
In such cases, combining strong defense with an equally strong attack will help a lot, and that’s what the pros practice as well.
In this section, I’ll discuss the most effective ways to create chances and score in FIFA.
Creating Chances
There are lots of ways to create chances in this game, from individual brilliance (e.g skill moves, long shots) to passing and crossing. I highly recommend practicing different approaches to making your game as unpredictable as possible.
Passing

Speaking of passing, the most important bit of advice seems quite obvious, but many average gamers do not take it as seriously as they should. You HAVE TO be patient on the ball.
You don’t necessarily have to play possession football, but forcing passes when they’re not clearly on often will almost certainly cost you in any match.
If a pass is not clearly on, you’re often better off holding on to possession and creating a better angle for the pass or sending it back into a safe area. Remember, you can’t concede if you don’t lose possession!
When a pass is on, there are several types of passes that you can execute depending on the situation – the position of the player you’re passing to, and the run that the player is making (if they’re making one).
This is excluding the regular pass and through ball which everyone obviously already uses all the time.
Flair Pass
The flair pass is executed by holding the L2/LT button and pressing X/A. I recommend using this pass when you have a runner ahead of you, but they are shoulder to shoulder with the opponent’s defender.
If the runner (your attacking teammate) is faster than the player they’re running with, using the flair pass should execute an outside-foot pass that rolls to the front of the pair of players. Then, you can use the speed advantage to get past the defender and carry on with the ball.
An example of a flair pass is shown in the image below. The player in possession of the ball is about to execute a trivela pass into space for the teammate making a diagonal run into space.

There are other use cases for the flair pass that produce different results technically, but this is the most effective in my opinion.
The rabona pass in the image below, for instance, is also a flair pass, but it is more flashy than effective.

Chipped Pass
A chipped pass is executed by double-tapping X/A. It is most effective in two scenarios.
The first is when the opponent’s defender is diving into a tackle against your player in possession. If you make a regular pass in that situation, it will get intercepted. A chipped pass, on the other hand, should lift the ball over the challenge to your intended destination.
The second scenario is if you want to execute a move with the receiving player that requires the ball to be in the air. For instance, if you want to catch the ball mid-air and shoot at goal immediately, a chipped pass is the way to go.
Driven Pass

The driven pass was much more effective in FIFA 22 than FIFA 23, but it is still a pretty useful skill. It is executed by holding the R1/RB button and pressing X/A to power the pass.
I mentioned earlier that you must be patient when passing the ball and avoid forcing passes. In the sample image above, there is an opportunity to play a driven pass into the player with an opponent directly behind him.
Another takeaway from this screenshot is the use of passing triangles. If you can learn to identify a triangular positioning of your players in any area of the pitch, passing the ball between the three players involved is a great way to retain possession.
The driven pass provides opportunities to play a pass into a player that could otherwise be intercepted by the opponent if it was a regular pass.
A scenario where the driven pass could be useful is when there’s a defender running to cover the space between you and the teammate you want to pass the ball to.
If you make a regular pass, the defender will get there in time and intercept the ball. However, a driven pass has more pace and power behind it, enough to get the ball to your teammate before the defender can intercept.
Driven passes are more effective for long-range situations. If you make a driven pass into a teammate that is very close to you, there’s a good chance they’ll struggle to control the ball properly with the first touch and you’ll lose possession.
One-Two Pass
The one-two pass is executed by holding L1/LB while tapping the X/A button to pass the ball. It triggers a run for the initial passer to receive the ball in a more advanced position.
This pass is most effective in overload situations where you have two players being defended by a single opponent’s player. The one-two pass easily takes the player out of the game in a swift pass ‘n’ move, and you can continue your attack barely interrupted.
Be careful when using this pass within your half as it can drag players out of position.
If you trigger the run and don’t pass back to the player making it, they’ll continue running forward for a bit and if you lose possession within that period, there is a gap in your defense that the opponent can exploit.
Crossing
Crossing for scoring chances is not as overpowered as it used to be in older FIFAs. However, when you have a player making the right type of run into space, it can be a dangerous weapon.
Let’s talk about the most effective types of crosses and sample use cases for them. All of these variations include the use of the cross button, O/B.
Driven Cross
The best use case for the driven cross is when the receiving player is in a good position to play a first-time shot.

This is because the pace and power behind the cross make it difficult to bring the ball under control, so you should instead look to guide it into the back of the net immediately.
The driven cross is best used for creating chances from the flanks, close to the 18-yard box. It is executed by pressing R1/RB + Square/B.
You can also use this type of cross to switch play in other areas of the pitch as long as there is a clear line of sight between the crosses and the receiver.
Like the trivela pass, it is faster than the regular cross, but the lower elevation makes it that much quicker than the trivela for getting the ball up the pitch quickly.
However, that lower elevation is also why you need a clear line of sight because any defender in the space can easily intercept the cross otherwise.
High Lob

The high lob is best used for playing the ball into a player at the far post, especially when that player is tall and good in the air.
The trajectory of the ball is much slower than the regular or driven crosses, so you really need the superiority of your player in the air to make good use of this cross.
It is executed by pressing the L1/LB + O/B buttons.
Flair Cross
The flair cross is most efficient in two scenarios.
The first is when you notice that your player in possession is in a congested area, but there’s a teammate on the other side of the pitch with more space around him. Switching play to that teammate will relieve that pressure.
The second scenario is when you’re running down the flank with a player who can only make a regular cross with their weaker foot in that position.
If you use the L2/LT + O/B combination, the resulting flair cross will be a trivela that uses the player’s stronger foot, increasing the chances of finding your target.
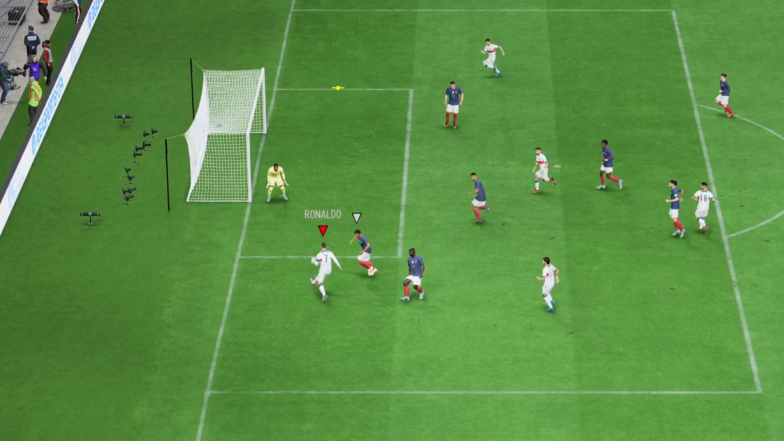
In the sample below, Ronaldo makes a trivela cross into the teammate making a run at the far post. The goalkeeper’s near-post starting position makes it hard to recover quickly, so my attacker connects with the header for an easy goal.
Depending on the skill rating of the player, you can even execute a rabona cross with this button combination.
Low Cross
The low cross is executed by double-tapping O/B in the direction of the player making a run. It is most effective in situations where you’re confident that your attacker is faster than the opponent’s defender and will get to the ball in the box first.
You can also use it in counter-attack situations to get the ball to your attackers in the middle quickly if you win possession on the flanks.
Triggering Runs
Generally, your players will make A.I triggered runs when you’re attacking. The regularity of these runs can also be affected by your custom tactics and individual player instructions.
However, you can also trigger these runs by yourself whenever you want. Let’s talk about that.
Come Short
If you want a teammate to come short to your player in possession to receive a pass, tap the R1/RB button while facing that player.
This can be useful for keeping possession when there is no clear space for players to run into. It also has the potential to open up that space you need if the opponent decides to track the movement of the player that you called short.
Get in Behind
On the flip side, when there is clear space for a teammate to run into but they’re not making the run that you want, you can trigger the “get in behind” instruction by tapping L1/LB while facing that player.
This is particularly effective in counter-attacking situations. Even if you don’t pass the ball to that teammate with the triggered run, this singular move would’ve dragged a defender out of position, potentially giving the player in possession more time on the ball to drive into space.
In the sample image below, I use the player on the ball, Joao Felix, to trigger a run from Cristiano Ronaldo so that I can play a through ball ahead of him.

Ronaldo makes it to the edge of the box in time to receive the through ball, and I use the sprint button (R2/RT on Alternate settings) to burst into the space ahead of him for a 1v1 against the keeper.

Scoring
Now for the most important part of the game – scoring goals. Arming yourself with varied finishing options will serve you well when you come up against opponents that give up as few opportunities as possible.
Timed Finish

I mentioned turning on the trainer option for timed finishing earlier, and it’s a really good way to practice this high-percentage success finishing type.
When you hit a timed finish, there are four possible color codes that glow around the player indicator to show the result of the attempt.
If you hit the second tap too early, you get a red-timed finish. If you hit it slightly early, you get a yellow-timed finish. If you hit it perfectly, you get a green-timed finish and if you hit it too late, you get a white-timed finish.
So, the goal here is to green-time your shots as often as possible. If you do this, you’ll notice a higher percentage of success with shots that would typically be saved or go wide.
To hit a timed finish, you have to press the Square/X button twice. First for the shot, and second when the shooting animation of the player is just about to end. It’s almost like a double-tap but not quite, which is why you need a lot of practice.
Low-driven Shot

The low-driven shot is the most effective way to score a 1v1 opportunity inside the box in FIFA.
It is executed by tapping and releasing the Square/X button with one bar of power which keeps the shot low and hard, making it almost impossible for the keeper to save if you direct it properly.
Finesse Shot
The finesse shot is another move that is less effective than it used to be, but still useful in certain situations. It is executed by holding R1/RT while pressing Square/X to power the shot.

For the moment, I would recommend using other types of shots when you can due to the nerfed quality of this one.
However, if the player has the Finesse Shot trait and high shot power, curve, and accuracy stats, then you will have a higher chance of success with this type of shot.
Trivela Shot
The trivela shot is the new finesse shot in FIFA in terms of how effective it is. This applies especially when you’re taking the shot with a player that has the “Outside Foot Shot” trait in FUT.
To execute this shot, hold the L2/LT button while powering the shot with Square/X.
The trivela shot is most effective when you’re coming in at a diagonal angle on the weaker foot of the player, something like the image below.

An example of the perfect opportunity for the shot is when you’re on the right edge of the box with a right-footed player that has the outside foot shot trait. If you’re on the left side of the box, you need a left-footed player.
Power Shot
The power shot was introduced in FIFA 23 and is a high-percentage shot if you master how to direct it. It is executed by holding L1/LB + R1/RB while powering the shot with Square/X.
Apart from the extra pace and power behind the power shot, another difference compared to the regular shot is that this is completely manual in terms of direction. You need to be very precise as the A.I will not help you guide the ball toward the goal.
Regardless, that pace and power are what make it hard to stop the shot, and if you can get it on target, it will often result in a goal.
Perfect use cases for the power shot at the elite levels of FUT are few and far between. Defenders will often be in a position to block the shot, so you should prioritize mastering other types of shots first. It’s still a nice weapon to have though.
Skill Moves
Many people are caught in two minds about using skill moves in FIFA. Some elite players cannot do without having 5-star players in attack, while some barely use any skill moves.
You can find a lot of success in the elite divisions regardless of your stand on skill moves, but I genuinely believe that they’re very useful because of how unpredictable they make your game.
That said, there are a lot of skill moves in this game, but you only really need to learn a handful and master them.
It’s much more effective to know when and where to use a few specific skill moves than to learn a bunch of them and just spam them all the time.
On that note, let’s discuss some of the most effective skill moves in FIFA.
Simple Skill Moves

These skill moves can be executed with players that have a 4-star (or less) skill rating.
Heel to Heel
Variation 1 (Minimum 1-star)
How to Execute: Hold L2/LT + Square/X then X/A.
Use Case: Create an extra yard of space when you execute this skill move in a direction facing away from an opponent that is marking you tightly. Very useful with central midfielders in the middle of the park and attackers inside the opponent’s 18-yard area.
Variation 2 (Minimum 4-star)
How to Execute: Hold L1/LB + flick RS up then down. The direction is determined by your LS movement.
Use Case: Very useful for beating a man on the flanks and cutting inside or beating a keeper when 1v1.
Stepover (Minimum 2-star)
How to Execute: Roll RS from the top to the left/right.
Use Case: Create space and earn a small speed boost to burst into space. Very useful for beating a man when there’s space behind him and also getting past a defense line to burst into the opponent’s box.
Ball Roll (Minimum 2-star)
How to Execute: Hold RS left/right.
Use Case: Excellent for creating new angles to make an accurate pass, cross, or take a shot when the obvious angle is marked by an opponent.
Lane Change (Minimum 4-star)
How to Execute: Hold L1/LB + hold RS left/right
Use Case: Useful when driving into the box from the byline or coming up against a defender on the flanks. Execute the lane change into space when you’re very close to the defender to surprise them. It is also called the “Croqueta”.
Advanced Skill Moves

These skill moves can only be executed with players that have a 5-star skill rating.
Reverse Elastico
How to Execute: Roll RS from left anti-clockwise to right.
Use Case: Excellent for a sudden change of direction into space to create a great angle for shot inside the opponent’s 18-yard area. Best used when your player is marked tightly and not when the opponent is jockeying.
Sombrero Flick
How to Execute: While standing, flick RS up, up, and down.
Use Case: Best used when your player has his back to the goal and is marked tightly by the opponent. If you’re on the edge of the box, this move can create space to immediately take a shot on goal.
Other Tips
Be Patient
This is the most important bit of advice that anyone can give you for FIFA, and it applies in both the defensive and offensive phases of play.
I already discussed jockeying while you’re defending, but when you’re attacking, you also need a lot of patience with passing and dribbling.
Cut sprinting out of your game unless there is clear space in front of you to run into, especially if you’re in possession in the middle of the pitch – it’s the easiest way to get dispossessed.
Tinker with Tactics
Sometimes, your tactics do not suit your play style and you’ll only notice an improvement when you change things up.
For this, I would recommend starting out with small changes to the custom tactics and player instructions. When you see how they reflect in-game, you can make further changes or roll back the ones you made accordingly and try something else.
We’ve got a handful of custom tactic guides, which is a good place to start if you’re unsure how to begin.
Watch Professionals
Watching pro-FIFA players is another great way to improve your own game. It’s the perfect way to reconcile theory with practice.
If you’re struggling with learning a skill in the game by yourself, watching a pro do it might help. I recommend watching real football as well.
Obviously, FIFA is only a football simulation and it’s not the most realistic interpretation of the real thing, but there are still a lot of ideas that you can only learn from knowing how real football is played – especially for the attacking aspect of the game.
Challenge Yourself
When you get very good at a certain level, don’t spend too much time patting yourself on the back for it. Look to challenge yourself with something that’s more difficult so you can continue the process of improvement.
For instance, if you have no experience with skill moves, I recommend starting out by practicing the easiest ones. When you master them, challenge yourself to practice more difficult skill moves.
Don’t be scared to play opponents that are better than you. Instead, focus on using those games as a learning opportunity to see how they play and your weaknesses that they take advantage of. If you can record a few games and watch them back, that can be pretty useful as well.
In FUT, many FUT gamers don’t bother with Squad Battles, but it can be good practice.

Outside of FUT, you can also challenge yourself by increasing the difficulty level of the AI and adjusting the game sliders.
Keep it Simple
As often as you can, keep it simple. Play the simple pass, execute the simple dribble, score the simple goal.
It’s nice to have advanced skills in your locker, but you don’t need to spam them all the time to be efficient. If you watch the pros, you’ll see the best examples of this.
If you think you’re ready to challenge in FIFA Ultimate Team, then you’ll be interested in learning how you can improve your players for an extra quality boost.