Madden 24’s Franchise Mode gives you the chance to build the roster of your dreams, both in the short term as well as far into the future.
In order to successfully build a team that has that long term success, being able to find outstanding young talent, bring them in through the draft, and develop them into stars is one of the most important processes to ensure your team can sustain winning across multiple seasons.
Thanks to the rookie pay scale the players that you acquire through the draft will be much cheaper than their veteran counterparts, allowing you to find studs to fill your roster with talent without having to break the bank and wind up tight in terms of cap space.
Of course, for this to all go according to plan you have to be smart throughout every step of the scouting process; you’ll need to be on your A-game from your first look at the incoming rookie prospects all the way up until the time comes to actually draft them.
That’s why today this guide will discuss the best scouting tips for Franchise Mode in Madden 24 to help you build your team up the elite tier of franchises and stay there for seasons to come.
Starting the Scouting Process (Week 1)
The very first steps of the scouting process starts at the same time as your quest for the Super Bowl: Week 1 of the regular season.
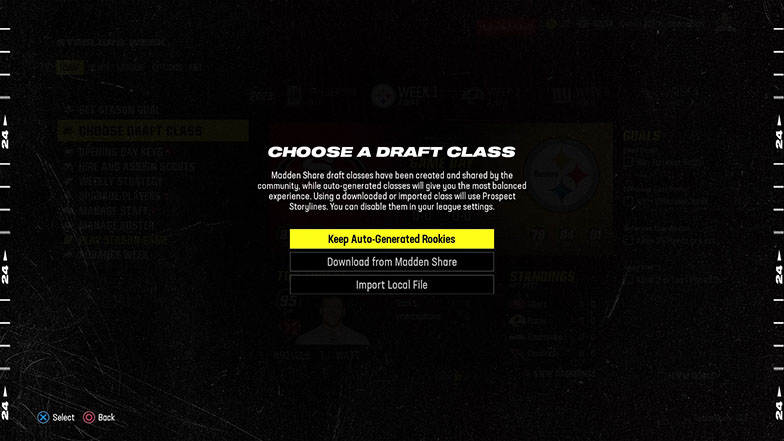
Your initial step will be to choose what draft class you’ll be working with, which will you do by selecting the “Choose Draft Class” task from the “Home” tab of Franchise Mode’s main menu. Once you’ve made that selection the game will prompt you with your available choices for draft classes.
The first is “Keep Auto Generated Rookies” which does exactly what it sounds like it does: it allows the game to create a draft class full of randomly generated prospects for you to scout from.
The second option is “Download from Madden Share”. This choice is how you’ll be able to download and use custom draft classes that have been created and uploaded by other players. The most common use for this is to be able to use some of the college prospects that will be entering the real life NFL over the next few years.
Finally, you can also use custom draft classes you already have saved, whether you created it yourself or you’ve previously downloaded someone else’s custom draft class in preparation. Choosing “Import Local File” will let you choose a draft class from those that you’ve already saved.
The class that you’d like to use is entirely up to your own personal preference, but for today’s example we’ll be going with “Keep Auto-Generated Rookies”.
After choosing the draft class you’d like to use, you’ll be taken to the main screen of the scouting hub. From here, your next step is one that may be easy to accidentally glance over but is extremely important: hiring and assigning your scouts.
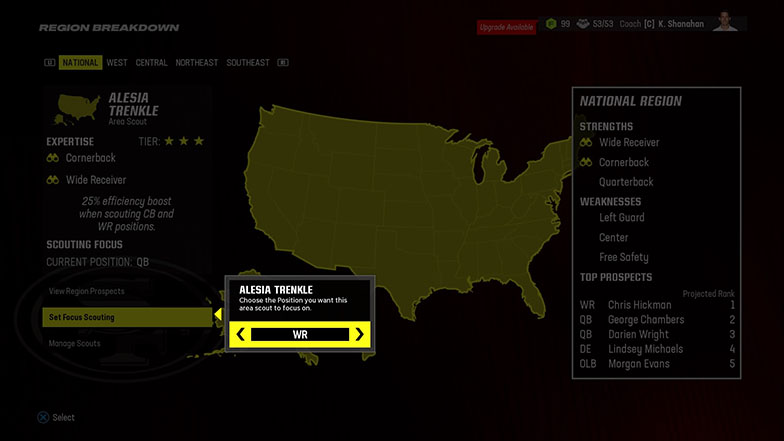
But before you can get these scouts to work, you’ll need to know what this draft class actually looks like in terms of strengths and weaknesses in order to maximize your scouts’ talents. To do this you’ll want to select the third option down titled “Region Breakdown”.
This will give you a high level overview of the incoming draft class by listing the three top strengths and three main weaknesses. Keep in mind that these strengths and weaknesses don’t mean that it applies to every player at a given position, rather that the average of a position is either stronger or weaker than normal.
You can use R1 and L1 (or RB and LB) to toggle between viewing the class either at a national level or broken down by region to give you a better idea of the talent in the class.

Once you’ve taken note of how this class’ strengths and weaknesses shake out it’s time to hire an assign your scouts to fit the strengths of the class. You can access your scouting team by selecting the second option down of “Scouts” from the same screen you previously selected “Region Breakdown”.
For the sake of making the process as smooth as possible, it’s easiest if you start by firing all your current scouts by pressing square (or X) over all five of them. This will allow you to more seamlessly get the scouts you need under contract.
Once your scouting team is a clean slate, you’ll want to use L2 (or LT) to toggle your view from “My Scouts” to “Free Agent Scouts”. This will give you a list of all the scouts that are available to hire.
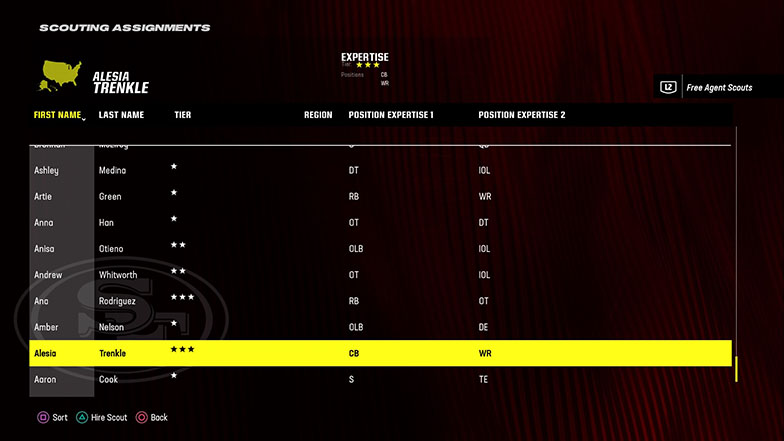
Your team of five scouts must consist of one three star scout, one two star scout, and three one star scouts. This means it’s important that you best line up your three star scout with a balance of your team needs and the draft class’ main national strengths.
Since you’ve already used the “Region Breakdown” screen to take a look at where this draft class is strong, it’s time to go through the available scouts and make your hires. Once you’ve found a scout you’d like to hire, simply press triangle (or Y) when they’re highlighted to bring them on board.
Once you’ve hired your full team of five scouts, it’s time to assign each scout to a specific region. Since you’re only allowed one three star scout on your team, it’s very important that you make sure they’re assigned to National in order to get the most use out of their abilities.
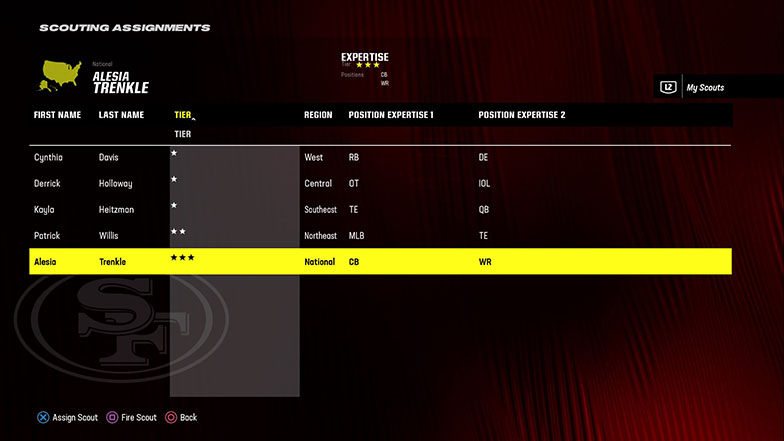
After assigning your three star scout to the National level, you can then mix and match the rest of your scouts across regions to best fit each region’s strengths as well as your team needs.
Once you’ve finished assigning each scout to their respective regions, you’re done with the Week 1 tasks of the set up for the scouting process.
Regional Focus Scouting and Mock Draft 1 (Week 3)
Your next step of hands on action for the scouting process comes when you reach Week 3 of the Regular Season.
The main task during this week will be the regional focus scouting. This is when you set in stone which scouts will be in charge of each region during the year, as the region assignments can’t be changed following this week.
Despite having already assigned a region to each of your scouts in Week 1, the game can sometimes have a mind of it’s own and move some around.
Due to this it’s best to just check in and make sure that each scout is overseeing the correct region before you move on to where the regional focus assignments can no longer be changed.
To do this, simply select “Regional Focus Scouting” from the home tab of the Franchise Mode main menu, followed by “Choose Regional Scouting Focus”.
From there you can make sure each scout is assigned to the correct region, as well as choose a specific position from their scouting specialties to focus the most heavily on.

Week 3 is also when the first mock draft of the season is available for you to view. The mock draft is a prediction of which teams will take which players based on a combination of the available pool of prospects, the draft order of the teams, and each team’s specific needs.
This mock draft will be the most inaccurate and unreliable as many things will change between Week 3 and the draft, such as the draft order of the teams and players moving both up and down the board.
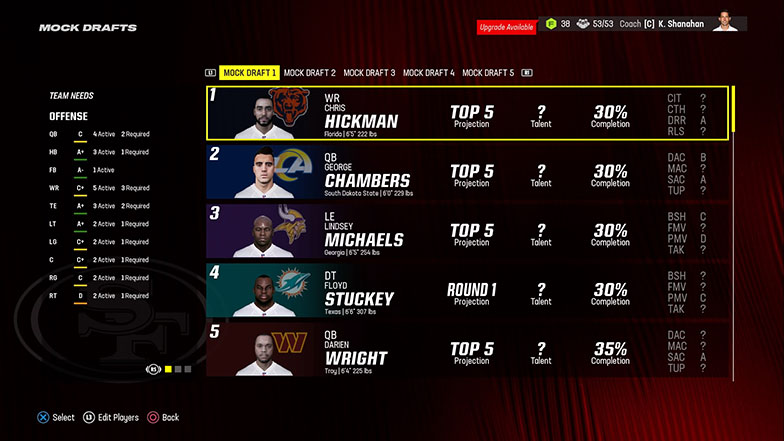
Despite these inaccuracies you can use this first mock draft to get an idea of the general range that some players are expected to be taken in.
Scouting National Focus and Mock Draft 2 (Week 8)
Week 8 of the regular season is the most simple of the directly hands on portions of the season’s scouting process.
Your main task in Week 8 is to set your national scout’s most heavily focused position in stone just as you did with your regional scouts back in Week 3. You can access this by selecting “Scouting National Focus” from the main menu of Franchise Mode followed by “Choose National Focus Position”.
This will allow you to confirm the selection of focus position you made all the way back in Week 1, or even change it if something has caused you to need to change course as the season progressed.
Week 8 is also when you’ll be able to view the season’s second mock draft, where you can take a look at the new predicted draft order and if any prospects have moved around the board.
This mock draft will be slightly more accurate than the one you looked at back in Week 3, although it will still have it’s fair share of difference due to events that happen between now and the actual draft.
Prospect Spotlight and Focus Scouting (Week 11)
Prospect Spotlight
In Week 11 of the regular season, your first task will be to take a look at the prospect spotlight. This will be a cutscene where you’re given a suggestion from your Assistant GM as to a specific prospect in the upcoming class that they think you should take a closer look at.

After you’ve talked to the Assistant GM about this prospect, you should take a second to look more in depth at their suggested prospect and assess their skills to see if there’s anything about them that you missed.
The prospect that they suggest isn’t necessarily guaranteed to be good and you’re not obligated to draft them, but it is worth at least taking a second look at them.
Focus Scouting
The much more important part of your scouting related tasks in Week 11 is the Focus Scouting. Focus Scouting allows you to choose three prospects that you’d like to really focus your team’s scouting efforts on to get a better picture of who they are as a player.
The three players you choose to use your focus scouting on will receive a massive boost in the percentage of scouting done on them, allowing you to get a much more in depth picture of where some of there skills are at to help you get an idea of what you plan to do when it’s time for the actual draft.
To begin choosing which players you’d like to use your focus scouting on, you’ll need to select “Scouting: Focus Player” from the home tab of Franchise Mode’s main menu, followed by “Choose Focus Players”.
This will then present you with a view of all the available prospects in the upcoming class.
Even if you already know what three players you’d like to use the focus scouting on, make sure to take your time to look through the class, as the focus scouting will give you a massive boost in the knowledge of these players so you want to make sure you use it on the right players for you.
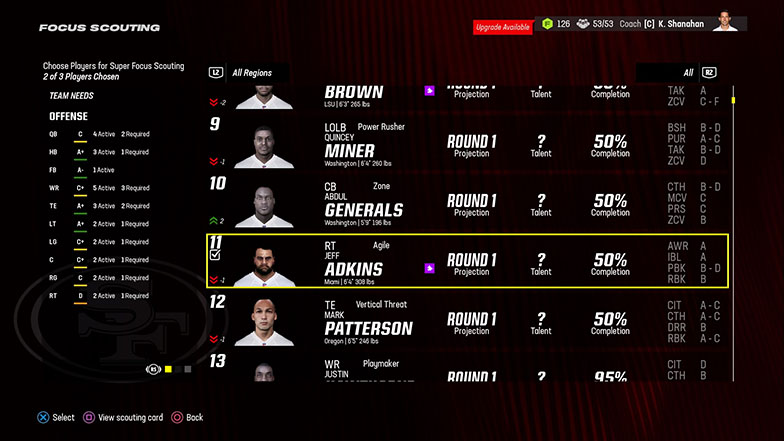
You can choose a prospect to use your focus scouting on by pressing X (or A) when that prospect is highlighted. Once you’ve chosen your three prospects you can confirm your selections by pressing triangle (or Y).
To see the most benefits out of your focus scouting selections I’d suggest you keep two factors in mind: which prospects are you already interested in but still have some questions about, and what positions are already being focused on by your scout’s regional and national focuses that you set back in Weeks 3 and 8?
By choosing prospects you already have some interest in but don’t have fully figured out, you can be sure that you’re getting more info on intriguing players to help you make the best decision possible come actual draft time.
By keeping in mind the positions that you already have either a regional or national focus on, you can consider using your focus scouting on a player that doesn’t fall within those positions, you can help make sure you have as much information on as many prospects as possible.
For example: if you’re choosing between using the focus scouting on a LB or a WR and you’ve already assigned your national focus scouting to the WR position, it may make more sense to use the focus scouting on the LB since the national focus scouting will already be doing heavy scouting on that WR.
Once you’ve finished up both looking at your prospect spotlight and choosing your three focus scouting prospects, you’re done with the directly hands on portions of scouting for the rest of the regular season (outside of occasionally checking in to take a look at prospects) as the next portion will come in the offseason.
Combine Results and Mock Draft 3
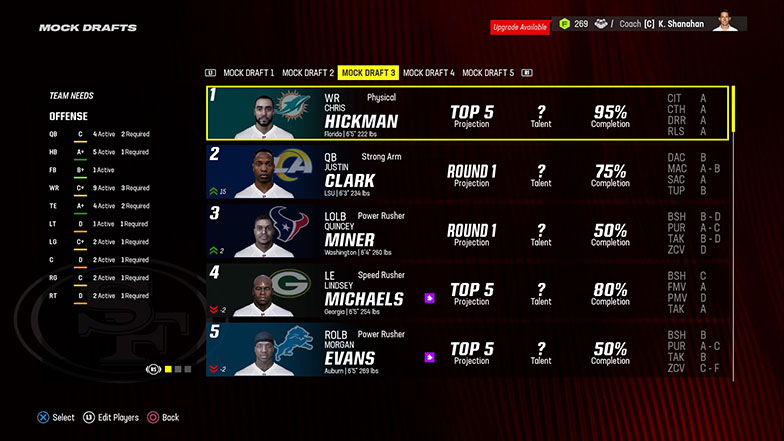
In the re-sign players stage of the offseason following the regular season and playoffs (ideally with your team winning it all!), you’ll be able to view the third mock draft.
This will be the first mock draft following the events of the season, meaning it’s the first mock draft to have a correct draft order (barring any potential trades) that reflects the actual upcoming draft.
This means that mock draft three is by far the most accurate of any of the mock drafts so far, so it’s definitely worth taking a look at to see where some players you’re interested in are projected to be drafted.
The following stage of the offseason, “Free Agency 1”, is a bit more fun in terms of the scouting process. This is because this is the stage where to first get access to the combine results for all of the prospects in the upcoming draft class, which you can access by selecting “See Combine Results” from the home tab of Franchise Mode’s main menu.
This can be incredibly useful, as it can give you a better idea of the physical traits of these prospects. Before the draft, the most information you can get for important stats such as speed and strength is just a vague range such as “good – great”.

But the combine results allows you to get actual measured numbers that you can use to have a much more specific idea of how fast, strong, or agile some of these prospects truly are, which can help prevent you from the mistake of accidentally using a pick on a player that doesn’t quite meet the physical requirements that you thought they did.
College Pro Day Results and Mock Draft 4
The following stage of the offseason, “Free Agency 2”, contains two different hands on tasks for you to dive into for the scouting process.
The first of the two tasks is the fourth mock draft. This mock draft does come only one offseason stage after the previous one (mock draft three in the “Free Agency 1” stage of the offseason), which means that it doesn’t leave much time between the mock drafts for things to change.
However, thanks to the combine results and college pro day results (which is the second thing to happen during this stage of the offseason), there is a decent change of some prospects moving up and down to the board, meaning there’s a chance a prospect you had interest in moves somewhere you previously thought they wouldn’t.
The other hands on scouting related task for you during this stage of the offseason is the college pro day results. You can access this by selecting “See College Pro Day Results” from the home tab of the Franchise Mode main menu.

The College Pro Days, similar to the combine, is when the prospects perform various drills to give teams an idea as to their physical traits. The catch with the college pro days is that these prospects perform them at their schools, which can sometimes lead to their numbers being somewhat inflated, such as a receiver clocking in as faster at their college pro day than they did at the combine.
Due to this, between the college pro day results and the combine results you’ll want to more heavily trust the results that came from the combine as they tend to be more accurate.
But this doesn’t mean that you have to entirely disregard the college pro day results, as they can sometimes still give you useful information. If the a prospect’s stats are similar between the two day event, that tells you they’re likely an accurate representation of the prospect’s true physical traits.
On the other hand, if you happen to notice a significant disparity between the numbers from the two events, that may be enough for you to take a deeper look at that prospect’s talents and even have an effect on how you feel about drafting them.
Private Workouts
The final directly hands on task that will be available to you in the scouting process will come in the last stage of the offseason before the draft: “Free Agency Recap”.
This last task is the private workouts, which you can access by selecting “Scouting: Private Workouts” from the home tab of the Franchise Mode main menu, followed by selecting “Private Workouts” from the two choices you’ll be prompted with.
Once you’ve made those selections the game will present you with a view of all the available prospects from the upcoming draft class. This is where you’ll select which prospects you’d like to bring in for the private workouts.
The private workouts work much like the previously mentioned focus scouting did back in Week 11. The private workouts will allow you to choose three players that you’d like to get much further scouted and learn further in-depth information on.
Here you’ll want to make sure that you really take your time when determining which prospects you’d like to gain further information on, as it’s the last scouting you’ll be able to do before it’s time for the actual draft, so you’ll want to get the most use possible out of it.
Once you’ve determined what prospects you want to bring in for the focus scouting, you can add them to your three selections by pressing X (or A) when the prospect in question is highlighted. Once you’ve selected all three private workout prospects, you can finalize your choices by pressing triangle (or Y).

Which prospects you decide you’d like to bring in for the private workouts is ultimately up to you, but I’d suggest using a different strategy than previously with the focus scouting.
This is because back in Week 11 when doing the focus scouting, it’s still very early on in the overall scouting process, so I suggested to use the focus scouting on players that are outside the positions already being focused on by your national and regional scouts in order to make the most use of them.
However, now that we’re only one offseason stage away from the actual draft (and there’s a solid chance that drafting will be the very next thing you do after this), I’d suggest instead using the private workouts on prospects that you are heavily considering drafting but don’t quite have fully scouted.
If you use the private workouts on this kind of prospect that you’re strongly considering drafting, it can allow you to reach 100% scouting with them, giving you every bit of information on that prospect.
With it being so close to the actual draft, this will let you get that final portion of scouting done for them, so you can assess them as in depth as possible, either allowing you to solidify which player you’d like to target or even getting new information on them that was worse than you expected causing you to take them off your board entirely to try to prevent drafting a bust.
After you’ve finished deciding which three players you’d like to use your private workouts on, you’re done with the scouting process! Maybe take one more look at the available prospects so you can form a plan of attack, and it’s time to move on and start the draft!