Valorant’s Pearl map brings a lot of unique things to the table. Pearl will try to challenge players to adjust accordingly with all the verticality on the map.
There are some ramps, stairs, towers, and dugouts that can challenge your aim or crosshair placements. However, these are the challenges that Pearl brings to the table as it brings you to a city-like map with a ton of narrow areas.
The lineups will also be more difficult for some agents, but someone like Sova will definitely enjoy all the narrow walls he can bounce his arrows on and make things interesting.
It will be difficult to find other lineups on other agents like Viper because of all the high ceilings, but it is possible.
In this brief guide, we will show you all the best Pearl lineups in Valorant for all relevant agents. This guide will include Cypher’s cameras and Sage’s walls too.
Sova Pearl Lineups
Attacking Side
B Site
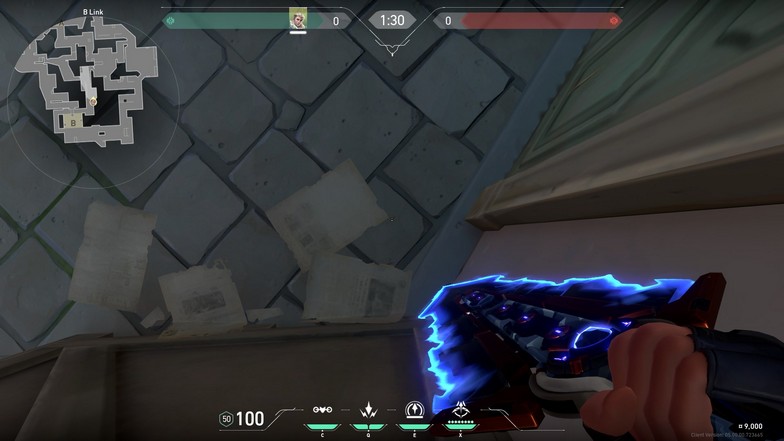
From the B Link area as an attacker, hug the corner of the box on B Link. Your position is relatively safe as long as you have teammates near you. Try not to peek from B Link yet and communicate with your teammates that you have a Recon Bolt for A Site first.
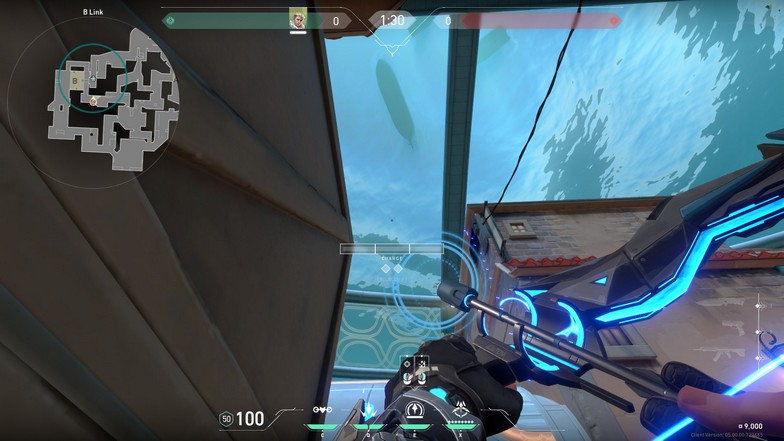
From the position on the position on the box, use the image above as a reference. You can align the rightmost part of your charge bar to the pillar on the dome or use the box’s top corner and align the charge bar there.
Use a no-bounce tap for your Recon Bolt. Tap, meaning you won’t be charging your shot, and just tap your mouse button for the shot.
The Recon Bolt will land on top of B Tower, where there are grills on the roof. It will detect anyone inside B Tower and the surrounding area close to B Site.
The lineup will not cover B Halls unless they go outside. This lineup is great because even if you have B Tower smoked, you can still detect enemies if they are not careful. You can even shoot through the wall or smoke if you ever detect an enemy inside the tower.
A Site
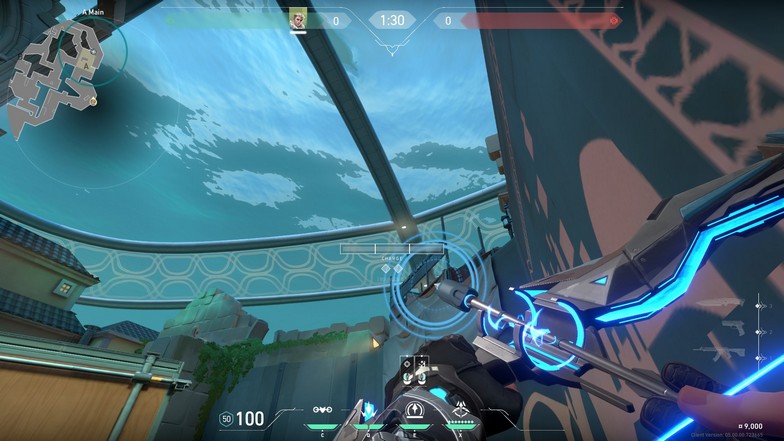
From the corner of A Main and behind the box, align the 2nd bar of your charge bar on the tiny light on the pillar of the dome. Adjust your crosshair down a little bit until it looks like the one on the image above.
Jump and then shoot a no-bounce, no-charge (tap) Recon Bolt. The Recon Bolt should land on top of the corner wall, where it will be hard to shoot for the defenders and detect incoming players on A Secret and the back of the site.
It will not cover players hiding in the little corner of A Dugout and the tiny cubby near the entrance.
Defending Side
B Site
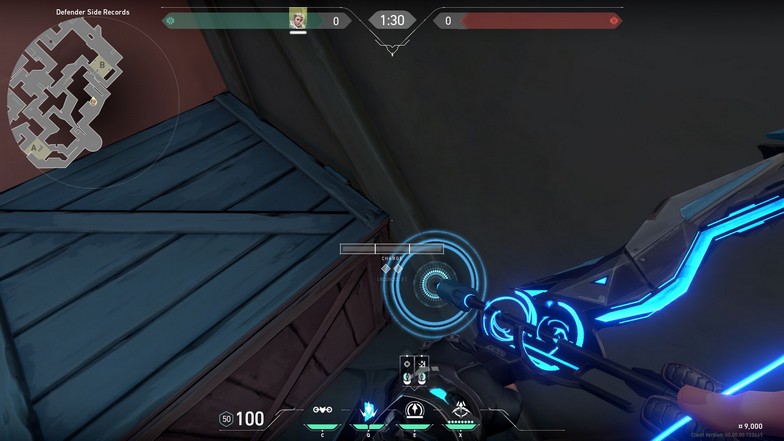
This lineup will be for an A site retake where you can support your teammates taking the site or get general information about the enemies’ whereabouts.
The Recon Bolt will scan all the ones holding B Main from the default plant. You can use your Owl Drone for your teammates to clear B Halls.
Set up your position on the corner of the small box near the defender side spawn.
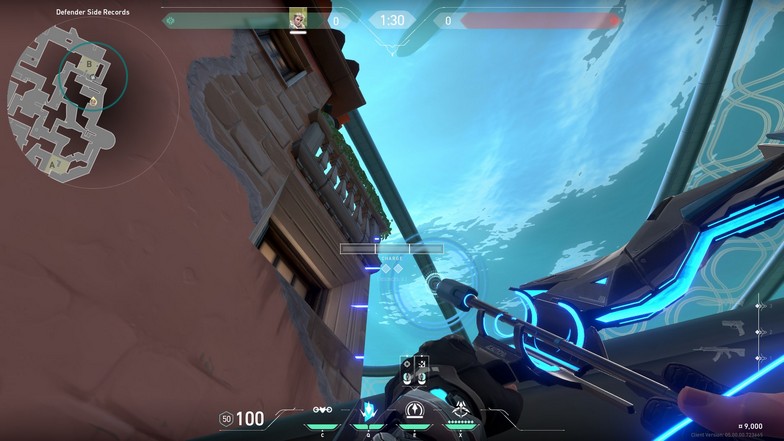
Aim your crosshair next to the leaf and move it to the middle of the pillar and the leaf. Use a no-bounce instant-charge (tap) Recon Bolt, and it should land on top of the wall and clear all the areas near the entry, including one part of B Halls.
Everyone holding B Main will be forced to stay back. As mentioned before, you still need to clear B Halls since it is hard to use utilities to clean that area up.
A Site
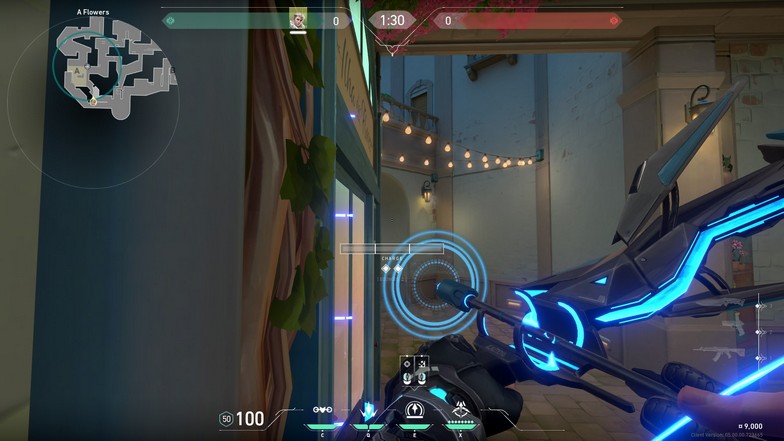
For this Recon Bolt lineup on Pearl, go to A Flowers and jump on top of the tiny box looking over the window. Aim your crosshair on the wall of the entryway. It should land on the corner of the wall near the top of the roof, which makes it hard to hit.
The Recon Bolt should scan everyone peeking on A Main, the cubby area inside the site, and A Link.
Viper Pearl Lineups
These Viper lineups will be focused on post-plant situations with Viper’s Snake Bite.
A Site
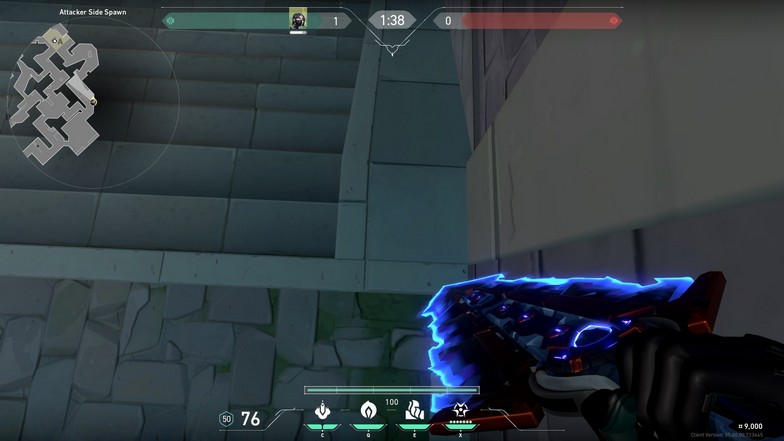
For the post-plant situation on A Site, plant the spike near the box (default) where it is also open from A Main. Run to the attacker’s side, spawn and hug the corner on top of the stairs. Use the image above to get the exact location.
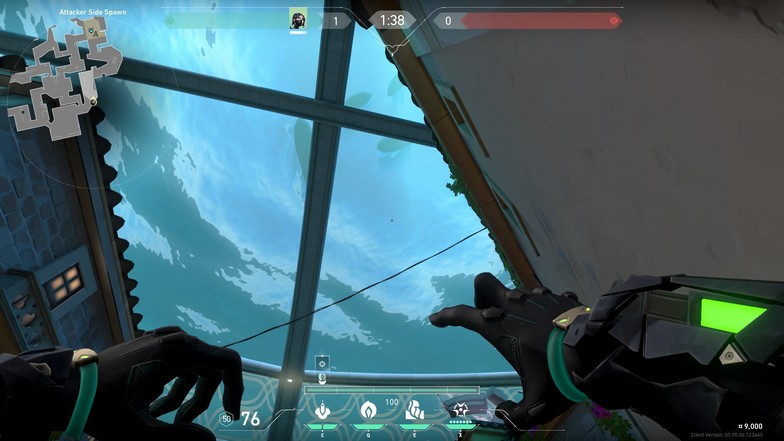
Align Viper’s long toxic charge bar on the pillar and adjust it a little so it looks like the image above.
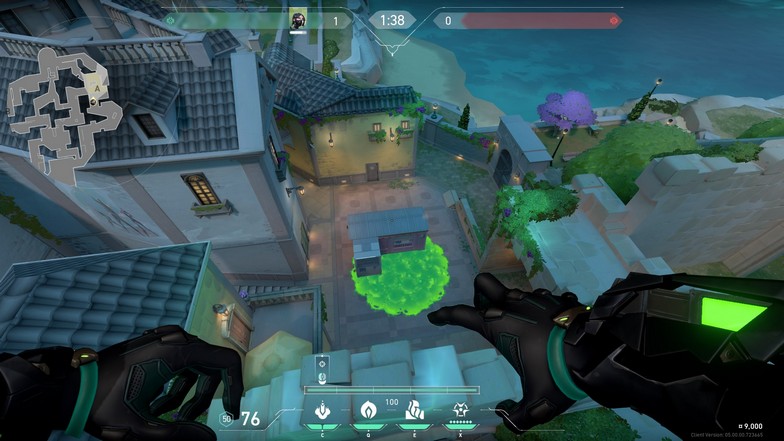
The Snake Bite should land directly next to the box in A Site.
B Site
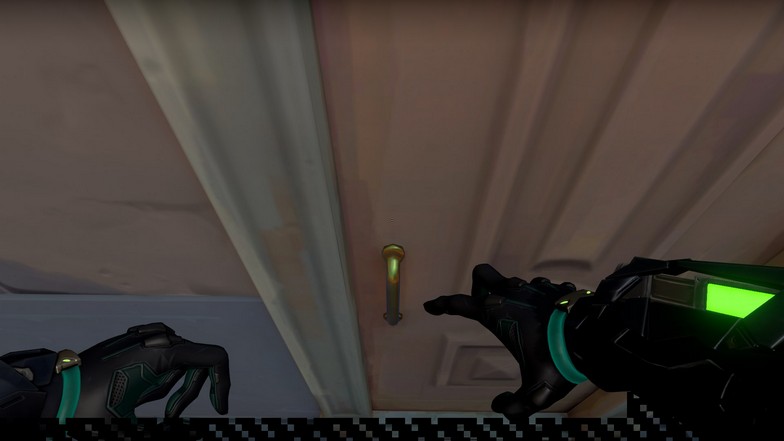
For this lineup, position yourself next to the door in B Link or Mid Doors by aiming your crosshair on top of the door handle. This door position is similar to Sova’s lineups in Ascent.
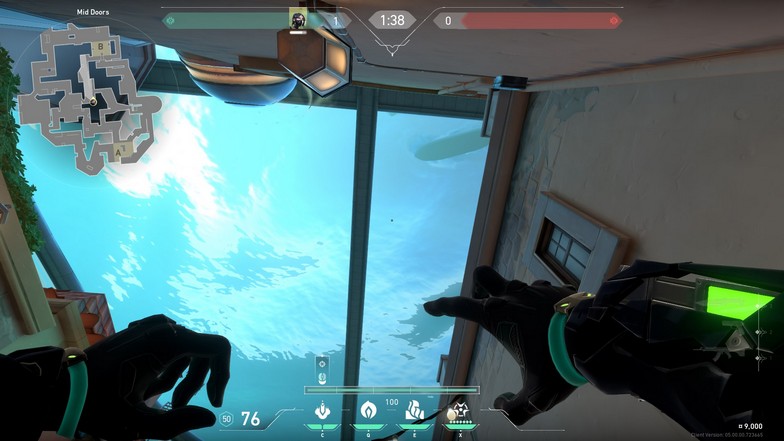
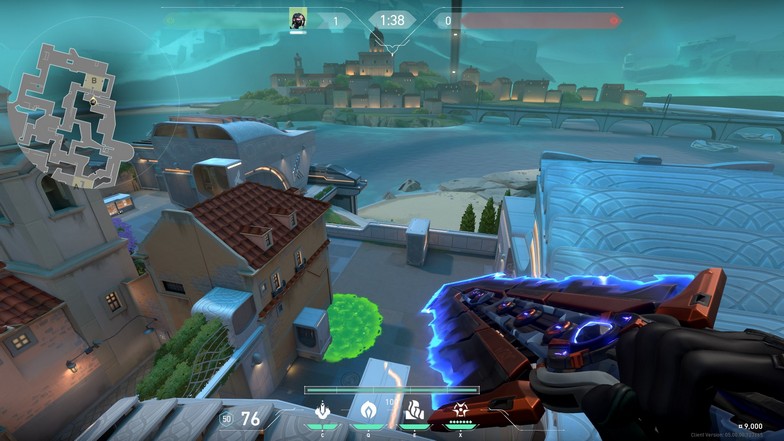
The image above has no clear markers but what I usually do is align Viper’s index finger on top of the little chimney. Since Viper’s hand moves, while you have Snake Bite out, I adjust the lineup by also looking at the rightmost tip of the Snake Bite’s tooltip and making sure the tip touches the dome’s pillar.
Brimstone Pearl Lineups
Brimstone’s lineups will also focus on post-plant situations.
B Site
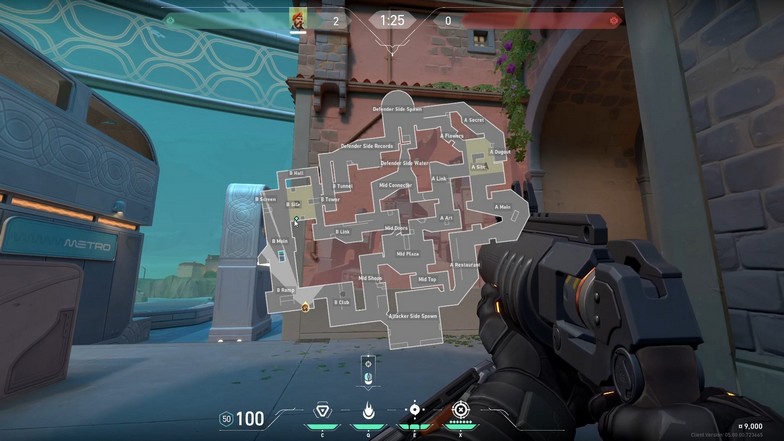
Brim’s lineups in Pearl are extremely hard to execute. If you know how to play Brimstone, you know his molly bounces before completely landing on the ground. It makes everything harder.
For this lineup, position yourself in B Ramp and align yourself directly linear with the spike plant near the box on B Site. You can open your map and ping it for a quick reference. Just remember to stick to the wall behind you.
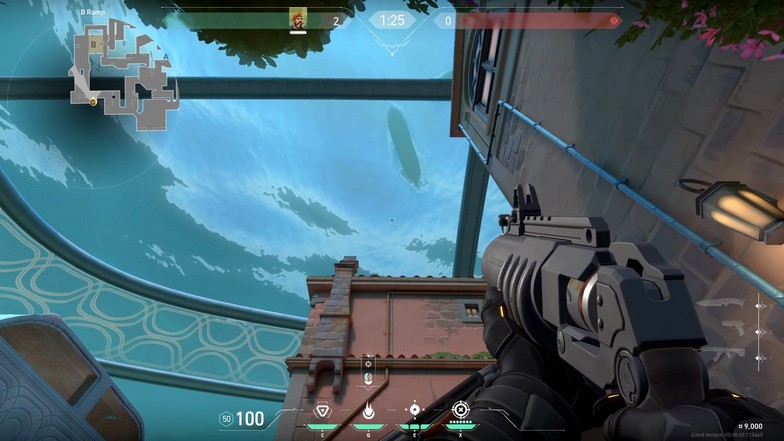
Place your crosshair on top of the 3rd curve on the roof and slowly move it up until the tiny dot on top of your molly tooltip reaches the 2nd-floor ledge of the building in front of you. Use the image above for the exact reference.
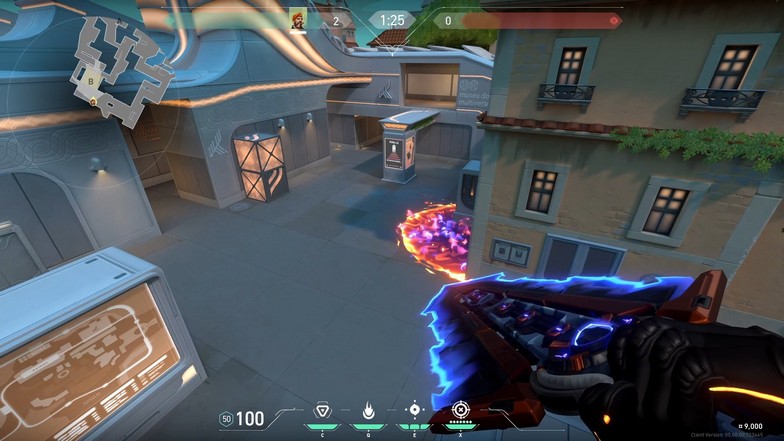
The molly should bounce on top of the triangular tower bounce all the way back to the default plant location. It will take a while before the molly lands on the spot, so make sure to time it correctly. If the spike is already being defused and you haven’t thrown the molly yet, you are already too late.
A Site
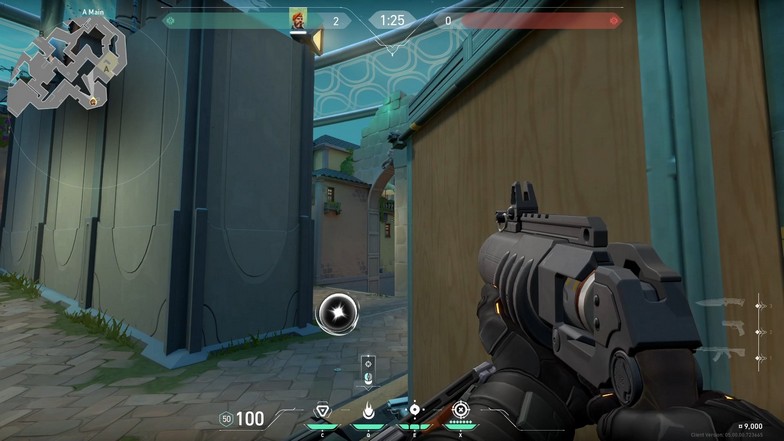
For the A Site lineup, it is insanely easy because you just need to aim at the window with the yellow wall. As for the position, you just need to hug the dumpster or box in A Main and peek on the left side.
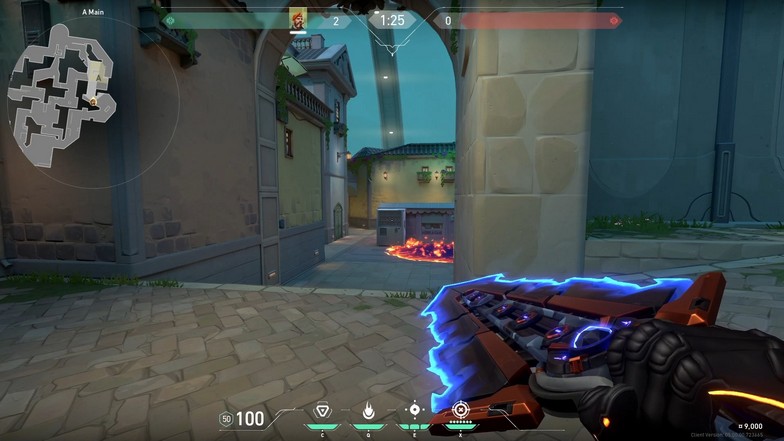
The molly will bounce off the wall and hit the middle where the spike is usually planted for an A Main post-plant defense. Be careful because you will be open to enemies pushing A Main.
If it is a 1v1 situation, just wait for the defender to tap the spike before using the molly.
Killjoy Pearl Lineups
B Site
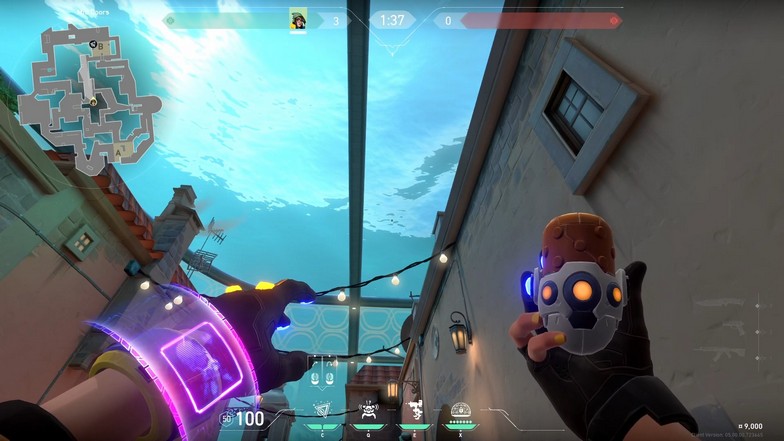
Using the same position as Viper’s Snake Bite lineup, align your crosshair on top of the chimney and slowly move it to the left until the leftmost corner of the round timer tooltip hits the pillar of the dome on top. Use the image as a reference.
Throw the molly, and it should land exactly on the B Site default plant, which is also seen on the minimap in the image above.
A Site
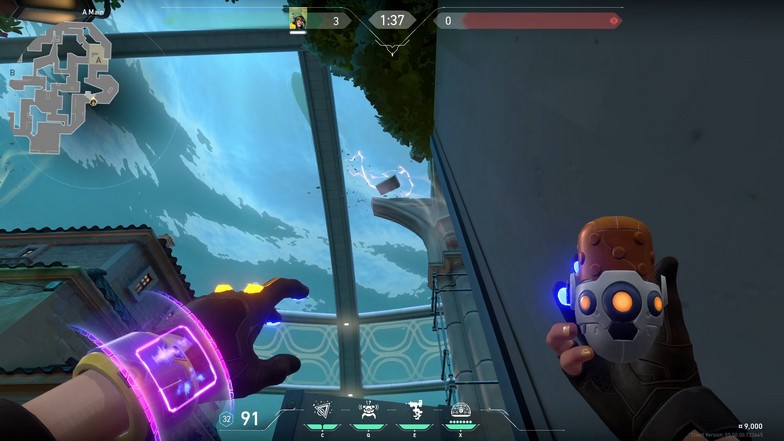
For the A Site default plant lineup, position yourself in A Main near the attacker spawn and hug the corner before going down the ramp. Aim your crosshair on the curvature of the pillar in front of you.
Ping the exact location of the spike to get a reference of your x-axis. You can throw the molly even if you haven’t planted the spike yet or even if the enemy hasn’t tried to defuse the spike yet.
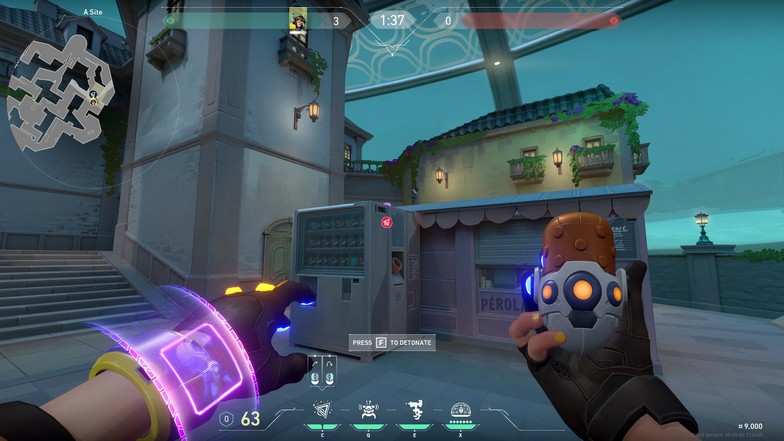
The Nanoswarm should land on top of the box, but if you detonate it, it will still damage the enemy defusing and cover the whole spike area.
Fade Pearl Lineups
A Site
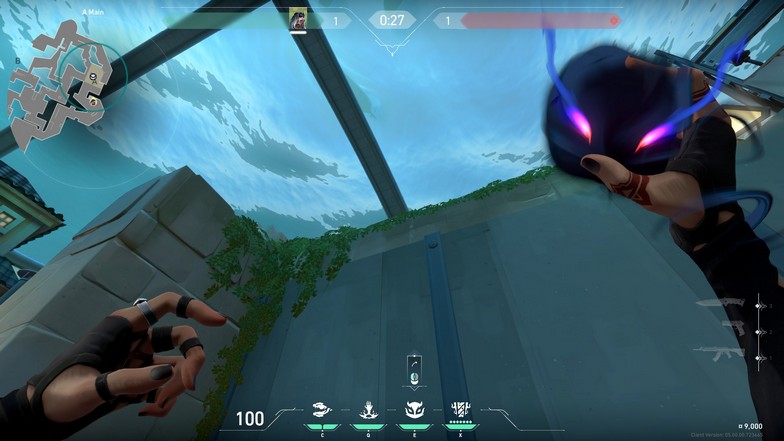
Fade’s lineups are all simple since her Haunt ability has a max range because of its maximum duration limit while in the air. Go to A Main and do a running jump while looking near the pillar.
The Haunt will land on top of the box in A Site and reveal everyone near A Site except for the A Dugout (if the player there isn’t peeking).
B Site
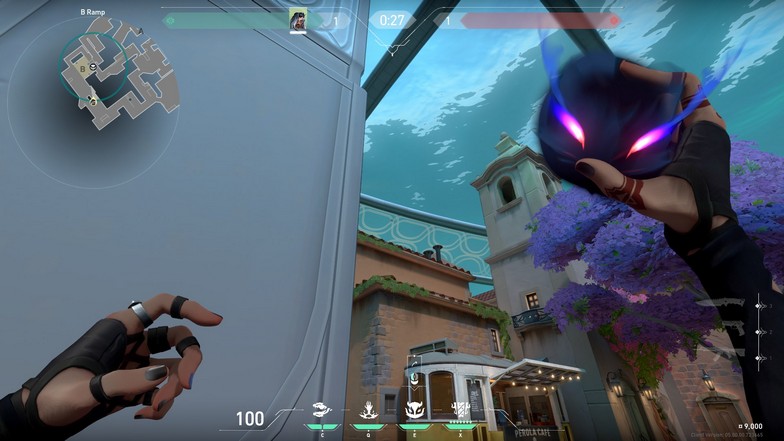
For a B Site push, go behind cover in the middle of B Ramp and do another running jump over the buildings. Use the image for reference.
The Haunt will land in B Site near the B Tower and also cover the rotations coming from B Link. If you adjust the Haunt throw more on the left, it can also land on top of the tower, but it will be easily destroyed.
KAY/O Pearl Lineups
A Site
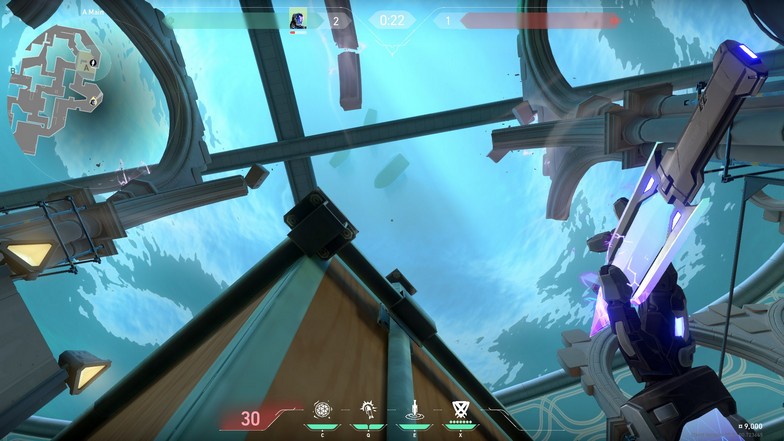
KAY/O’s lineup is easy since you have room for errors. Position yourself on the leftmost corner of the box in A Main. Place your crosshair on the tip of the metal piping and slowly move it up until your crosshair is aimed as high as in the image above.
There is a little room for error but the perfect knife lands on the ledge of A Dugout. Since A Flower and A Secret are usually smoked, you can easily check if there are enemies holding inside the site with KAY/O’s knife.
B Site
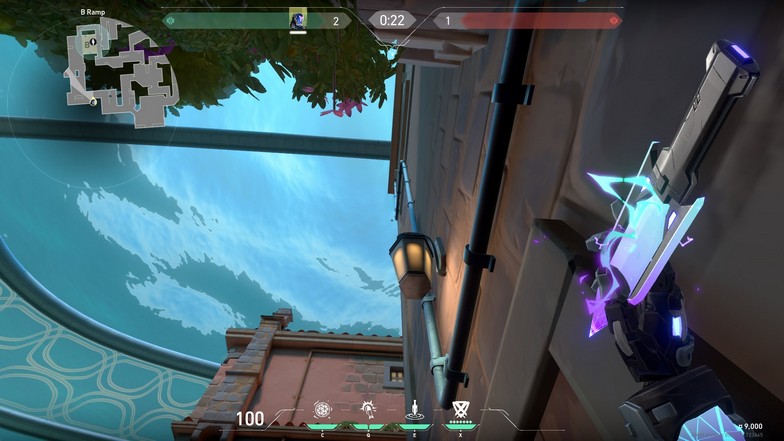
With the same position as Brimstone’s molly lineup before, this one is easier to execute. For KAY/O, hug the corner of B Ramp and place your crosshair next to the pipe as seen in the image.
Throw the knife, and it should land in the middle of B Tower and gain information from B Halls, B Site, and B Tower. Only enemies peeking B Halls will not be tagged, but they should clearly be seen anyway from your teammates pushing B Main.
Sage Pearl Walls
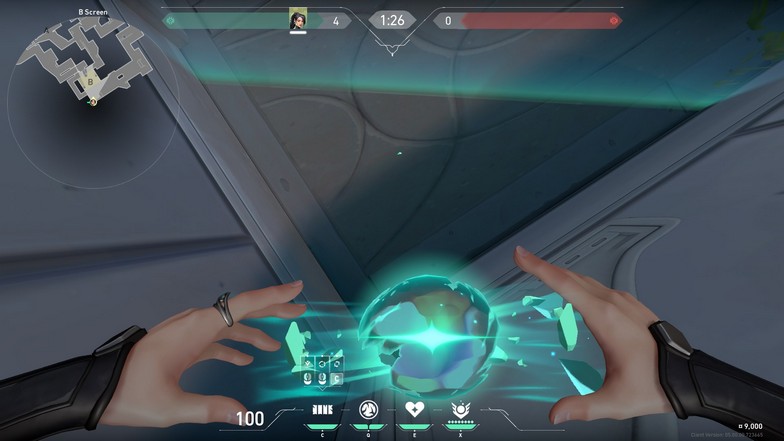
In B Site, go to the corner of B Screen and use a diagonal Sage wall on the corner. Boost yourself up while crouching, so you are a bit hidden from the enemies.
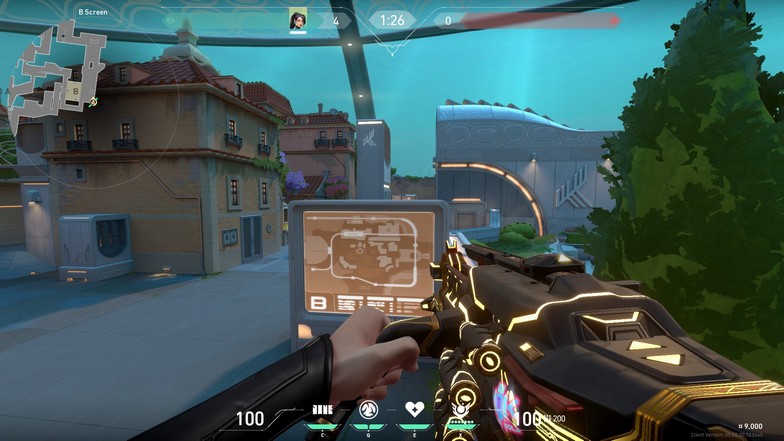
The image above should be your view when crouching. Once you stand up, you will see the enemies pushing from B Ramps. Make sure to have the perfect timing because enemies will always try to learn B Screen when pushing.
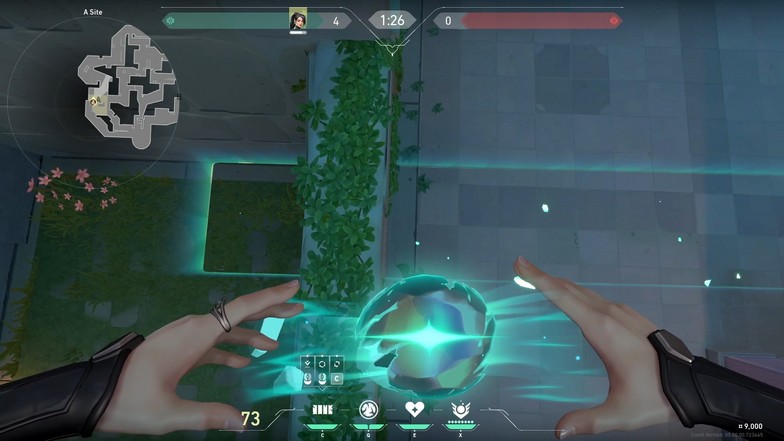
For this next wall, go to A Site and use the ledge near A Dugout to create a wall.
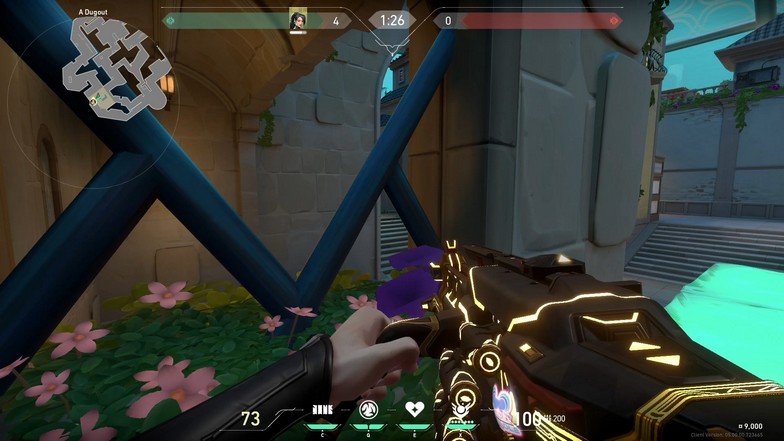
While it may look ridiculous because this wall actually helps the attackers, you can still peek at the tiny window on the left, which can catch enemies if they aren’t expecting it.
Cypher Pearl Cameras
A Site
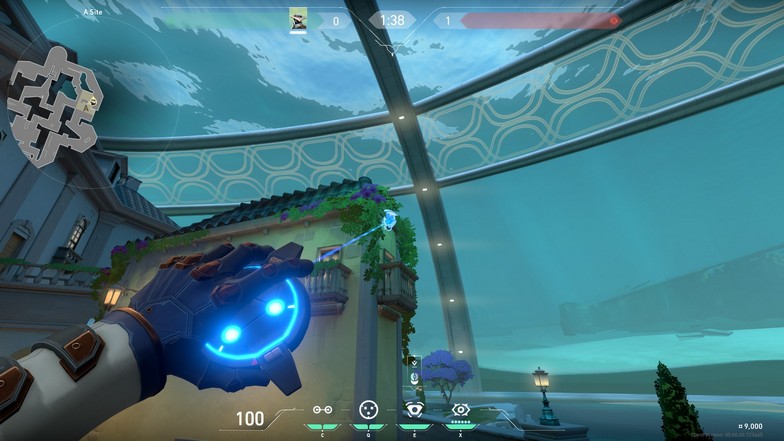
In A Site, place Cypher’s camera on the corner of the wall in A Secret. The camera’s position might not help you tag enemies entering because it is facing the other way, but you can still see the enemies coming from A Main, and the camera is hard to spot because of the leaves covering it.
B Site
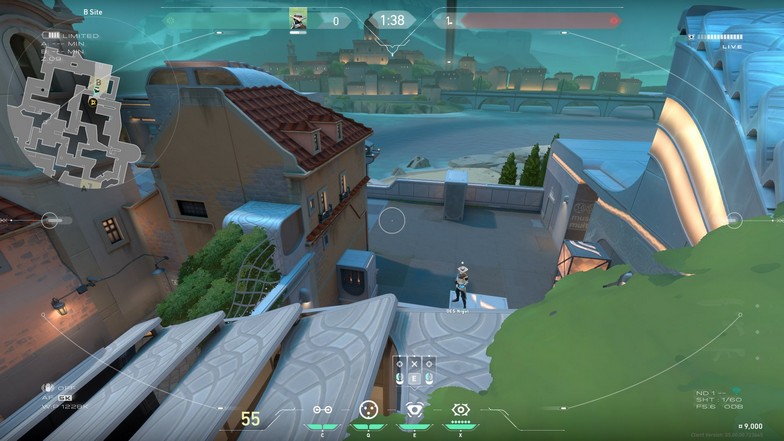
In B Site, you can place Cypher’s camera on top of B Tower, but it is only accessible if you can get a boost from a Sage wall. You can tell your Sage to use a wall on the edge of B Tower and boost you for the camera.
You can also have another teammate boosted for an off-angle peek to B Main if someone has an Operator. That might be too much of a requirement already, but it can be a good idea once a match.

