Sova is one of the most complex agents to play because you will need to research how to play Sova properly and utilize his abilities on each map in Valorant.
The amount of information you need to learn from the most basic lineups to the most complicated double Shock Bolt lineups is too much for an average gamer to learn and master.
It could take months to learn all the maps and even add new lineups of your own when you have enough knowledge. In this guide, we will focus more on the best Sova lineups in Valorant for both Recon Bolts and Shock Bolts.
Each lineup will be explained why it is good, when you should use it, how to position yourself, and how to align it properly. Feel free to browse through the navigation bar and find the specific map or lineup you are looking for.
Recon Bolt Lineups
There are more than a hundred ways you can use your Recon Bolt effectively without having a prepared lineup researched. Sova’s Recon Bolt usage is best used by players who are incredibly familiar with all the maps, including some basic geometry.
Generally, you want Recon Bolts to land on a spot high enough to cover more areas but at the same time, not high enough that it doesn’t scan areas crucial areas you want to clear. An example of this would be in Breeze, where you can hit a high spot, so it is harder to hit and scan more areas, but you end up missing a few angles in the A Site (Default) or B Site (Back Site).
The lineups listed below will focus on the most useful ones that need to be practiced and can heavily affect your team’s chances of winning the round. These Recon Bolt lineups can either support your team through smoke bangs, wall bangs, post plant retakes, cross site information or even get yourself a kill with a delayed one.
Ascent
Ascent is a simple map with a lot of high walls and short angles to cover. It makes Sova insanely great on the map because of how easy he can gather information compared to a map like Fracture.
B Main for Fast B – Push
Bounce: One
Charge: Max
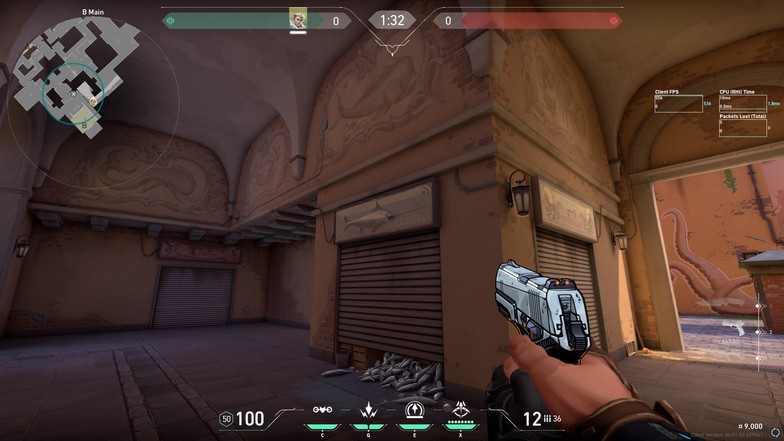
For this Recon Bolt lineup, you want to aim exactly at the mouth of the swordfish portrait shown on the image above. You hug the box near the B Main orb and use a one bounce max charge to hit everyone close including those hiding near the switch, market, and logs.
It is easy to do, and you can have many variations since your goal is just to go fast with your team without even having the need to use your Owl Drone.
Since smokes will likely be placed on the B Main entrance, your team can smoke the defender’s spawn entry to B Site and B Market. When this Recon Bolt scans enemies, your teammates can actually wait near the smoked B Main entrance and wait until someone gets scanned so they can shoot them through the smoke.
Top Mid to Mid and B Market
Bounce: One
Charge: Max
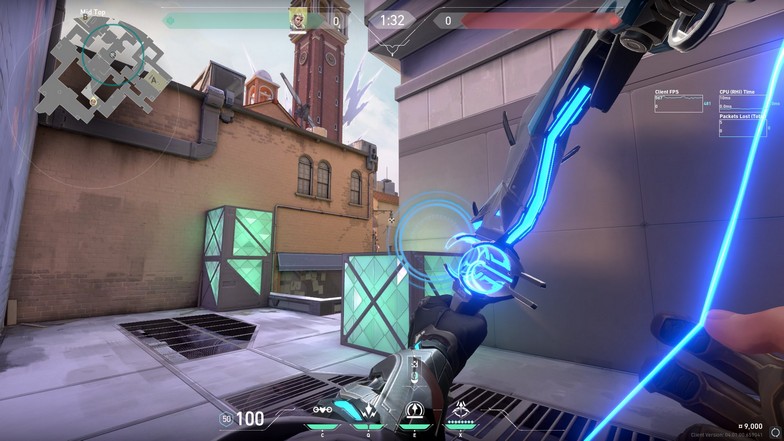
Aim at the lamp seen in the image above and use a one bounce max charge to hit everyone peeking middle. It is a simple one that doesn’t even need a specific position for you to land the Recon Bolt.
It prevents any pressure for your team when you are trying to gain mid control. When you see a Sage wall mid, you can save your Recon Bolt for a better one unless your team wants to safely clear the middle.
B Switch to A Main
Bounce: None
Charge: Two
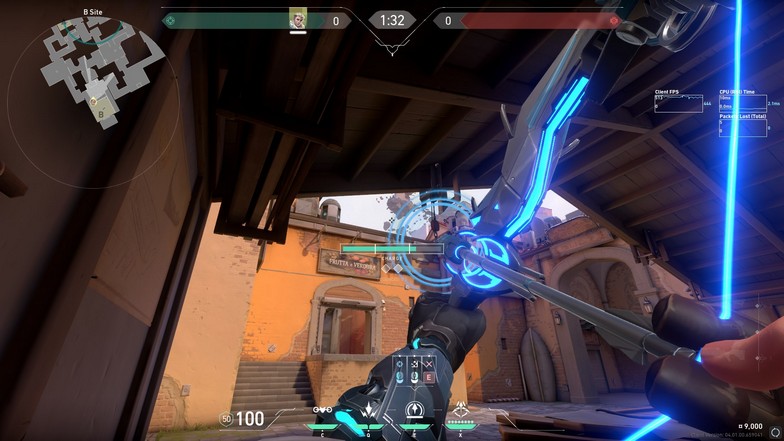
Place your crosshair on the upper-right side of the tiny cloud on the image above. Use a no bounce two charge for your Recon Bolt, and it should land on A Main. It does not cover A Site, so make sure to use this Recon Bolt when they haven’t completely committed to a push yet.
Since A Main is likely smoked by your teammates when they hear enemies coming near, you can use this Recon Bolt so your teammates can aggressively smoke bang through A Main.
B Main to B Site Stairs and Market
Bounce: One
Charge: Max
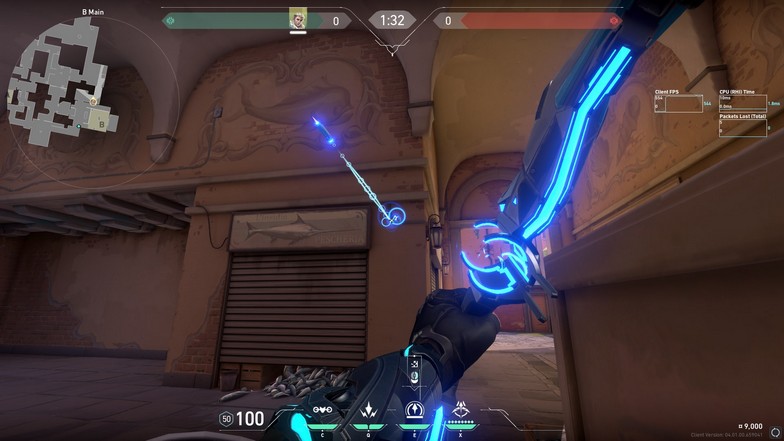
Aim at the little square near the pipe and use a one bounce max charge. This will land on a door frame for defenders looking towards B Main. It also hits B Market and the stairs in B Site, where defenders usually position themselves.
You can use your Owl Drone to cover the closer angles and you can absolutely gain all the information for the whole B Site.
B Main to B Site
Bounce: None
Charge: Max
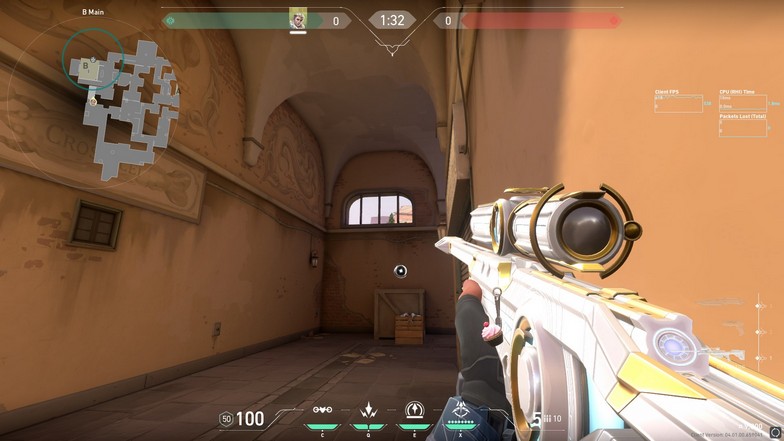
Aim directly on the tree from the window. You have to aim a little higher (on top of the tree) and use a no bounce max charge. The Recon Bolt will land on the tree and cover B Site, including the stairs. It only scans players peeking on B Boathouse, so you still need to clear that area. A simple and easy Recon Bolt lineup to remember.
B Site to B Main and B Lobby – Wall Bang
Bounce: One
Charge: Max
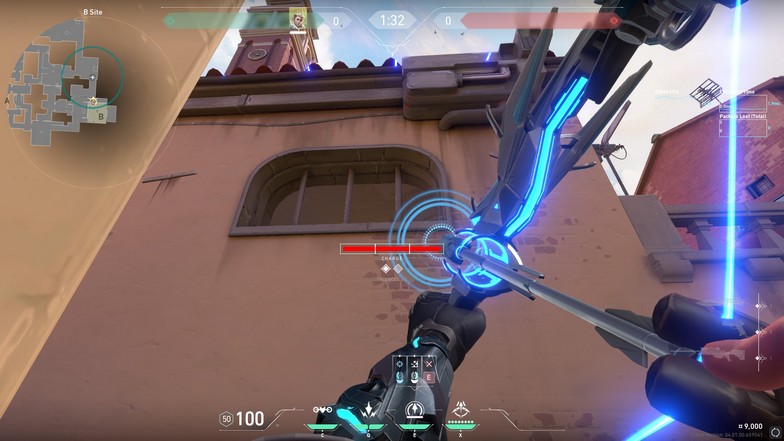
If you have played Valorant for a long time, you should already know that the wall on B Main is a popular wall bang spot. There are two boxes there, where the B Orb is located, so you should remember to aim at the left or right side of the boxes.
Use your charge bar to align just below the window and shoot a one bounce max charge Recon Bolt. Any Recon Bolt shot will actually work, but this lineup also covers B Lobby. You can even aim a little higher and use a two bounce max charge Recon Bolt, and it will still work.
B Market to A Site – A Push Support
Bounce: None
Charge: Two
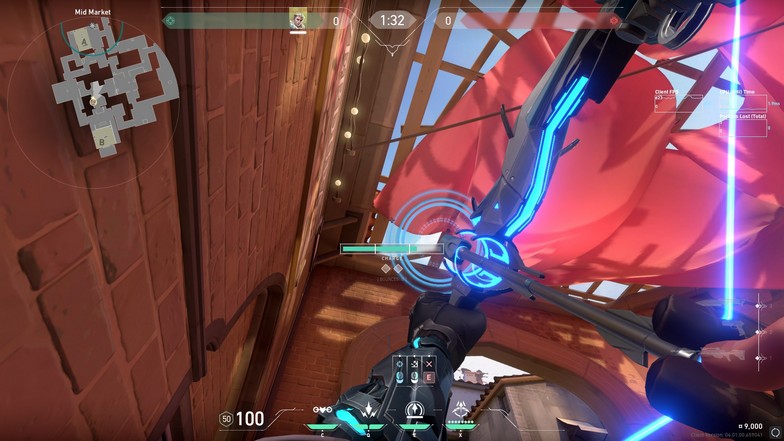
Place your crosshair just to the right side of the wooden plank and the tarpaulin. Use a no bounce two charge (slightly above the second bar marker) and it will land on top of the corner boxes in A Site.
Since Sova can be holding different sites on every round, you can offer support to your teammates by learning this Recon Bolt when you are in the middle or holding B Site. Once your teammates call for a fast A Site push, you can launch this immediately and support them.
Most of the time, your teammates will be smoked off on A Rafters (Heaven) or holding an area near the generators on A Site. The Recon Bolt will give your teammates a lot of easy kills if the enemy fails to shoot it immediately. The arrow will be landing from the sky so it would be hard for them to notice it at first.
A Lobby to A Site – Covers Back of Generators
Bounce: None
Charge: Two
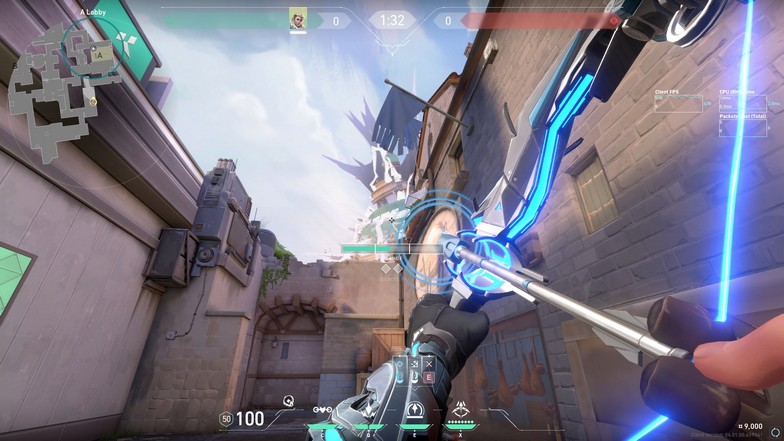
Position yourself in front of the small box (use the minimap for positional reference). Place your crosshair on the middle of the curve of the white crystal thing shown in the image above.
Use a no bounce two charge Recon Bolt. It will land exactly on the wall behind the generators on A Site. If you exceed the two bar charge line, this will land out of bounds. You want around 60-65% charge since if you charge it too low, it will hit the wall on A Main, which is practically useless.
A Rafters (Heaven) to A Hell – Wall Bang
Bounce: Two
Charge: Max
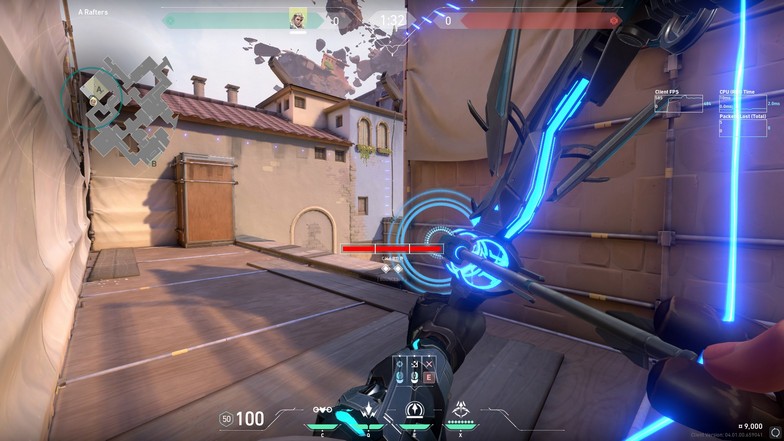
Aim at the top of the metal frame on the box and use a two bounce max charge to hit A Hell. You can wall bang anyone camping in that area from A Rafters (Heaven), which should secure some easy kills during a retake situation.
A Main to A Tree and A Garden
Bounce: One
Charge: Max
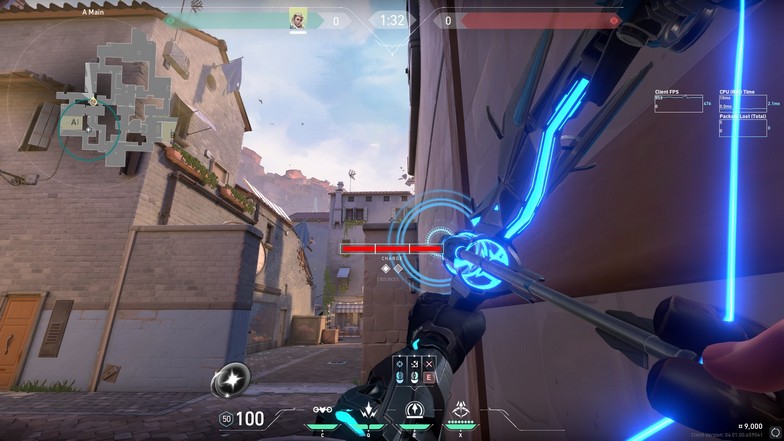
Place your crosshair on the lower-left corner of the window frame as seen on the image above. Use a one bounce max charge, and it will land on a spot near the window on A Garden. It should scan players holding A Garden and aggressive defenders on the middle of A Tree.
It helps your team secure the area fast when you are splitting your A Site push with players on A Main and A Tree.
Bind
Bind is one of Sova’s strongest maps because of the tight corners and long hallways for his Hunter’s Fury. There are a ton of Recon Bolts you can angle without the need for mastering lineups, but there are some lineups that are still useful since Sova can support any site from anywhere with insane Recon Bolts.
B Link to B Hookah
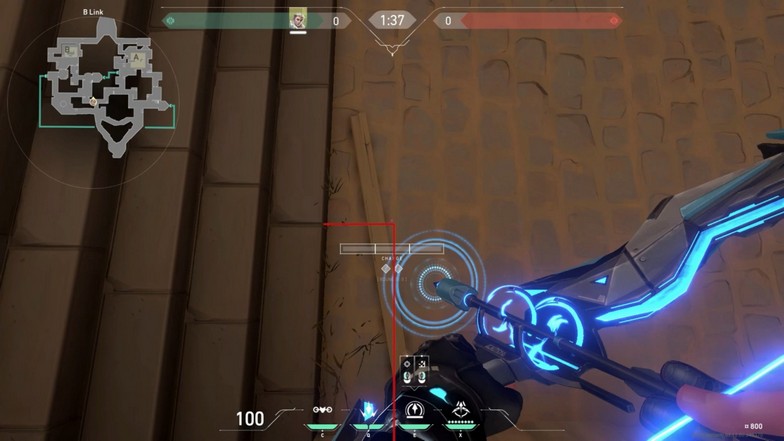
Position yourself near the stairs in B Link so that your crosshair aligns with the image above.
Bounce: None
Charge: Two
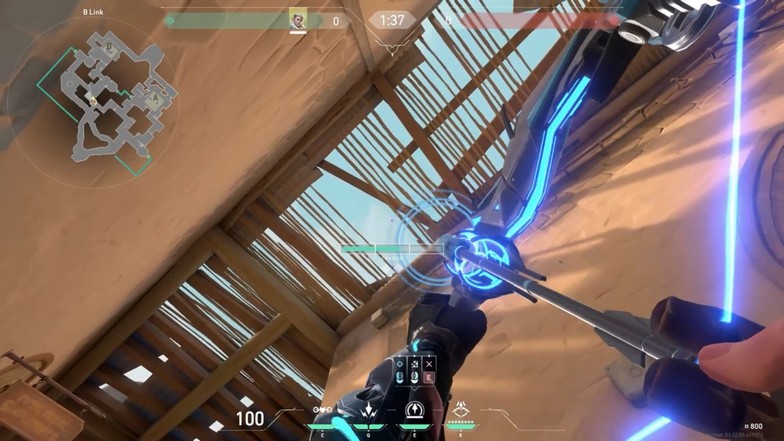
Place your crosshair on the image above. An easier indicator could be the right line below the round timer and aligning it with the wall. Use a no bounce two charge Recon Bolt, and this will land on top of B Hookah and scan the whole area for sneaky campers or aggressive pushers.
B Labs to B Mid
Labs Position
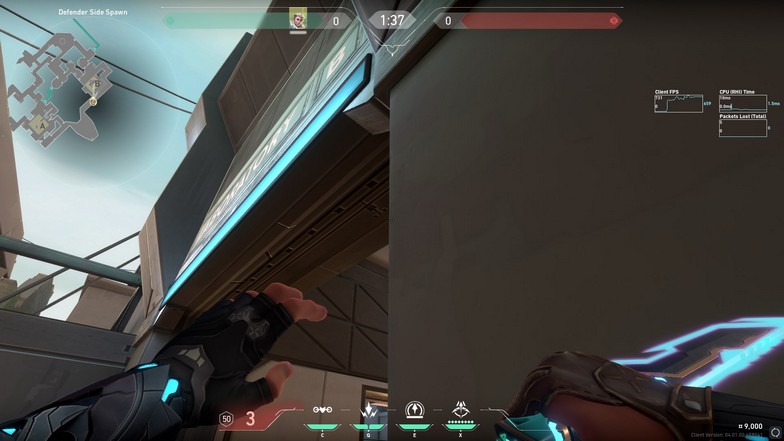
There are a lot of lineups on this spot so it is good to remember this labs spot.
Bounce: None
Charge: Two
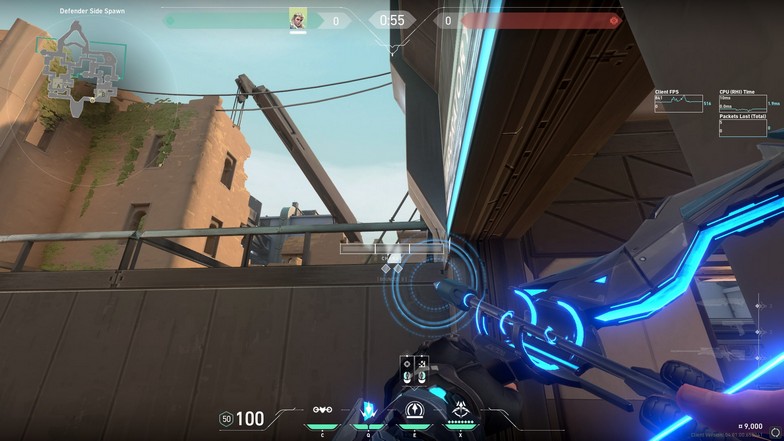
Place your crosshair on top of the metal frame and exactly on the wire shown in the image above. Use a no bounce two charge, and it should land directly at the exit of B Link.
It is a good support Recon Bolt where you can set up your teammate pushing B Hookah for a quick kill.
B Labs to B Site Retake
Bounce: One
Charge: Two
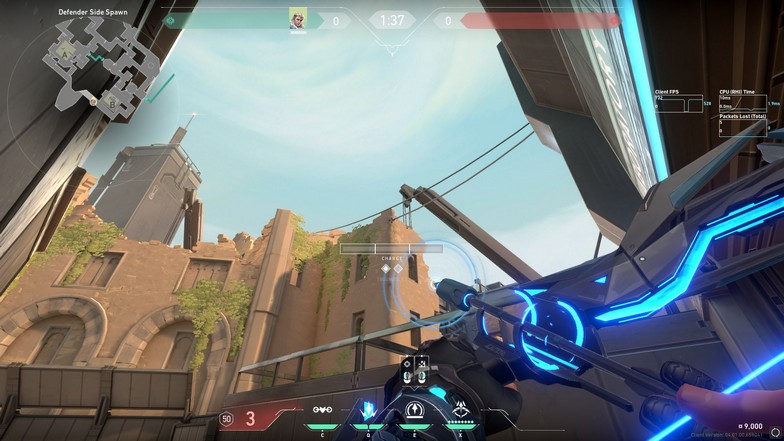
From the same labs position, place your crosshair on the start of the wire near the tip of the wall. Use a one bounce two charge Recon Bolt, and it will land on a high angle near the B Hookah window.
It covers B Site except for the ones holding close to the defender’s entrance. It is a safer way to use a Recon Bolt since you can easily get caught off guard when you try to peek the entrance with your Recon Bolt out.
B Site to B Main / B Fountain Fast Info
Bounce: One
Charge: Max
One Bounce Max Charge
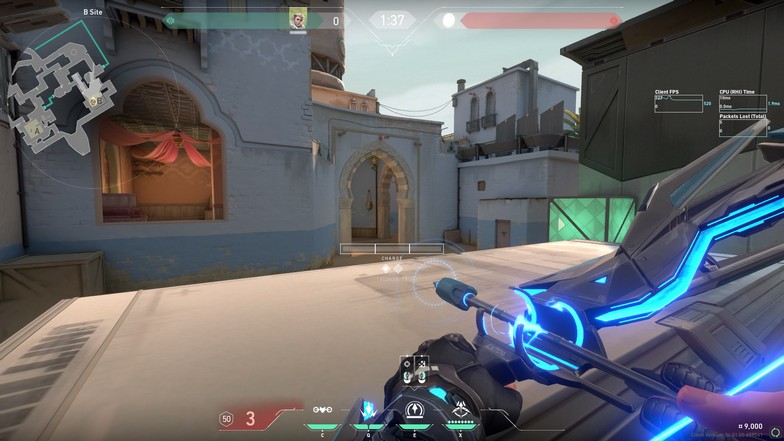
Here is a simple Recon Bolt where it will land on B Fountain but also cover the B Main push. Just get high ground by jumping on top of the box on B Site and aim at the wall. Use a one bounce max charge, and it should give you fast information about the position of the opponents at the start.
B Site to B Fountain and B Main – Short Delay
Bounce: None
Charge: One and a Half
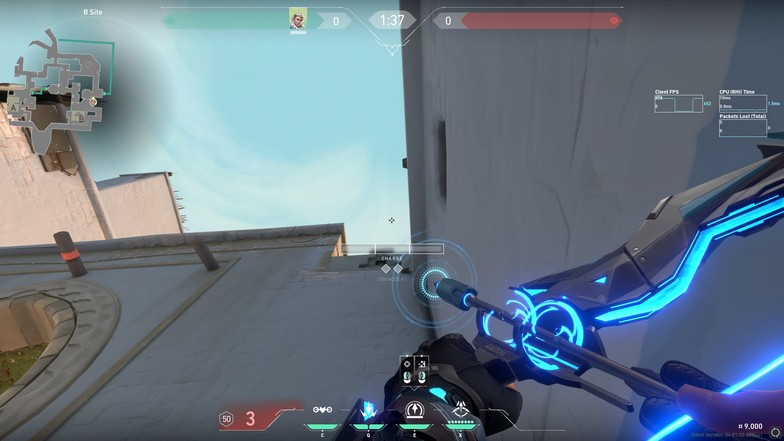
Cover the little box you see on top of the wall with your charge bar. You can also make a square with the tip of the wall and align it on top of the little box connected to the wall. Use a no bounce two bar charge, and it will land behind B Fountain.
Once the Recon Bolt is fired, you have the opportunity to go to B Garden and peek after your Recon Bolt spots anyone. You can perfect the timing on your peek by going a second after you hear the Recon Bolt land.
Breeze
Breeze is another good Sova map. The vast spaces around power positions and the amount of space you have on each site make Recon Bolts and Owl Drones extremely useful. An initiator like Skye is still good but it lacks the information gathering that Sova brings.
However, this is probably one of the maps that dual-initiator team compositions shine the most. Sova’s Recon Bolt does not need to be exactly precise since there are a ton of good spots that do not need a lineup to execute.
Instead, the lineups below will focus on more important setups like retake situations and hard to hit Recon Bolts for specific areas on Breeze.
Defender Spawn to B Site – Retake
Defender Spawn Recon Bolt Position
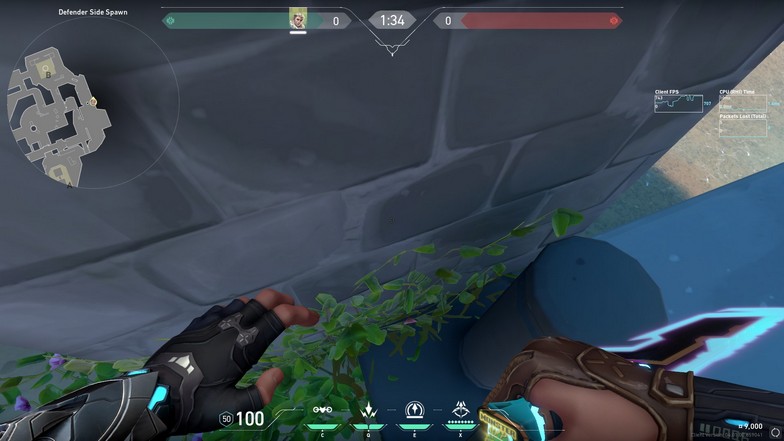
For the first Recon Bolt, use this position on the Defender Side Spawn and hug the corner near the first arches going to B Site.
Bounce: Two
Charge: Max
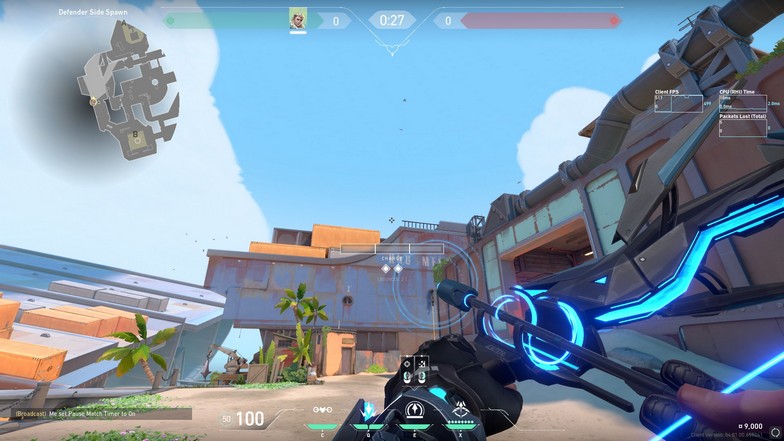
Aim at the wall where the top tip of your 2nd bounce icon goes under the second letter on the wall near A Bridge. Use a two bounce max charge, and it should land perfectly near the entrance of B Main and the upper-right corner of the B Site from a defender’s perspective.
It is a great Recon Bolt for your teammates who are simultaneously pushing B Tunnel and B Main. If it scans nobody, they can focus on the other angles as the enemies should definitely be on the two other corners of B Site.
A Bridge to A Halls – Roof Recon Bolt
For this Recon Bolt, you need to position yourself on A Bridge next to the rope. Do not jump on the ledge and just walk to the lower-left corner of A Bridge.
Bounce: None
Charge: Two
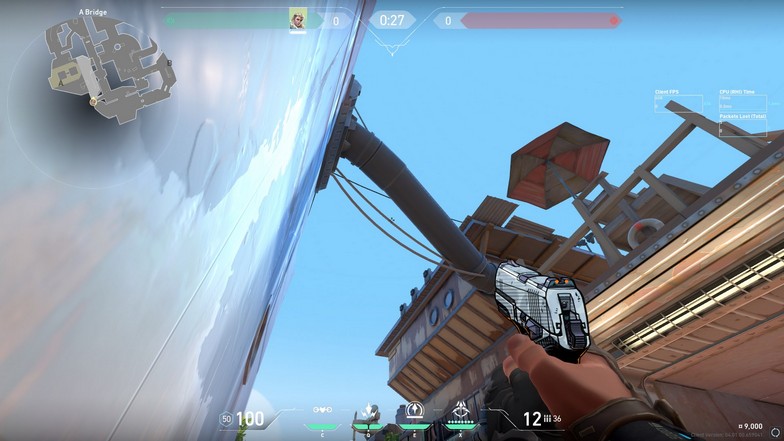
Place the upper-right tip of your Shock Bolt icon on the small tower, as seen in the image above. Pulling out Sova’s bow will block the vision, so you can bring out your pistol first to get used to this lineup first.
Use a no bounce two charge Recon Bolt, and it will land directly on top of the roof on A Halls, which still scans the whole area. The Recon Bolt takes a while to land, so you can position yourself to peek A Halls with an Operator and wait until someone gets scanned when the Recon Bolt lands.
Mid Cannon to B Site – Back Site Recon Bolt
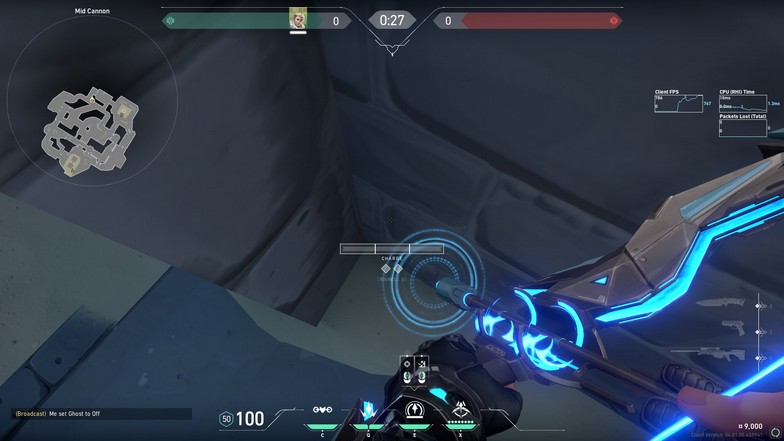
Position yourself on Mid Cannon by the corner before the buy phase shields and next to the B Window entrance. Use the image above as a reference for the position.
Bounce: One
Charge: Max
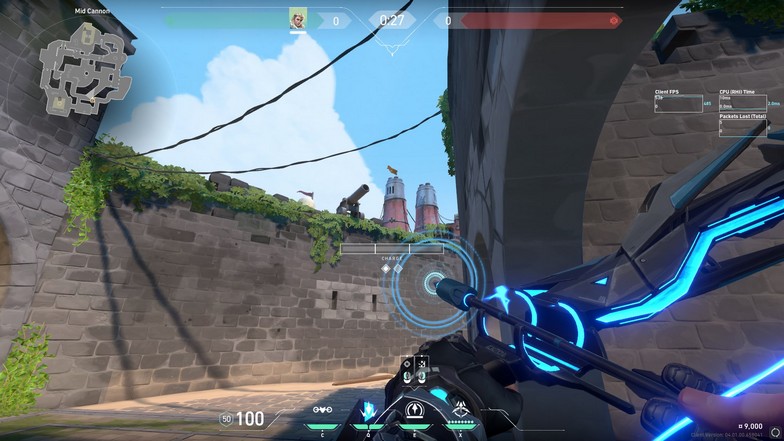
You will see two red towers (silos?) and aim at the first one. This red tower has a little panel, and when you look closely you will see a square outline on it. Aim directly at the bottom of the square panel and use a one bounce max charge Recon Bolt.
This Recon Bolt will scan the whole back site of the B Site, which is a little tricky to hit when you are pushing since you will be open from enemies when you try to peek. Make sure your team pushes along with the scans, so they know which areas to look first.
Mid Bottom to Mid Doors Recon Bolt – Wall Bang
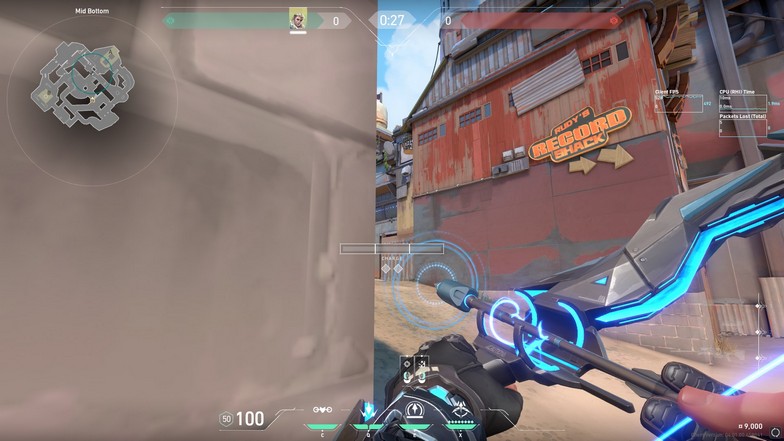
This Recon Bolt is a pretty weird one. Your goal is to hit the little frame inside the mid doors, so it scans the defender’s side of mid doors. Your arrow does not need to hit the frame directly, but you need to hit the inside of the door without being open from Sniper’s Nest and Mid Door peeks.
Use a jumping no bounce max charge and time it perfectly to land inside the door. The position and charge do not matter a lot, but if you use a max charge and time the release perfectly on the top of your jump, it should hit the metal frame inside.
You can proceed to wall bang any scanned enemies through the door and push immediately. If you cannot get the kill, do not be too greedy because Sniper’s Nest might not be clear yet.
Fracture
Pro players’ views on playing Sova on Fracture are mostly negative. With so many angles to watch and players potentially roaming the map, Sova finds it hard to provide easy support to the team. However, he is not all bad. An Initiator like Skye or Breach can outshine him easily on Fracture because of their kit.
When you are using Sova’s Recon Bolts, you have to be preemptive with your Recon Bolts. Enemies can enter a site extremely fast and you might need to provide support by shooting instead of using a Recon Bolt.
A Site / A Rope to A Main Rooftop Recon Bolt – Wall Bang
A Site / A Rope Position
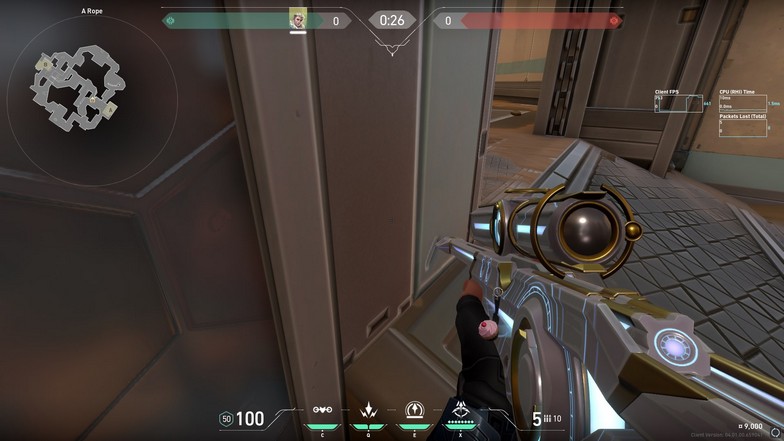
For the next Recon Bolt lineup, you will need to position yourself at the corner of the doorway on A Rope. You have a lot of time to prepare for this lineup because you can quickly go to the position during the buy phase.
Bounce: None
Charge: One and a Half

From looking at the image above, you have two indicators for the Recon Bolt lineup. You can align the “[” of the word [Bounce: 0] on the middle of the curve but slightly outside the curvature. The left tip of the first bounce can also be aligned on the curvature but slightly above the middle. Use the image for reference.
The Recon Bolt will land on top of the rooftop on A Main. This Recon Bolt is amazing because it lands exactly on the broken glass (yes, there is actually a slight hole) on the rooftop on A Main. When the Recon Bolt lands, it will scan anyone pushing A Main near the orb.
Once you see enemies getting scanned, you can shoot the sliding door and get some easy kills.
A Main Recon Bolt – Aggressive Peek
Bounce: One
Charge: Max
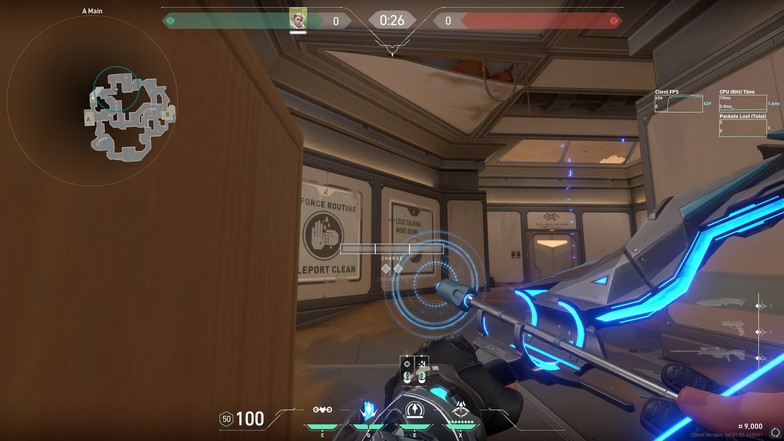
This Recon Bolt is simple and does not need any specific position or lineups. You can hug the box and anywhere around the second sign on the wall. Aim a little towards the left, and you can adjust your aim depending on your position so it lands directly on the wall near the attackers’ side.
A Dish to A Site Recon Bolt Push
Bounce: None
Charge: One
No Bounce One Charge
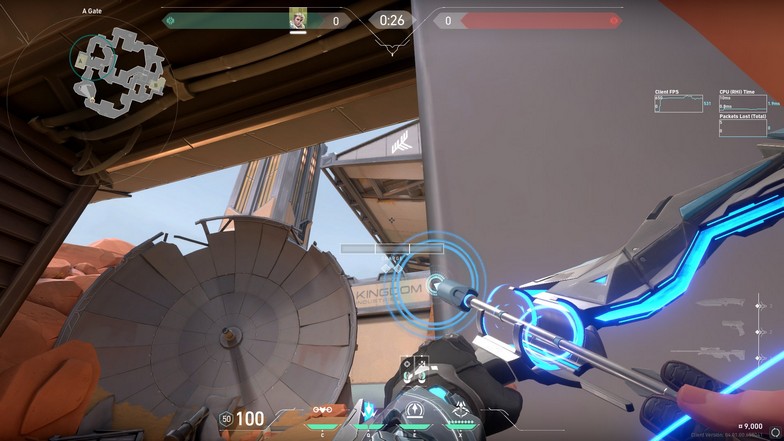
The image on top is another simple Recon Bolt lineup but sometimes unnecessary. When you are pushing A Dish, you never know if defenders are going to be defending from that area.
Some defenders like to fight for control over the A Dish orb and put some pressure on the A Main push by completely controlling A Dish. This Recon Bolt can be useful if you want to scan the A Site first before committing to an A Site push.
Use a no bounce one charge Recon Bolt from the right side of the A Gate. Use the left diamond bounce icon and align it on top of the metal plating above the Kingdom logo.
A Drop to A Dish Recon Bolt – Wall Bang
Bounce: None
Charge: Max
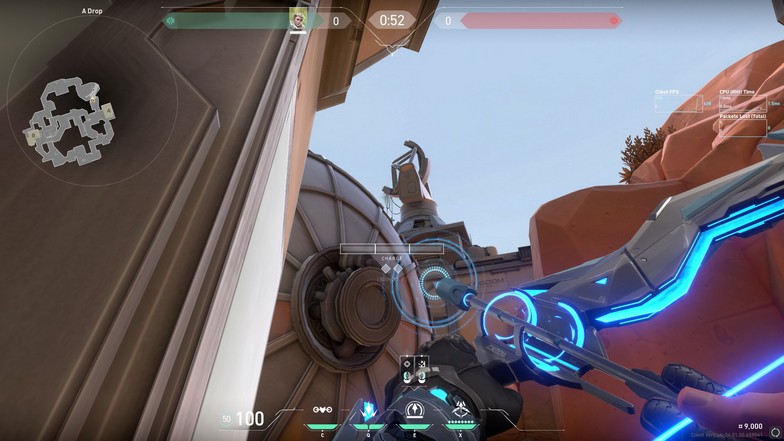
From the defending side, this Recon Bolt lineup will land exactly on top of A Dish which is hard to destroy from an attacker’s perspective. The Recon Bolt scans both sides of A Dish, and if it scans any enemies, you can easily wall bang through the big dish and hit them.
Use a no bounce max charge Recon Bolt so it sticks to the dish on top. Aim directly at the section where the tiny wire meets the edge of the dish, and it will land there at the corner.
Defender Spawn to A Site – Retake
Bounce: None
Charge: One
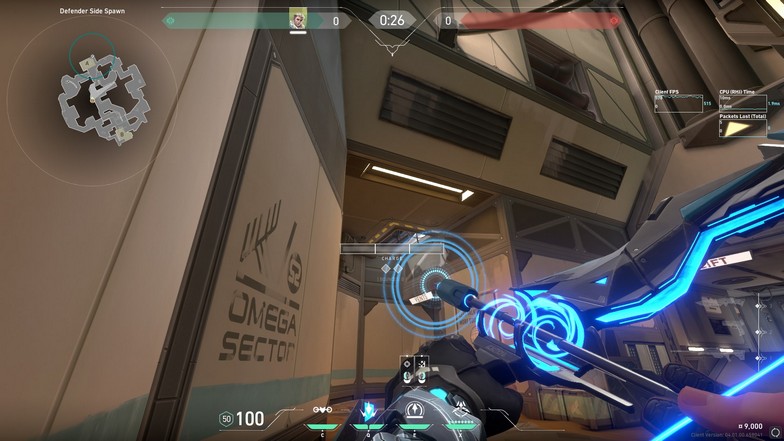
Aim at the upper-left tip of the hole on the roof and use a no bounce one charge. The Recon Bolt will land on the upper-right corner of A Site covering most of the spots on the A Site except for the two corners on top of the A Site and the two corners on the bottom.
It is perfect for scanning enemies camping, but you can pair this with a teammate who plays Breach, Viper, or any agent that can clear corners with an ability and force them out to be scanned by the Recon Bolt. They could be easy targets afterward.
B Tree to B Site Recon Bolt
Bounce: None
Charge: Max
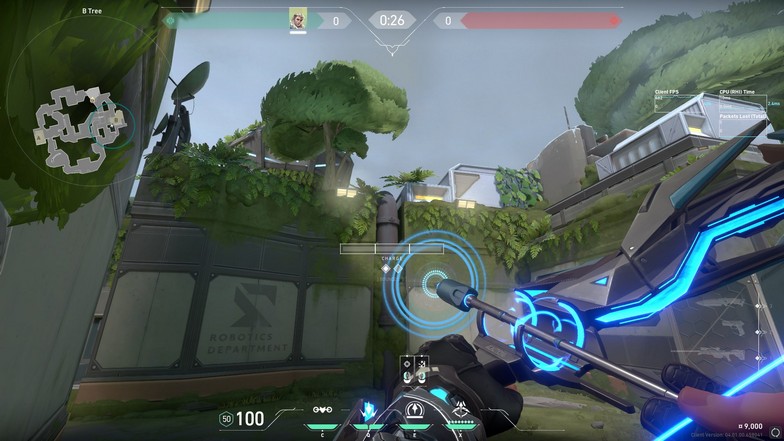
Position yourself on the corner of the big box on B Tree while hugging the wall. Position the first bar of your charge bar to the left side of the pipe, as seen on the image above.
Use a one bounce max charge and you should be able to hit the B Site with a Recon Bolt. It hits a high area that can scan the whole B Site excluding the tower. This lineup is safer than peeking on the B Site without any cover.
B Generator to B Bench and B Arcade
Bounce: One
Charge: Max
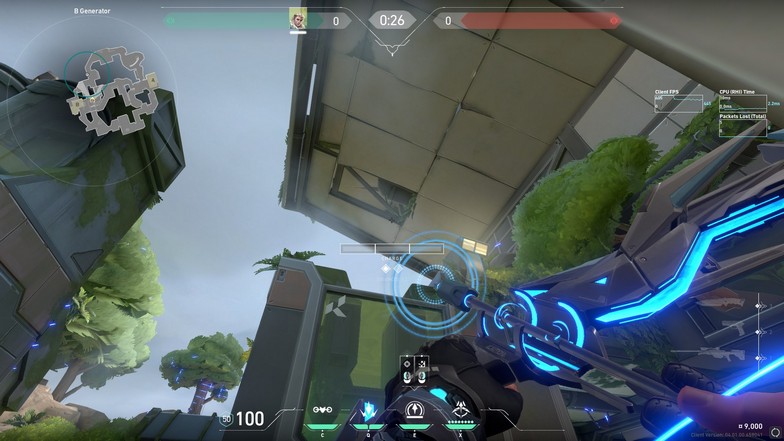
Aim at the little railing on the broken panel above B Generators. Hug the corner of the generator and just do a one bounce max charge. Your position does not matter as any one bounce Recon Bolt on the general area of the roof above should land on B Bench and B Arcade.
It is great for supporting defending players holding B Tower where they can easily peek if they are getting the orb on B Arcade.
B Link to B Site – Retake
Bounce: One
Charge: Max
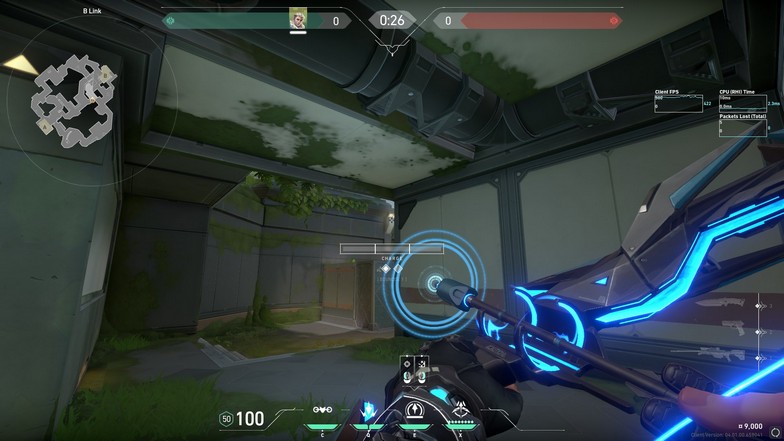
Position yourself so the lamp is barely seen on the corner of the wall. Aim at the bottom of the lamp and do a one bounce max charge and it should hit the B Site, including the ones peeking aggressively on B Tower.
B Site to B Tree
Bounce: None
Charge: One and a Half
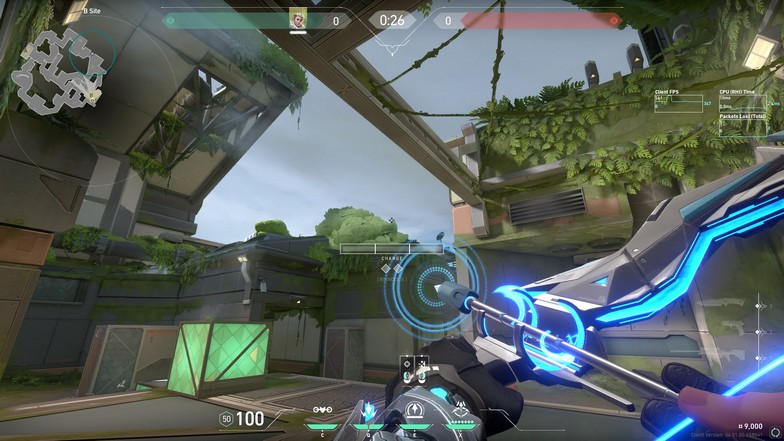
This Recon Bolt lineup is simple because you just need to aim at that little leaf shown on the image above. Do a no bounce one and a half bar charge and it should land on a tree on B Tree. The Recon Bolt will scan anyone trying to push or going underground to attack from two directions.
If you can tell your team’s controller to smoke a little closer to B Tree, your other teammates can actually smoke bang them after enemies get scanned.
Haven
Haven is an amazing map for Sova when it comes to Recon Bolt usage. He can support from basically anywhere on the map, and there are a total of three sites to defend or attack. There are a lot of long alleys or hallways for a good Hunter’s Fury paired with a Recon Bolt scan as well.
A Long to A Site – Covers B Link Rotations
Bounce: None
Charge: One
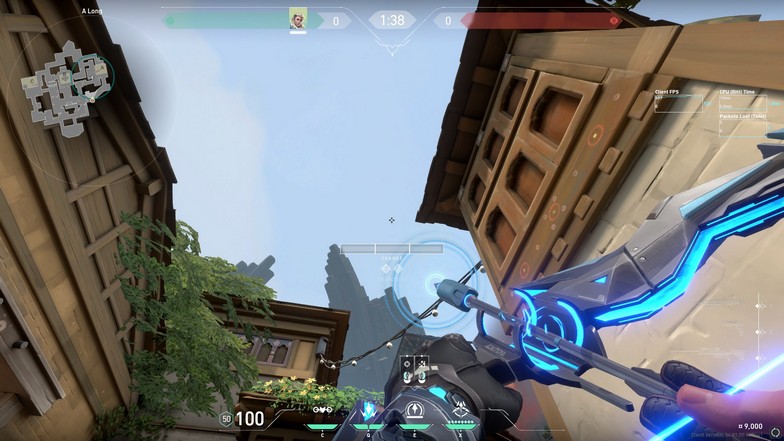
For the first Recon Bolt lineup, you need to position yourself on the corner in A Long as shown on the minimap. Look at your HP’s HUD and align the short white line on the wall in front of you. This Recon Bolt needs to be precise because we are aiming at one of the rooftop corners.
Look at the image above for reference, as it already landed on the same spot as seen on the minimap. Use a no bounce one charge Recon Bolt and it will cover the A Site excluding A Hell. The purpose of this Recon Bolt is to also show the incoming rotation from the B Site as it also covers A Link.
A Long to A Site – Covers A Heaven Peeks
Bounce: None
Charge: One
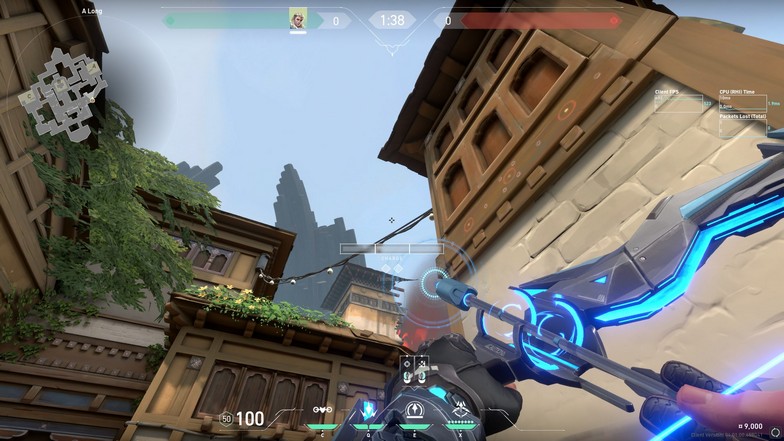
Using the same position before, align the letter “U” on “[Bounce: 0]” on the second wooden plank from the right on the rooftop. Use a no bounce one charge Recon Bolt and it will hit the wooden frame on A Heaven. It will cover the back of A Site and those inside A Heaven.
It is a great way to prevent enemies from peeking A Heaven and from the back of A Site when your team is entering. Since A Long is frequently smoked by the defenders, you can easily get smoke bang kills if this Recon Bolt lands perfectly.
A Link to A Site – Retake
Bounce: None
Charge: Max (Jumping)
Jumping No Bounce Max Charge
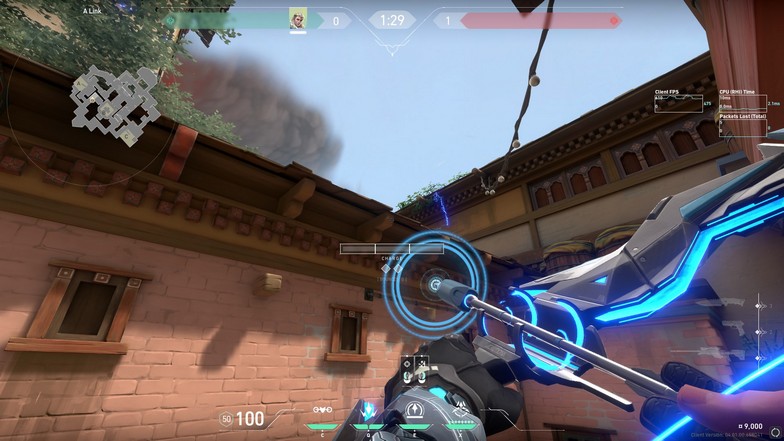
For the positioning, there are two boxes on A Link where you can jump on to get this angle shown above. Use the higher box and the main goal is to hit the corner of the rooftop overlooking A Site.
Use a jumping no bounce max charge and time it perfectly to hit the corner of the rooftop. Use the crosshair placement seen on the image above and release your Recon Bolt exactly when you reach the top of your jump.
It is hard to execute, and it could take a while to practice. You can charge your Recon Bolt preemptively since you are doing a max charge, and it makes it a lot easier.
C Long to C Site – Covers Back of C Site and Rotations
Bounce: None
Charge: Two

Position yourself on the corner of C Long and align the second bar charge of your Recon Bolt on the wooden door frame. Adjust the height so that your crosshair hits the corner of the leaf shown on the image.
Use a no bounce two charge Recon Bolt, and it will hit the corner of the C Site entrance and reveal the whole back site. It also covers those rotating quickly so you would have a rough idea how many players have rotated already.
In post plant situations, it can be used as a good support recon as your teammates should smoke this entry point, and your teammates can smoke bang anyone who gets scanned.
C Site to C Long – Smoke Bangs
Bounce: None
Charge: One
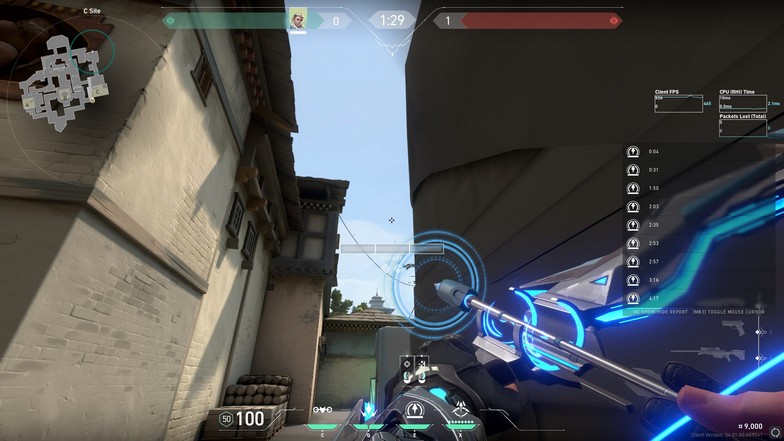
On the opposite side, hug the box on the entry point of C Site and align the left circle on your Owl Drone icon on the C Garage door entry. Align the whole icon to the wall and use a no bounce one charge Recon Bolt.
It will scan everyone pushing C Long and it could potentially set you up for an awesome Hunter’s Fury if they all rush the site. Since you are a little farther from danger, you can make the enemy team panic and commit to the site instead of retreating.
They will not be able to rush you since you might have a teammate supporting you from the site and they have to clear everything first while dodging your ultimate.
C Garage to Mid – Hits the Rooftop – Wall Bang
Bounce: Two
Charge: Max

Position yourself next to the box and just aim at the first tip of the box in front of C Garage. Use a two bounce max charge, and the Recon Bolt will land on top of the rooftop where the enemies will have to look up to destroy it.
You can wall bang through the door if anyone gets scanned. Since the positioning is literally on the corner of the barrier during the buy phase, you can set this Recon Bolt lineup easily and prepare to get some easy frags.
B Site to B Window and Mid – Wall Bang
Bounce: Two
Charge: Max
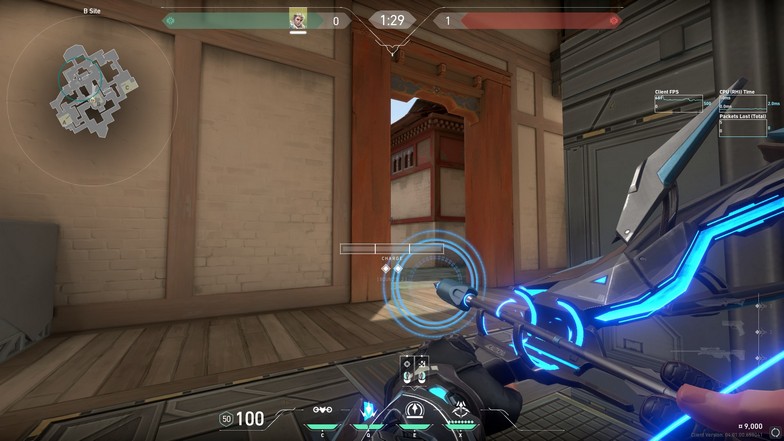
Hug the corner of the B Site and aim at the red panel on the wall in front of you. Use a two bounce max charge and the Recon Bolt will land inside the window. You can wall bang any enemy scanned if they are trying to peek at the B Site.
Like the Recon Bolt lineup before, you can set this up during the buy phase, and you will be faster than the enemy team on the window peek at the start of the round.
Icebox
Icebox is also one of Sova’s best maps. With all the angles to cover when pushing or defending A Site, Sova can gather all the information on his own because of a well-placed Recon Bolt and his Owl Drone.
Mid Boiler to B Green – B Push Support

Position yourself on top of the small barrels in Mid Boiler.
Bounce: None
Charge: One and a Half
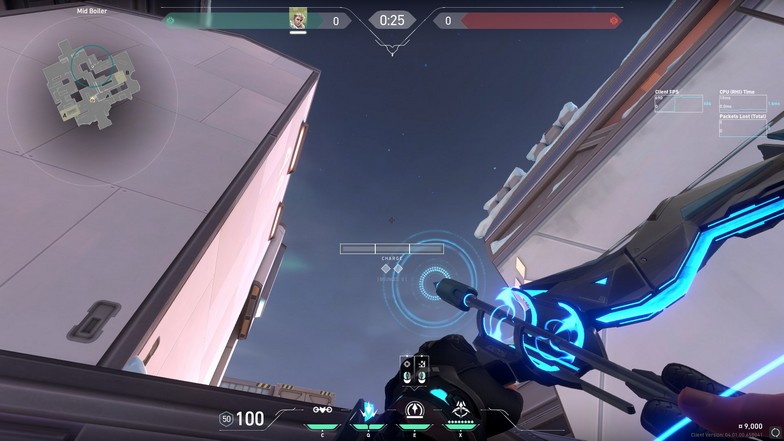
Look at the right circle on your Owl Drone icon and line it up directly below the little hinge on the container. Use a no bounce one and a half bar charge Recon Bolt and it will land on a wall corner on B Green. It gathers information on the whole B Site push while having the ability to assist in A Site and gather information on Mid Boiler as well.
Mid Blue to A Screens Recon Bolt – Also Hits Half of A Site Including A Nest, A Rafters, and Back of Maze
Bounce: Two
Charge: Two
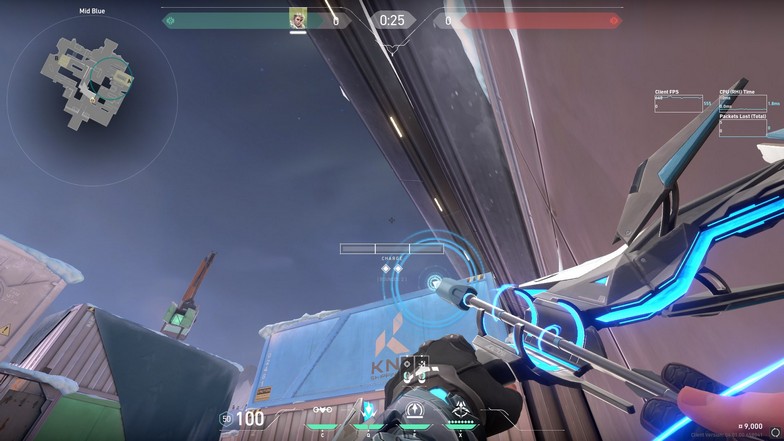
Position yourself on top of the small box in Mid Blue. Look at your HP HUD and align the white line on the silver container as seen in the image above. Use a two bounce two bars charge Recon Bolt, and it will hit the corner of A Screens.
It reveals everyone on A Screens and half of the A Site, including A Nest, A Rafters, and the back of maze. This Recon Bolt is amazing because the A Site in Icebox is usually defended from A Screens and A Rafters when attackers use their utilities to clear out the site.
There are too many angles to cover when you confront the attackers directly at A Site. If you pair the Recon Bolt with an Owl Drone, you can gather information on every inch of the A Site.
B Hut to B Site – Retake
Bounce: None
Charge: One and a Half
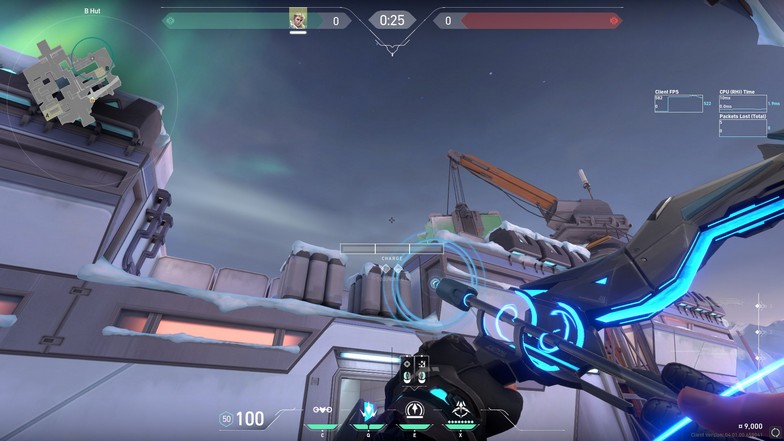
Position yourself at the lower-right corner of B Hut. Use the diamond bounce bar icons as an indicator and align them on the generators in front of you. Use a no bounce one and a half bar charge Recon Bolt, and it will land on a metal frame on top of A Green.
It covers everyone peeking from B Main (B Green) and the left corner of B Yellow. Players holding Danger can also get scanned if they are not hugging the corner. It is the perfect Recon Bolt for a B Site retake situation.
Pearl
A Main to A Site
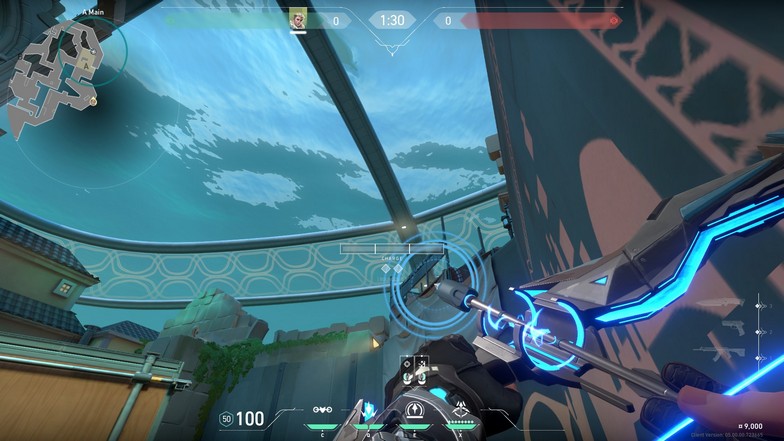
From the corner of A Main and behind the box, align the 2nd bar of your charge bar on the tiny light on the pillar of the dome. Adjust your crosshair down a little bit until it looks like the one on the image above.
Jump and then shoot a no-bounce, no-charge (tap) Recon Bolt. The Recon Bolt should land on top of the corner wall, where it will be hard to shoot for the defenders and detect incoming players on A Secret and the back of the site.
It will not cover players hiding in the little corner of A Dugout and the tiny cubby near the entrance.
B Link to B Site
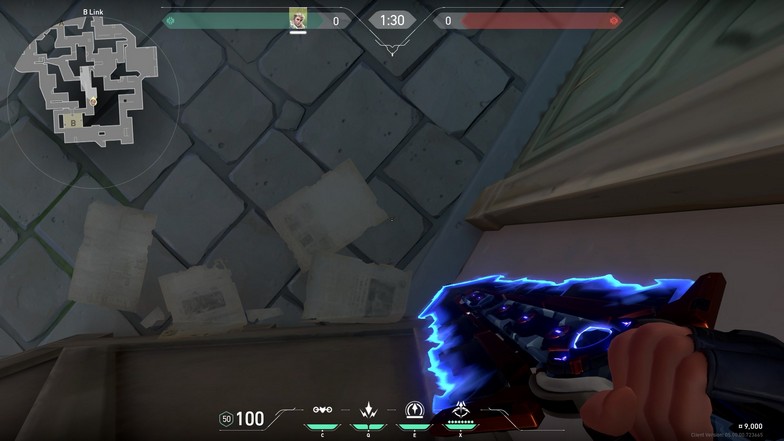
From the B Link area as an attacker, hug the corner of the box on B Link. Your position is relatively safe as long as you have teammates near you. Try not to peek from B Link yet and communicate with your teammates that you have a Recon Bolt for A Site first.
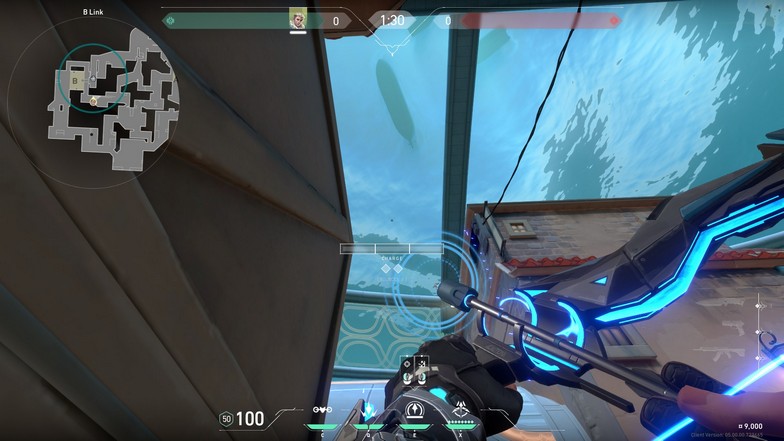
From the position on the position on the box, use the image above as a reference. You can align the rightmost part of your charge bar to the pillar on the dome or use the box’s top corner and align the charge bar there.
Use a no-bounce tap for your Recon Bolt. Tap, meaning you won’t be charging your shot, and just tap your mouse button for the shot.
The Recon Bolt will land on top of B Tower, where there are grills on the roof. It will detect anyone inside B Tower and the surrounding area close to B Site.
The lineup will not cover B Halls unless they go outside. This lineup is great because even if you have B Tower smoked, you can still detect enemies if they are not careful. You can even shoot through the wall or smoke if you ever detect an enemy inside the tower.
Defender Spawn to B Site – Retake
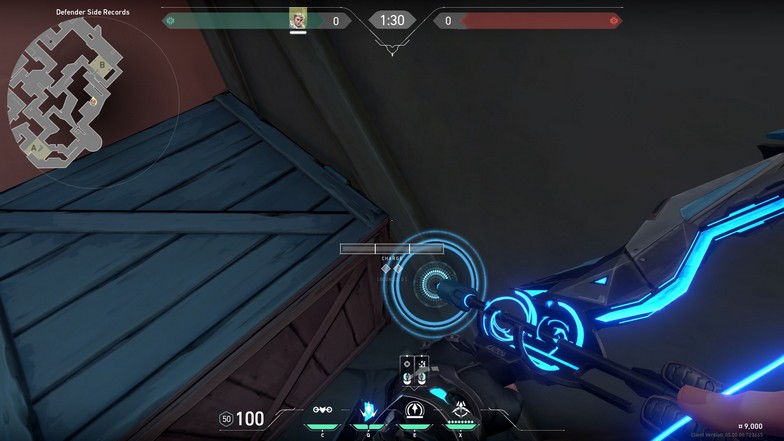
This lineup will be for an A site retake where you can support your teammates taking the site or get general information about the enemies’ whereabouts.
The Recon Bolt will scan all the ones holding B Main from the default plant. You can use your Owl Drone for your teammates to clear B Halls.
Set up your position on the corner of the small box near the defender side spawn.
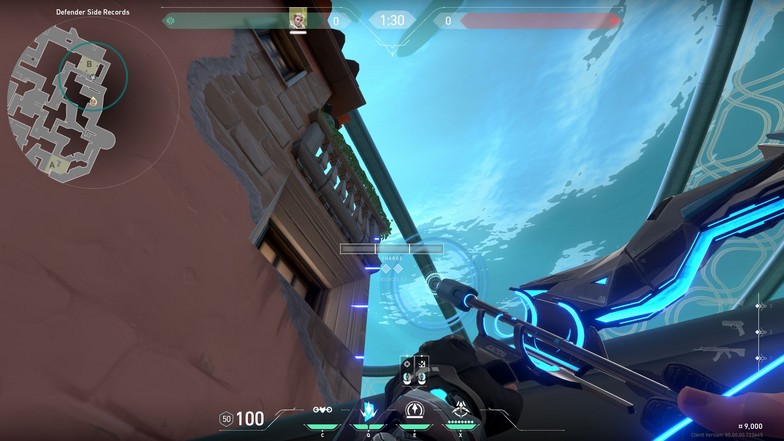
Aim your crosshair next to the leaf and move it to the middle of the pillar and the leaf. Use a no-bounce instant-charge (tap) Recon Bolt, and it should land on top of the wall and clear all the areas near the entry, including one part of B Halls.
Everyone holding B Main will be forced to stay back. As mentioned before, you still need to clear B Halls since it is hard to use utilities to clean that area up.
A Flowers to A Site – Retake
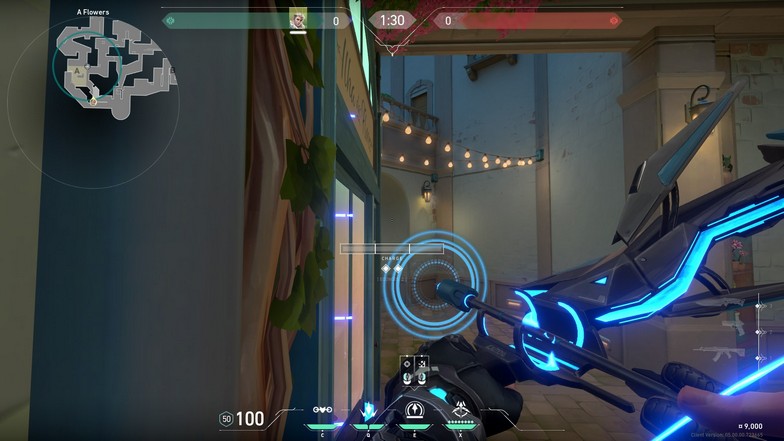
For this Recon Bolt lineup on Pearl, go to A Flowers and jump on top of the tiny box looking over the window. Aim your crosshair on the wall of the entryway. It should land on the corner of the wall near the top of the roof, which makes it hard to hit.
The Recon Bolt should scan everyone peeking on A Main, the cubby area inside the site, and A Link.
Split
Split is not a good map for Sova. While there are a ton of good areas where Sova can utilize his Hunter’s Fury, the rotation areas are very tight, which makes it hard for Sova to gain useful information.
Areas such as Mid Vents, Sewers, Mail, and even B Elbow are hard to scan with a Recon Bolt. However, there are a few lineups in Split where you can maximize Sova on Split.
A Rafters to A Lobby / A Main – Smoke Bang
Bounce: None
Charge: One and a Half
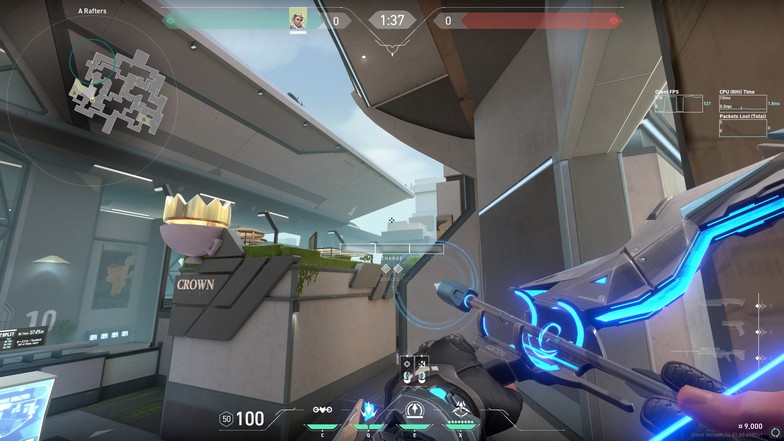
Position yourself near the corner of A Rafters overlooking A Site. Aim at the tip of the building and move your crosshair slightly to the right. Carefully look at the image above for reference. Use a no bounce one and a half bar charge Recon Bolt, and it will show everyone trying to push A Main.
Since rotations for attackers takes a long time, scanning enemies here will give your team enough time to react since a rotation to a B Site push will take a little longer. Again, you can utilize your team’s smokes to smoke bang enemies with this Recon Bolt.
A Lobby to A Rafters / A Site
Bounce: None
Charge: Max

Position yourself on top of the A Lobby planters (box) and aim directly at A Rafters. The goal is just to hit the A Rafters door and try to scan enemies and gain information. Normally, this will be smoked when you are pushing the A Site. Coordinate with your team which Recon Bolt you should use because if A Rafters is smoked, the Recon Bolt will not be able to scan anyone in A Heaven.
A Ramp to B Garage – B Support
Bounce: Two
Charge: Max
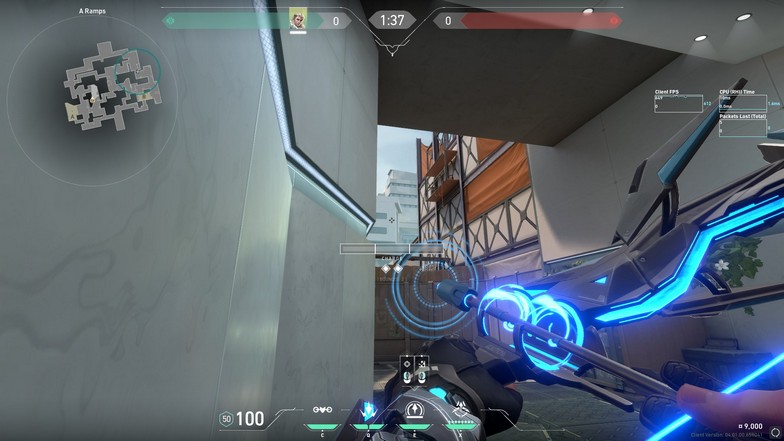
Position yourself at the corner of A Ramps and aim at the lower right corner of the window on the building shown in the image above. Align the one charge marker on your Recon Bolt charge on the wall and use a two bounce max charge Recon Bolt.
It will land directly on B Garage, and the enemies will never see it coming because the Recon Bolt will be coming from their spawn.
B Lobby to B Site – Covers Back of B Site
Bounce: One
Charge: Max
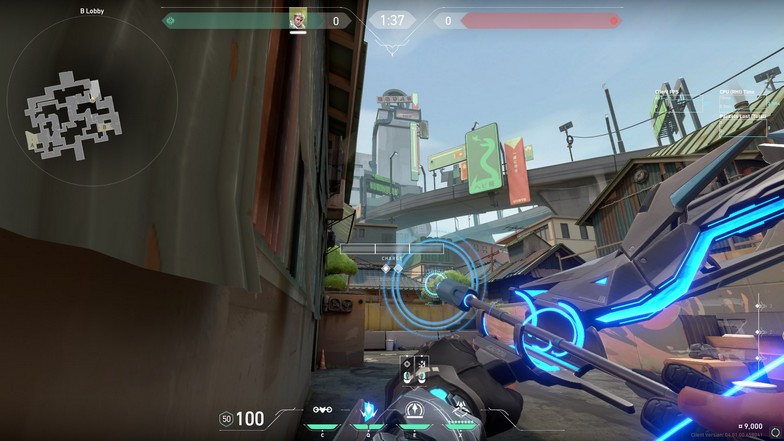
From the B Lobby, hug the corner where defenders and attackers usually fight at the start of the round. Do not worry. They will not be able to see you if you hug the corner. Aim slightly on the top-right corner of the roof and adjust the crosshair so that it looks like the image above.
Use a one bounce max charge Recon Bolt, and it should land directly at the back of B Site. The Recon Bolt will come out fast, and out of nowhere, so the defenders might get caught off guard.
Shock Bolt Lineups
Double Shock Bolts are one of the most annoying and yet most amazing things in Valorant. The timing and prediction have to be perfect and getting kills from it as a Sova main is one of the most satisfying things in the game.
These Sova double Shock Bolt lineups will help you get some sneaky kills, but it is one of the hardest ones to master. The Shock Bolts have to be synced so that both Shock Bolts land perfectly at the same time.
If you think lineups from Viper and Killjoy are easy, then you are in for a treat.
Ascent
A Site Generator – Double Shock Bolts
A Main Door – Position
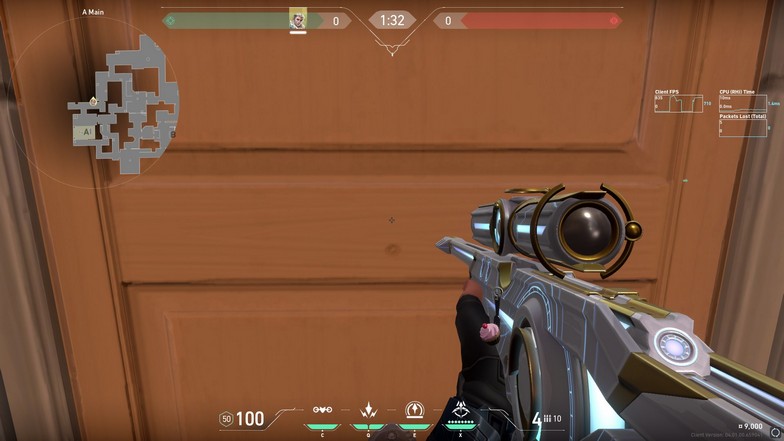
Position yourself on the A Main and find the orange door on the wall. Center yourself on the door and remember this position as most of the double Shock Bolts to A Site uses this position.
Bounce: None
Charge: Two
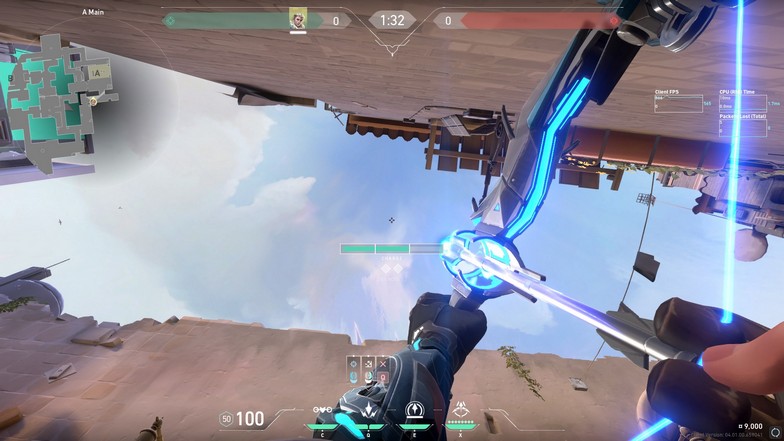
For the first Shock Bolt to A Site Generator, aim at the top-left tip of the weird cloud on top. Use a no bounce two charge Shock Bolt. You have to be precise with the two charge bar because the gap on the A Site Generator is insanely small.
Bounce: None
Charge: One
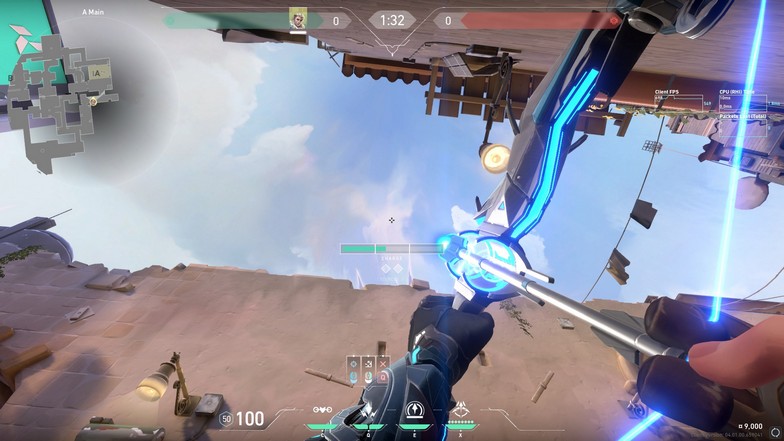
The second Shock Bolt needs to be fired after two seconds. You will see a little crystal spike on the cloud and align the second charge bar line on it. Look at the image above for reference.
Use a no bounce one charge Shock Bolt, and you also have to be precise with the charge bar. Combine this with the Recon Bolt lineup shown before, and you can gain information first before using this trick.
A Main to A Site Default Plant – Double Shock Bolts
Bounce: None
Charge: Two
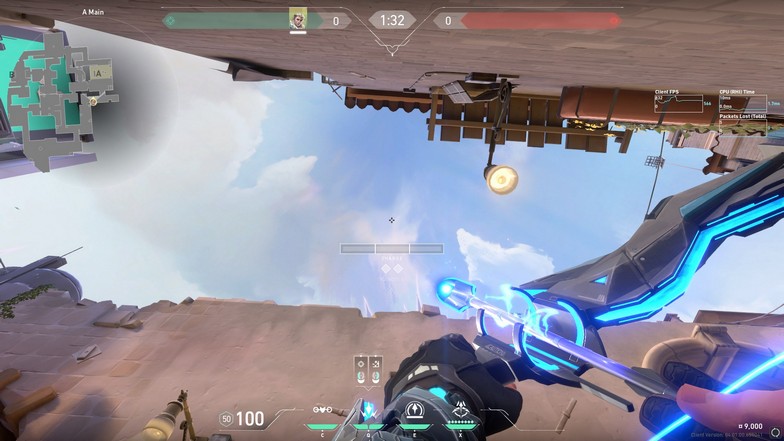
There aren’t any clear indicators for this lineup, but you have to aim at the curve of the cloud where the cloud is still thick. Use a no bounce two charge Shock Bolt, and it should land at the A Site default plant near the generator.
Bounce: None
Charge: Instant
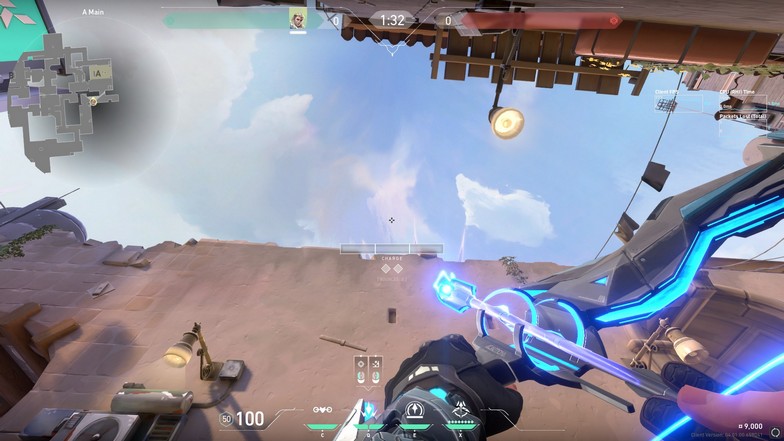
For the next one, align the charge bar on top of the wall and align the first bar charge on the small crack. Use a no bounce instant charge Shock Bolt, and it should land after seconds. The intervals between the Shock Bolts should be around two seconds (weapon/bow switches included). You will have to be fast.
Double Shock Bolt A Rafters (Heaven)
Positioning
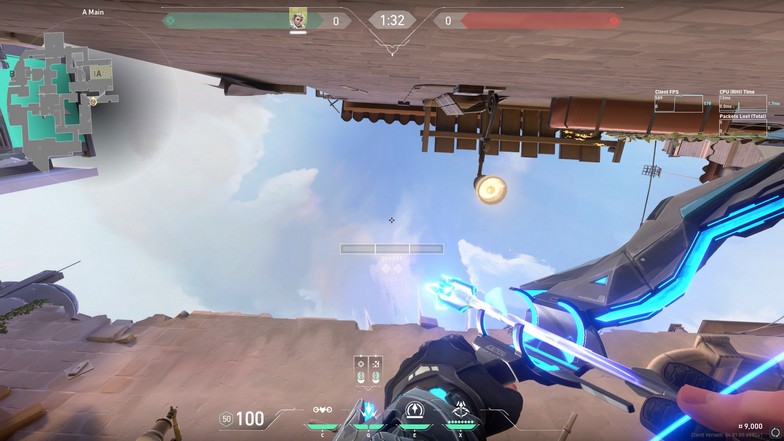
Position Sova’s left hand or glove to exactly cover the hole on the wall in front of you. You should be in the same position as mentioned before on A Main, standing in the middle of the door.
Bounce: None
Charge: Two
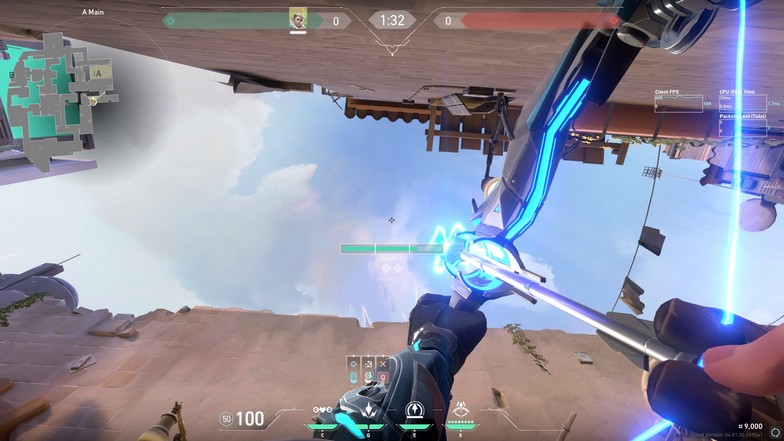
A Rafters is a little narrow, so you have to be precise here as well. Go slightly above a two bar charge Shock Bolt (3-5% more), and it will land on the peek spot on A Rafters.
Bounce: None
Charge: One
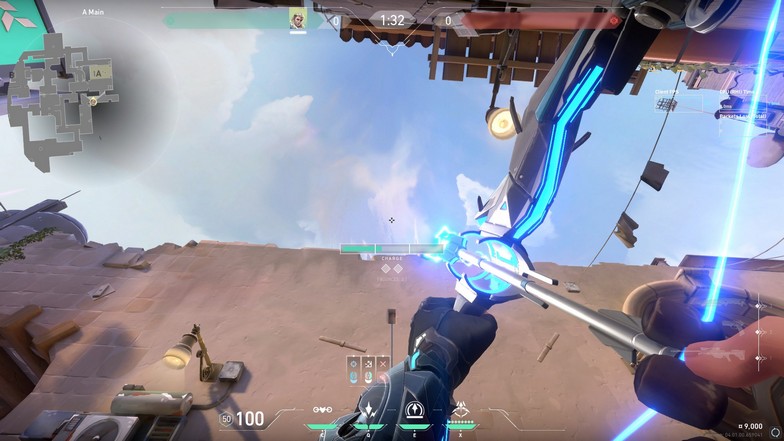
Using the same second Shock Bolt lineup on the A Site default plant, align your charge bar on top of the wall and do a no bounce one charge Shock Bolt instead.
You can execute this double Shock Bolt lineup every time your team gains control of A Site without getting any kills. It will be more likely that a defender will be holding A Rafters while waiting for his team to arrive. Since A Rafters is usually smoked, they will have a hard time pushing and staying in the area for a little longer.
Double Shock Bolt Mid Cubby from Mid Link
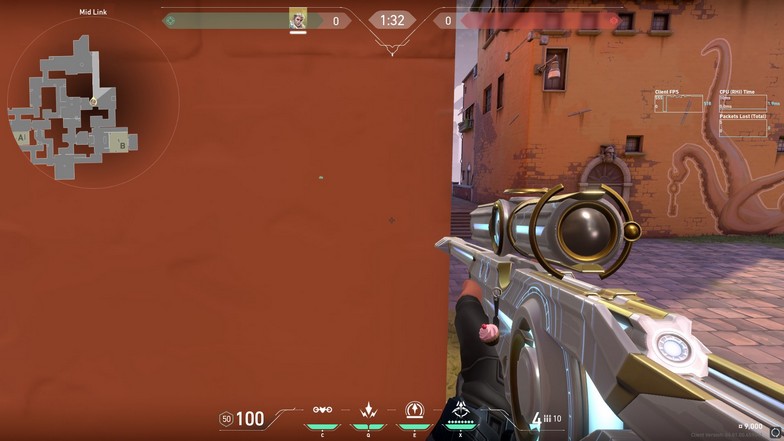
Position yourself on the corner of this wall where almost half of Sova’s body can see the pathway towards the attacker’s spawn.
Bounce: None
Charge: Two
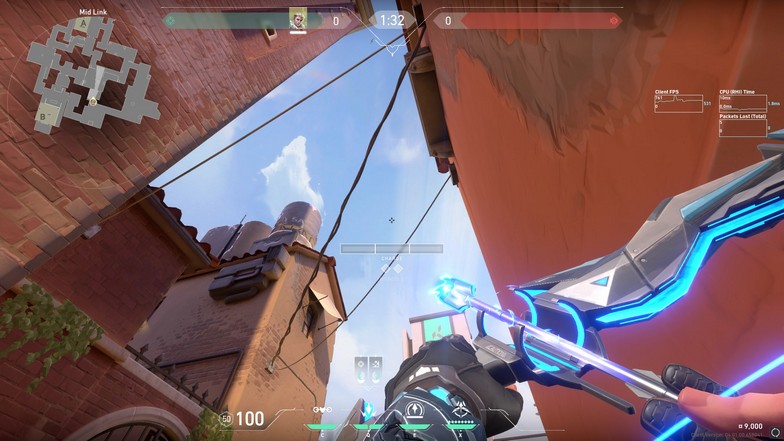
Move your crosshair near the roof of the building on top of you. Align the left corner of your charge bar near the upper-right side of the rooftop.
Bounce: None
Charge: Instant (Jumping)
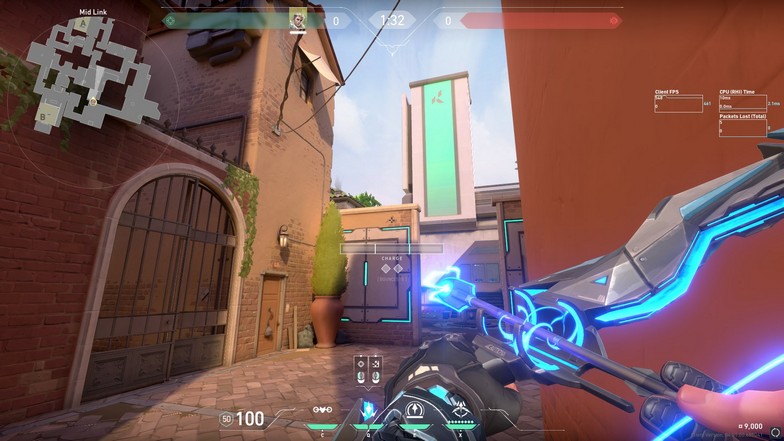
For the next shock bolt, you will see four dark bricks on the wall (image above) and position your crosshair exactly in the middle of those four dark bricks.
Double Shock Bolt B Main Orb from B Site
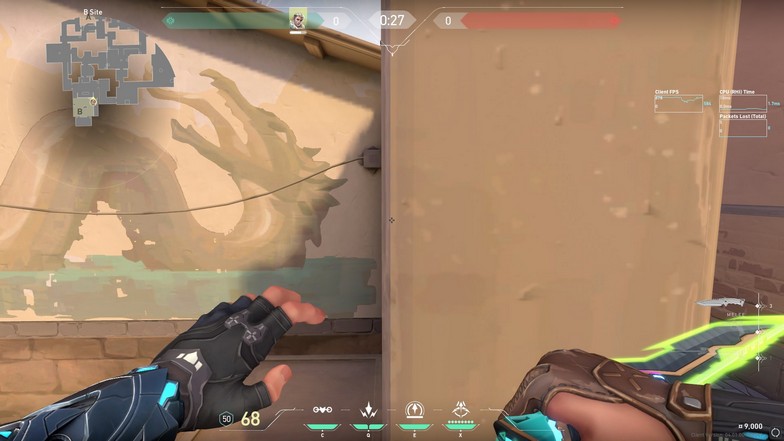
Position yourself near the lanes and hug the wall where attackers usually enter B Site from. Make sure you see the little square on the image above.
Bounce: Two
Charge: Max
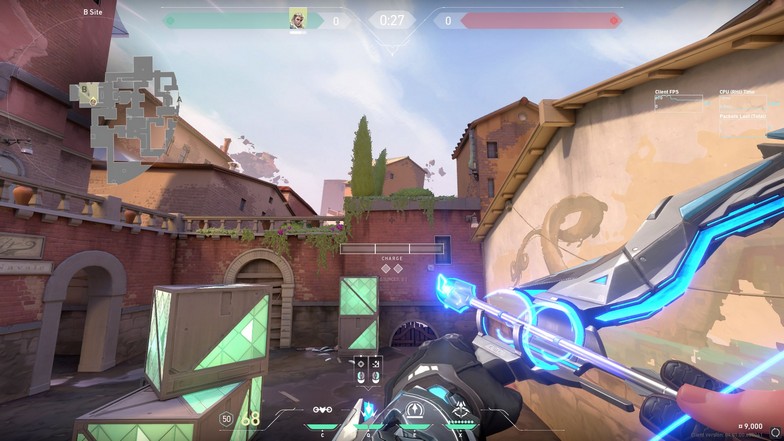
Position the word “[Bounce: 2]” on the upper-right corner of the box in B Site. Make sure the “[” is just to the right corner of the box and use a two bounce max charge.
Bounce: One
Charge: Instant
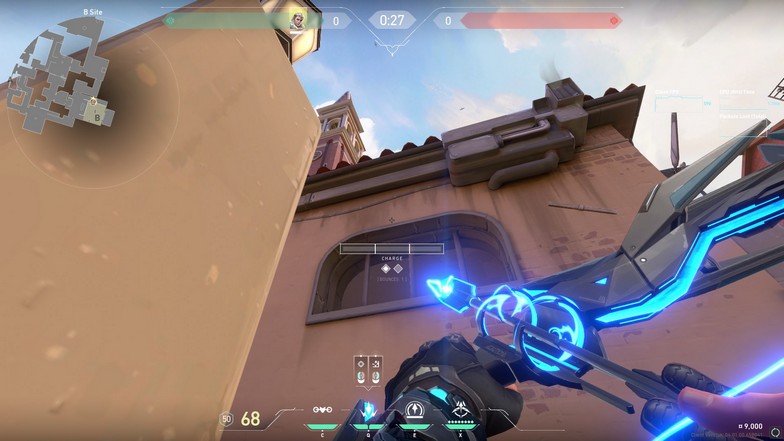
The next one is adjustable because there are many simple ways to hit the B Main orb from this window. You can use the image above, where the upper-left tip of the charge bar hits the corner of the window.
Use a one bounce instant charge to quickly hit the timing with the first shock dart. Since you are turning for a quick 180 degrees from the first Shock Bolt, you have to adjust fast so that they both hit at the same time.
You can also adjust the crosshair where it hits the inside of the window and do a one bounce max charge. For non-Sova mains, it will be easier to adjust once you get used to playing with Shock Bolts every game.
Double Shock Bolt B Site Stairs
In B Lobby, you will see a little hut on the left side near the B Main entrance. Position yourself by hugging the upper-left corner of the hut before entering B Main.
Bounce: None
Charge: Two
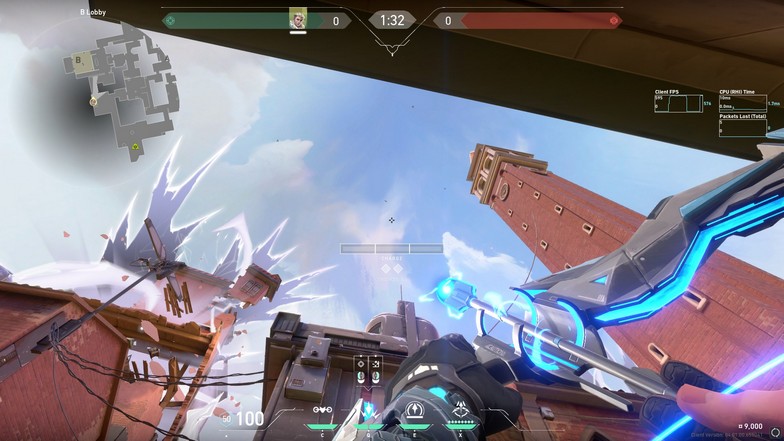
Position your Owl Drone icon below the metal box on the image above. Align the left ear of the Owl Drone icon on the lower-right tip of the metal box. Use a no bounce two charge Shock Bolt, and it will land on the B Site Stairs after five seconds.
Bounce: None
Charge: One (Jumping)
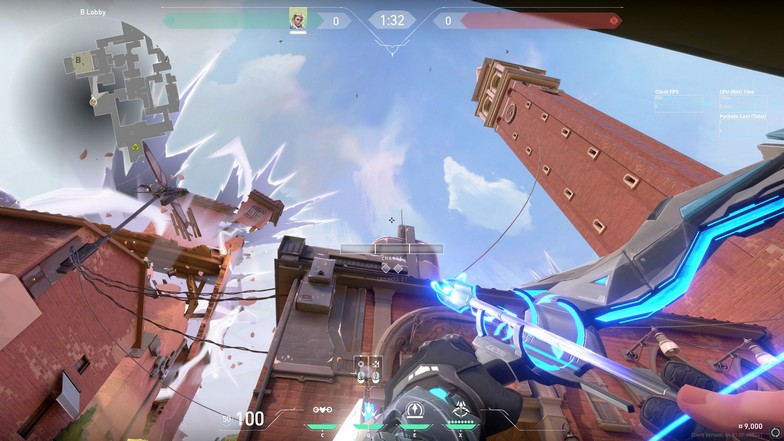
For the next Shock Bolt, you have around 2 seconds to adjust so they both land perfectly. Position the first line of your charge bar next to the left corner of that metal tower above B Main. Once the line covers the tower, use a jumping no bounce one charge Shock Bolt.
This position is tough because you are using a jumping Shock Bolt where your head will actually hit the tip of the hut behind you. You want to make sure you release the Shock Bolt before you hit your head.
If you are slightly below the one bar charge, the Shock Bolt will land on the tower and miss. If you release your Shock Bolt too late and hit your head on the hut, the same thing will happen.
Bind
Sova is strong on the map Bind. Even without the lineups, there are many easy ways to use your Shock Bolt to potentially hit enemies.
On the defending side, you can easily use the angles on walls to bounce your Shock Bolt and hit the default area or A Mid while being safe.
Defender Spawn to B Site Default Plant – Double Shock Bolts
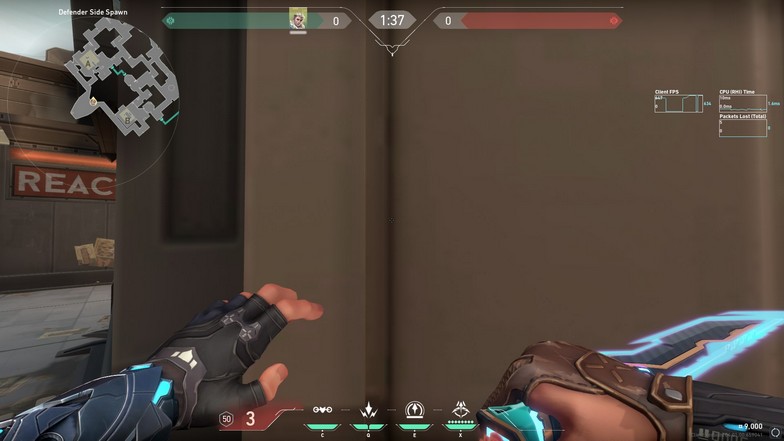
From the defender’s spawn, go to the wall and hug the corner slanting towards the B Site. Center your crosshair on the gap of the wall for the correct positioning.
Bounce: None
Charge: Two
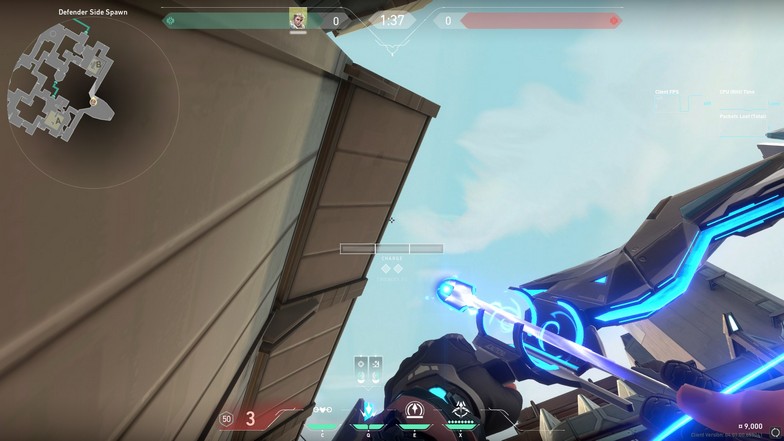
Place the first charge bar on the first line of the panel, as seen in the image above. The crosshair should be just on the corner of the panel looking up the sky. Use a no bounce two charge Shock Bolt and it will land exactly on the default plant on B Site.
Bounce: None
Charge: One
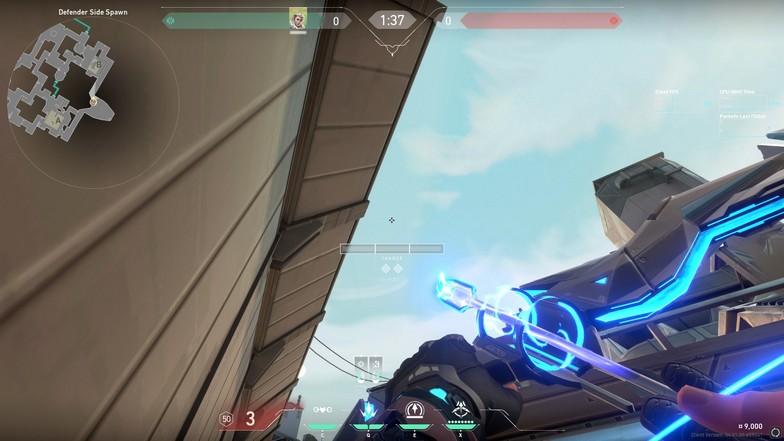
For the second Shock Bolt, aim a little lower and place the first bar of the charge right beside the panel (two lines below the first one). Follow the image above for reference.
Use a no bounce one charge Shock Bolt and use a two-second interval from the first Shock Bolt lineup. With all the aim placement and weapon switching, you should do this as fast as possible so that both will land at the same time.
There are some margins for error when it comes to the charge since the B Site is a little open. Just do not mistake the angle, or it might hit the top of the tube or the top of the box.
A Lobby to A Site Default Plant – Post Plant Situation
Bounce: One
Charge: Two
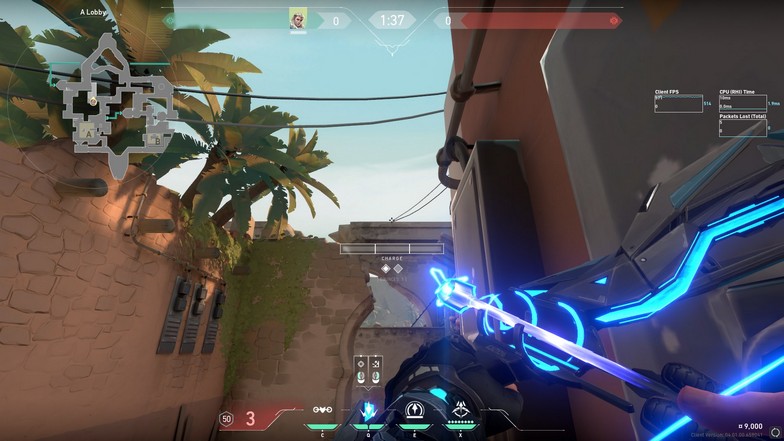
For the position, go up the ledge on A Lobby and hug the corner. Aim at the top of the wall and place your crosshair on the wire intersecting the wall. Use a one bounce two charge Shock Bolt, and it should hit the A Site default plant.
Bounce: None
Charge: Instant
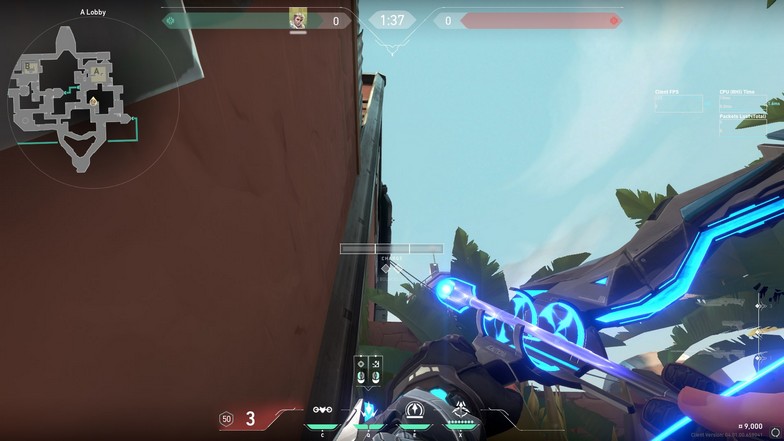
For the second Shock Bolt, aim at the little edge with a small slant. You have to do a full turn, so you have to be fast. Use a no bounce instant charge Shock Bolt as fast as you can because the first Shock Bolt will be coming a little faster because of the bounce.
A Lobby to A Heaven – Attacker Spawn Barrier Corner
Bounce: Two
Charge: Max
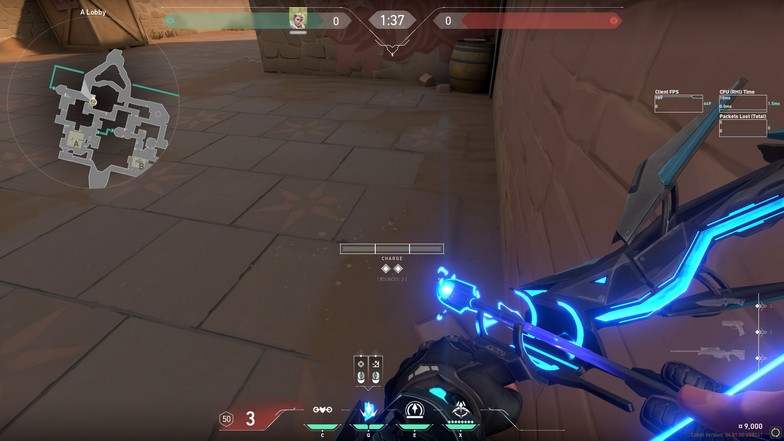
Position yourself near the wall entry. It is hard to get a perfect position, but as an attacker, there will be a spawn barrier on this spot, and all you have to do is hug the corner.
Use the curvature of the timer HUD on top and align it on the painting. You can use the image above as a reference. Use a two bounce max charge Shock Bolt, and it should land directly inside A Heaven.
Bounce: None
Charge: Two
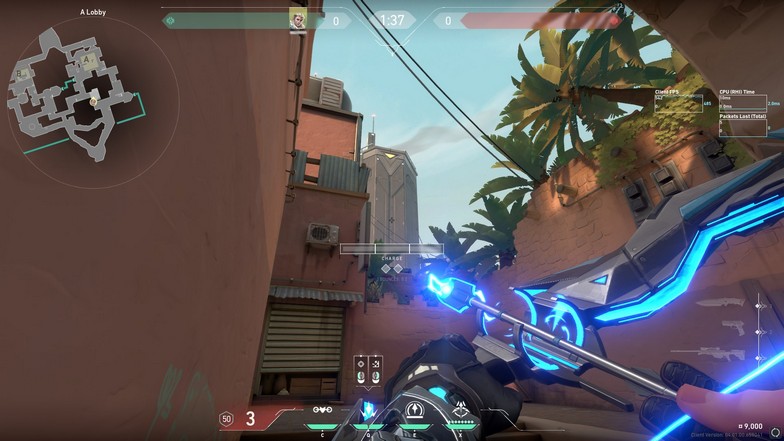
Turn around and aim at the middle of the building. Use a no bounce two charge Shock Bolt, and you have around three seconds to make both Shock Bolts land at the same time.
B Labs to A Main Push – Double Shock Bolts
B Labs Position

Using the same position on B Labs mentioned before on the Recon Bolt lineups.
Bounce: None
Charge: Two
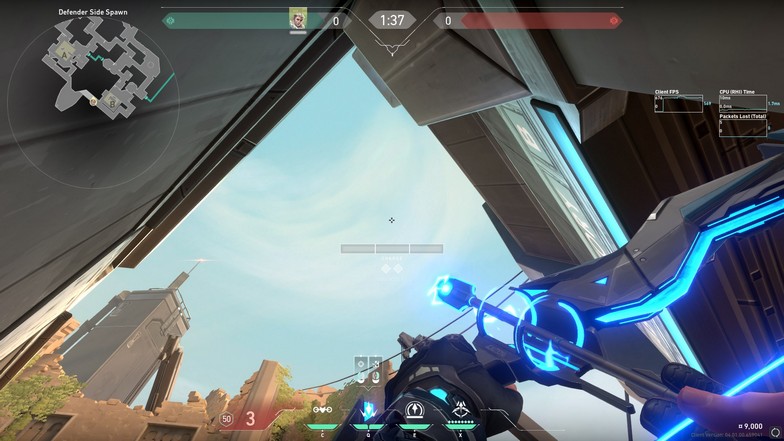
Place the middle of the Owl Drone icon between the leaves on the wall. Look at the image above for reference because it could be hard to pinpoint.
Use a no bounce two charge Shock Bolt, and it should land in A Mid.
Bounce: None
Charge: One (Jumping)
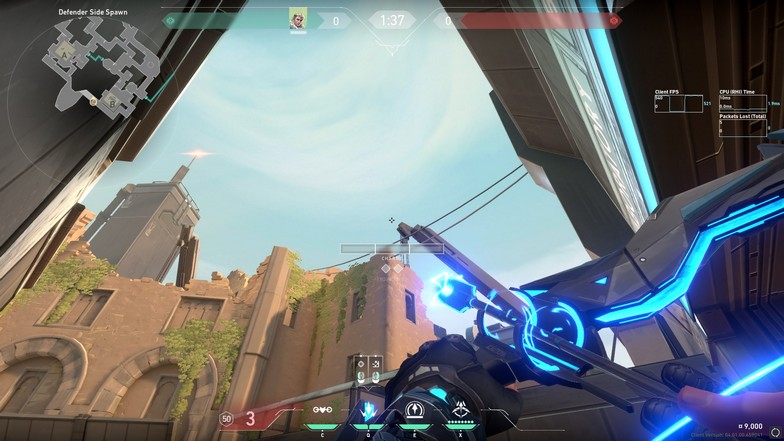
The second Shock Bolt is a little easier. Place the middle of your charge bar on the middle of the curve of the wall. Use a jumping no bounce one charge Shock Bolt.
Since the defenders smoke this area, enemies might try to camp the area and wait for the smoke to fade and play for picks.
B Site to B Garden – Double Shock Bolts
Bounce: One
Charge: Two
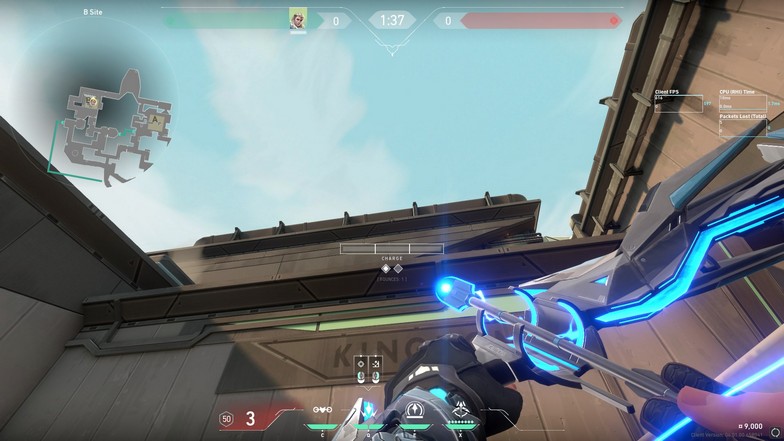
In the B Site, there is a box behind the tube in the middle behind B Site. Hug that corner and place your crosshair on the middle of the metal frame on the roof.
Use a one bounce two bar charge Shock Bolt, and it will land quite fast on B Garden.
Bounce: None
Charge: Instant

For the next Shock Bolt, just aim at B Garden and use a no bounce instant charge Shock Bolt. It will be easy since there isn’t any specific lineup for this second Shock Bolt.
A Heaven to A Site Default Plant – Single Shock Bolt
Bounce: Two
Charge: Max
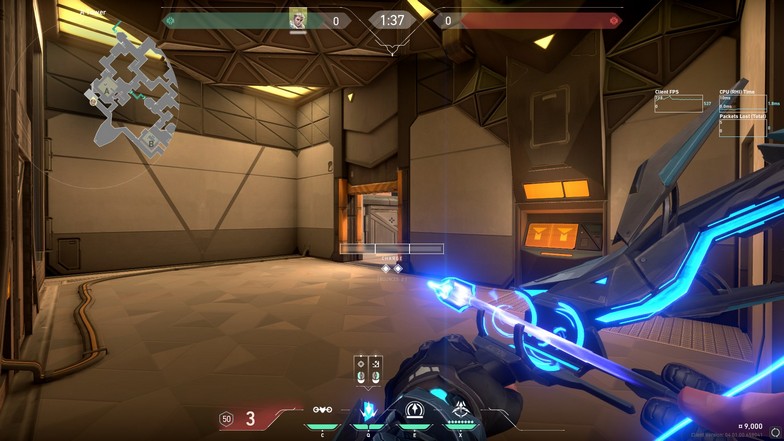
Position yourself on the corner of A Heaven. Align the right circle of the Owl Drone logo on the tip of the dark floor tile seen in the image above.
This lineup is great because even if A Heaven is smoked, you can still do this Shock Bolt lineup. Use a two bounce max charge Shock Bolt, and it should hit default plant on A Site.
It is a single Shock Bolt lineup, but you can do two consecutive Shock Bolts and still hit the enemy planting the spike. If there is a Sage wall blocking the area for the attacker’s side, the Shock Bolt will be blocked.
Breeze
Breeze is a good map for Sova because of all the open spaces. However, double Shock Bolt lineups are not as popular on this map because of it.
There are too many areas to predict where the enemy is going, and it could be a waste to use two Shock Bolts without hitting anyone.
Most of the time, you are better off saving the Shock Bolts for situations where an enemy can get stuck in a corner. The lineups below will focus on simple ones that can likely get you a frag.
A Site to B Orb – Double Shock Bolts
A Site Positioning
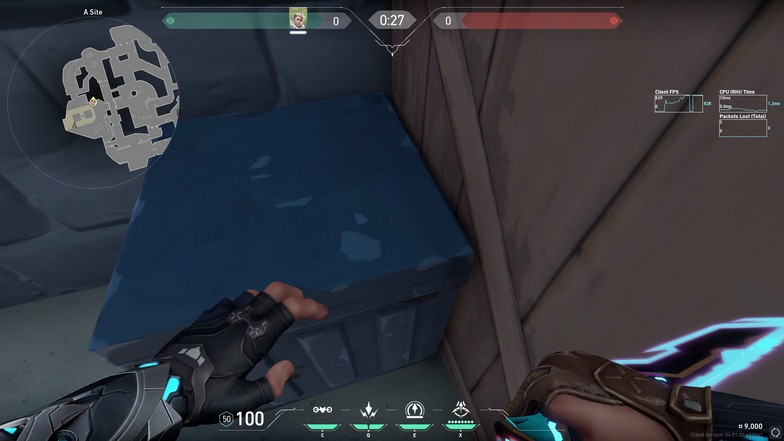
From the A Site, position yourself near the small box near the middle doors.
Bounce: None
Charge: Max
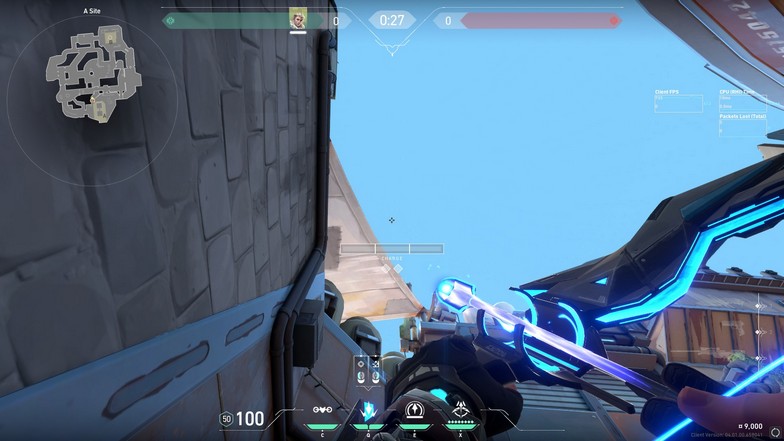
Align the tooltip on top of your Shock Bolt icon to the square of the silo on the top of the wall. Look at the image for the proper placement.
Use a no bounce max charge Shock Bolt and it should land after five to six seconds on the B Main orb.
Bounce: None
Charge: Two and a Half
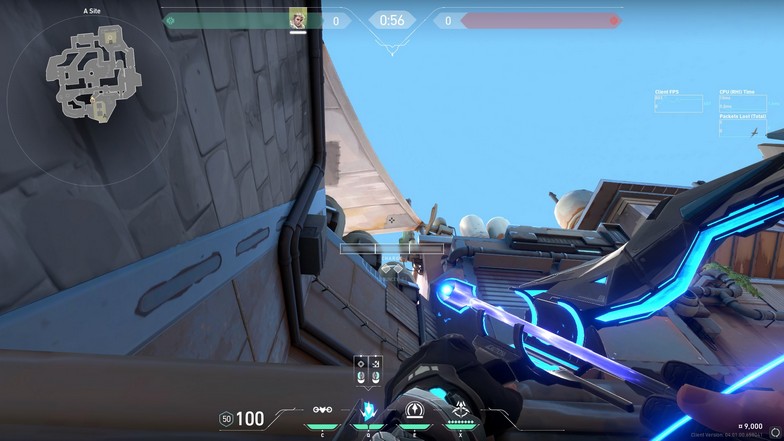
Since most of the second Shock Bolt lineups only require you to drop your aim below the first Shock Bolt, you can get a feel of how low you need to drop your aim to hit the same spot with a lower bar charge.
The indicator for this is a little hard, but you can use the Shock Bolt tooltip (left and right-click icons) and align them on the corner of the wall, as seen in the image above.
Use a no bounce two and a half charge Shock Bolt, and it should land at the orb on B Main. You have around three to four seconds to set this second Shock Bolt because the first Shock Bolt has a big delay.
Fracture
There are a lot of Shock Bolt lineups for Sova in Fracture. Attackers securing the ultimate orbs are popular for the attacking team because they can spam Killjoy’s ultimate on B Site every three rounds.
For the Shock Bolt lineups, most of them will be focused on aiming at these orb spots and try to get a free kill before a big push happens.
B Generator to B Arcade Orb – Double Shock Bolts
Bounce: One
Charge: One and a Half
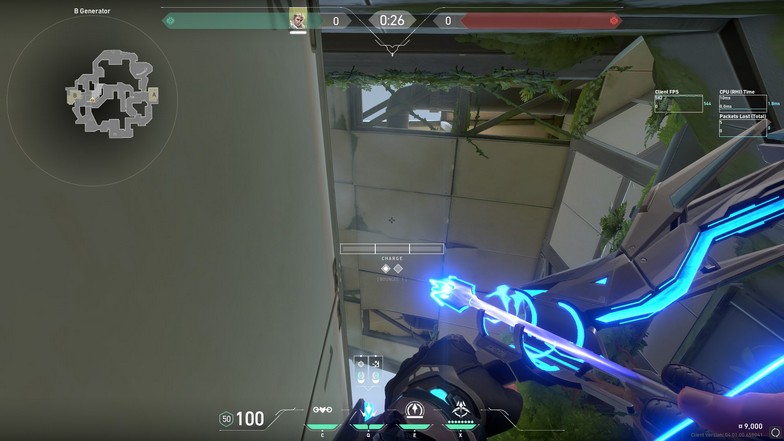
Position yourself on B Generator and hug the corner. Align the edge of your charge bar on the intersection of the four panels. Use a one bounce one and a half bar charge Shock Bolt.
Bounce: None
Charge: Instant
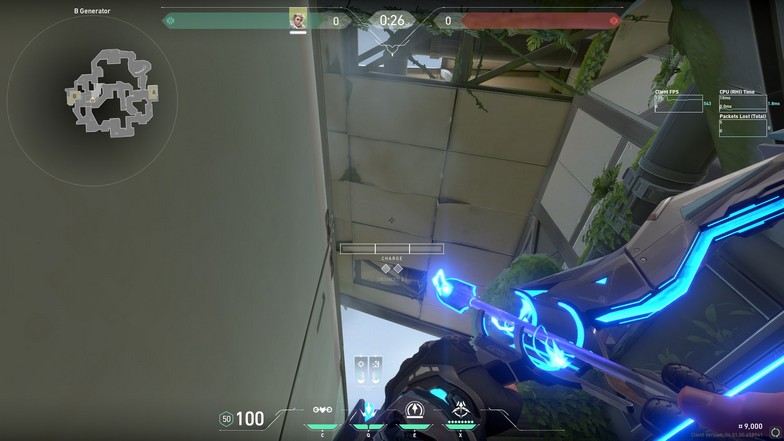
Aim the bottom tip of the first bounce icon to the metal frame. For the alignment, drop your aim straight down from the first Shock Bolt placement.
Use a no bounce instant charge Shock Bolt, and it will land at the same time as the first Shock Bolt if you shoot it immediately.
B Link to B Tree Orb – Double Shock Bolts
B Link Position
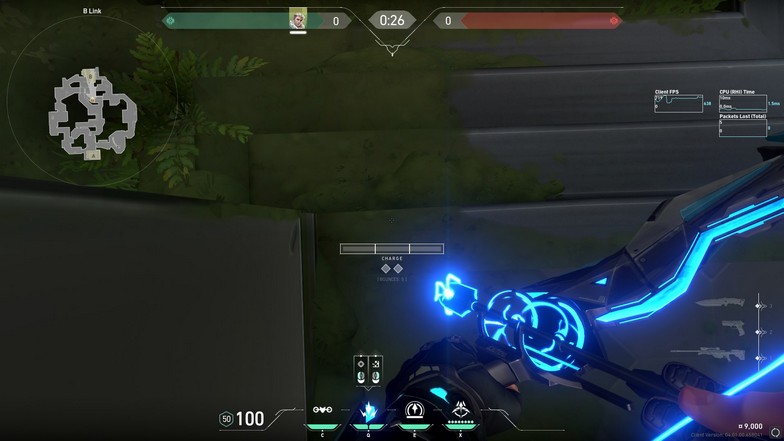
Position yourself in B Link and hug the corner of the door and the edge of the staircase.
Bounce: None
Charge: Two
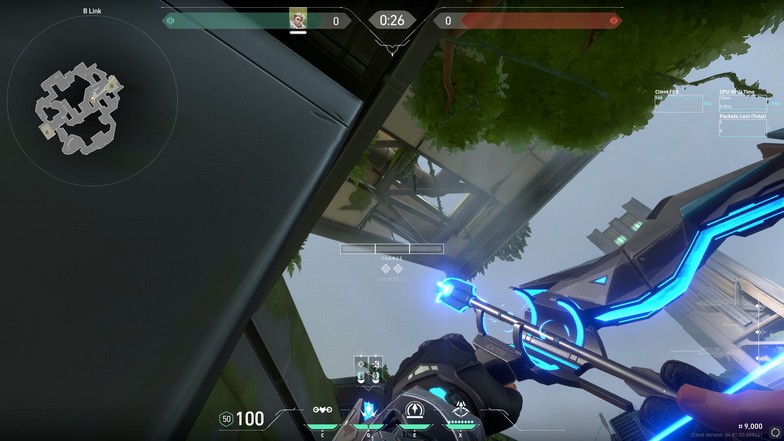
Aim at the metal frame shown in the image above. Use a no bounce two charge Shock Bolt, and it will slowly land on the B Tree orb.
Bounce: None
Charge: Instant
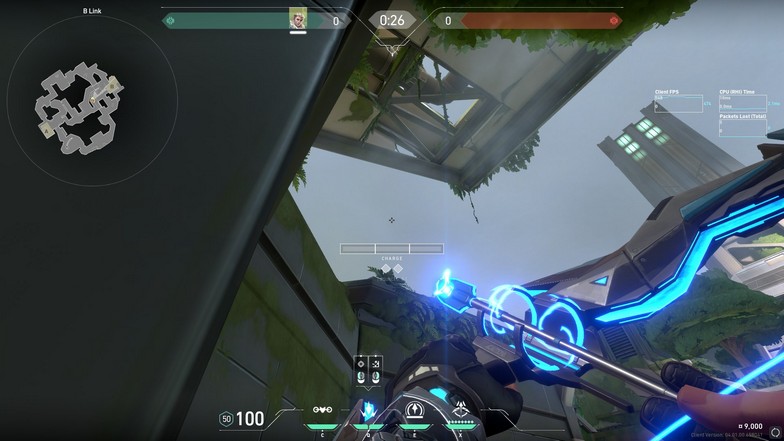
Aim a little lower and align the bounce icons on the leaves on top of the wall. Use a no bounce instant charge Shock Bolt.
A Site to A Dish Orb – Double Shock Bolts
Bounce: Two
Charge: Two and a Half
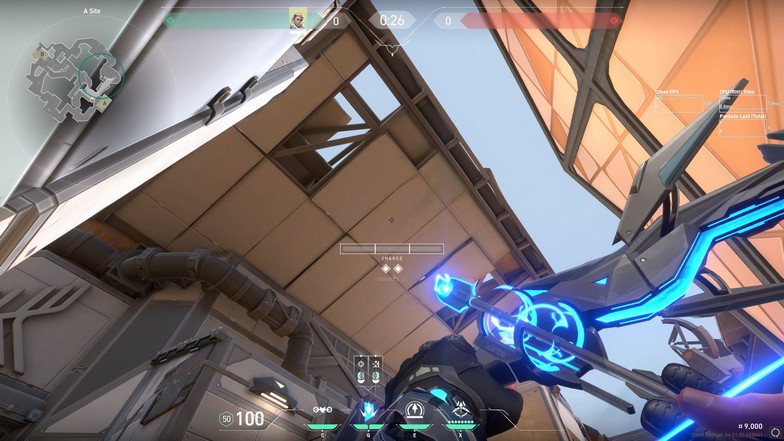
Position yourself next to the box on A Site. The position on the box is close to A Rope and align the left ear of the Owl Drone icon on the upper-right frame of the entryway. Use a two bounce two and a half bar charge Shock Bolt and it will bounce slowly to the orb on A Dish.
Bounce: One
Charge: One and a Half
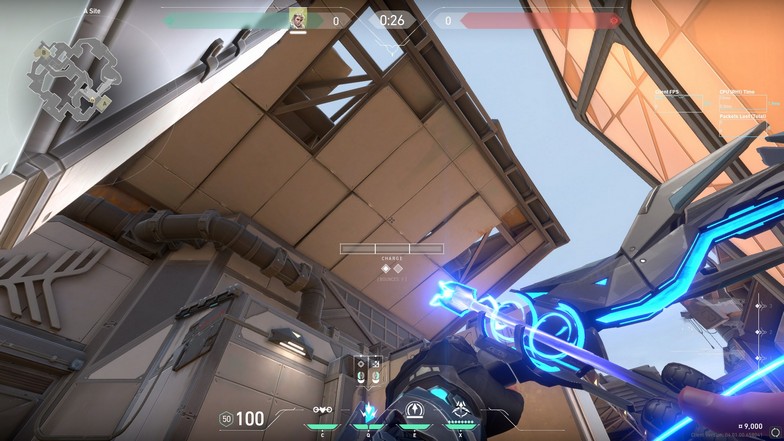
From the same position, aim at the bottom left panel as shown in the image above. Use a one bounce one and a half bar charge Shock Bolt.
Haven
Haven also has a lot of good Shock Bolt lineups. There are some that are easy to pull off, but most of your Shock Bolt could also be used during battle because of all the corners you can bounce them off.
A Site Default Plant – Double Shock Bolts
A Link Position
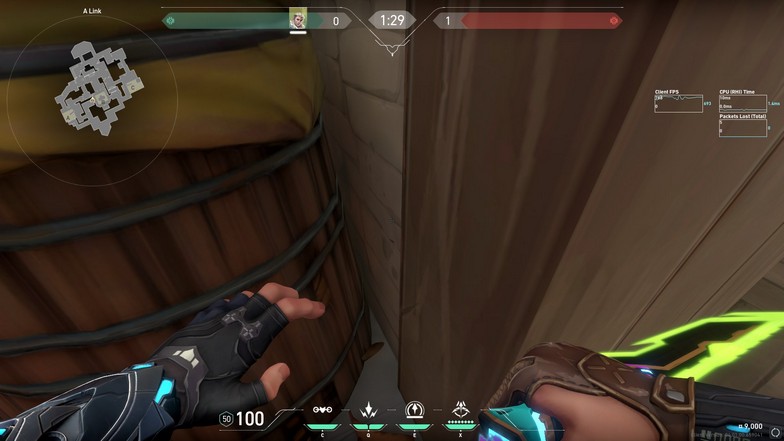
Position yourself outside B Site going to A Link and go between the wooden frame and the wooden barrel.
Bounce: None
Charge: One and a Half
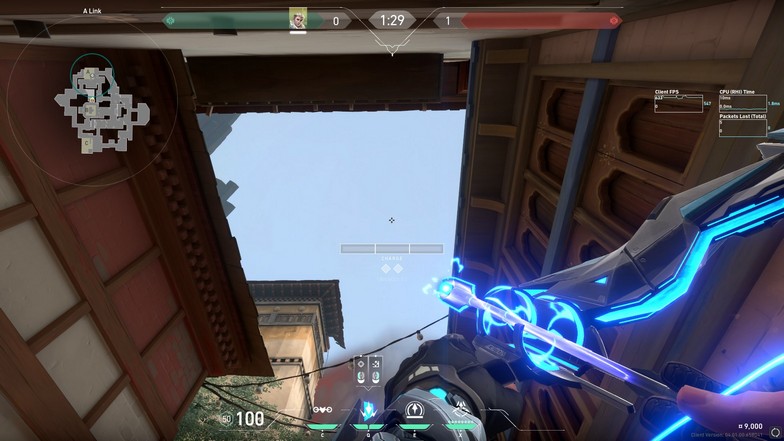
Align the left curve of the Owl Drone icon to one of the ledge on the rooftop as seen in the image above. Use a no bounce one and a half bar charge Shock Bolt and it will land directly at the A Site default plant.
Bounce: None
Charge: Instant
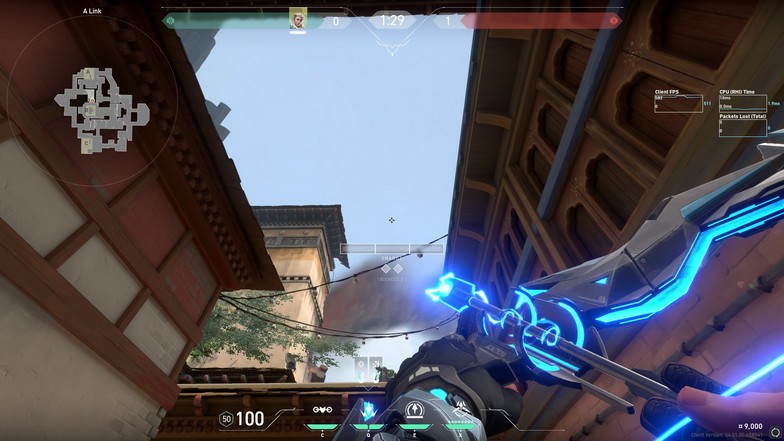
Move your crosshair down so that the mouse icon on the Shock Bolt tooltip slightly overlaps the wall in front of you. Use a no bounce instant charge Shock Bolt.
C Link to C Site Default Plant – Double Shock Bolts
Bounce: None
Charge: One
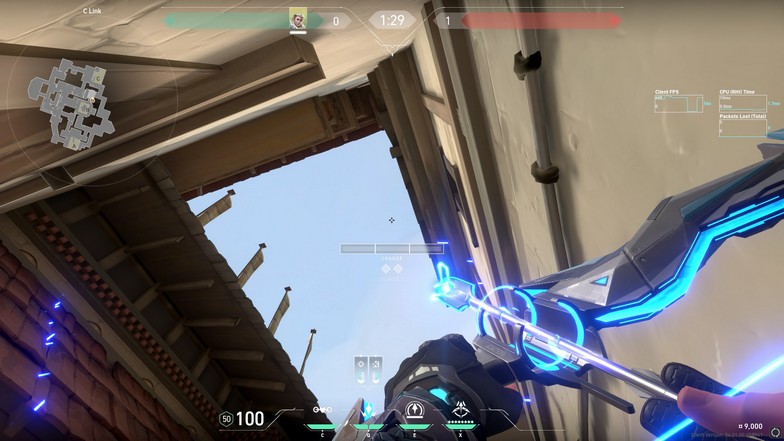
Position yourself on the corner of C Link, but be careful from enemies who can push C Garage. You are wide open if your team does not have control of C Garage. Align the line of your HP Hud on the wooden plank on the rooftop.
Use a no bounce one bar charge and it will land on C Site default plant after three seconds.
Bounce: None
Charge: Instant
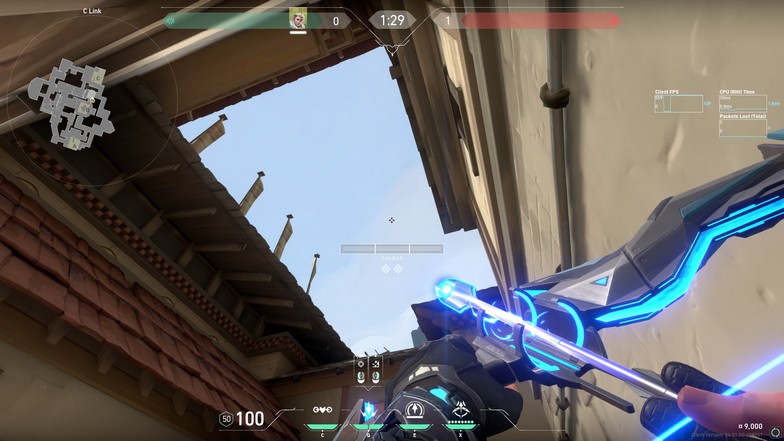
Place your crosshair down until the white circle on the Shock Bolt right-click tooltip hits the top of the wall. Use a no bounce instant charge Shock Bolt as fast as you can so they land at the same time.
Icebox
Sova’s role on Icebox is more about using his information gathering skills because of the number of corners you need to clear on B Site and A Site. There are only a few Shock Bolt lineups that are worth using in Icebox.
A Site Default Plant – Single Shock Bolt
Mid Boiler Position
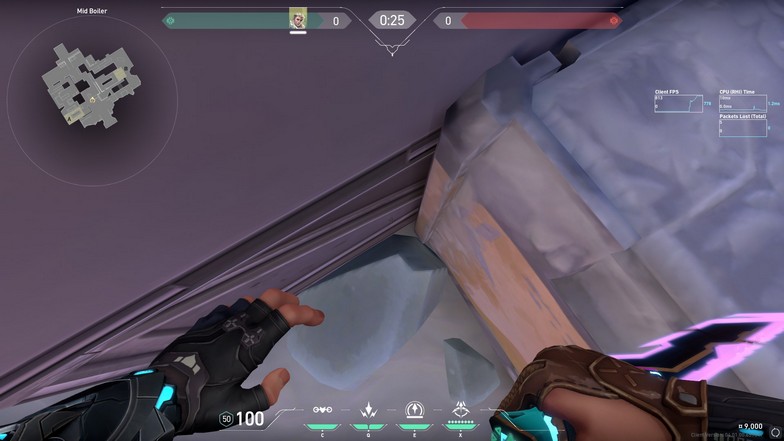
From the Mid Boiler, position yourself next to the small box where you cannot be seen by the enemies peeking from the middle.
Bounce: Two
Charge: Two and a Half
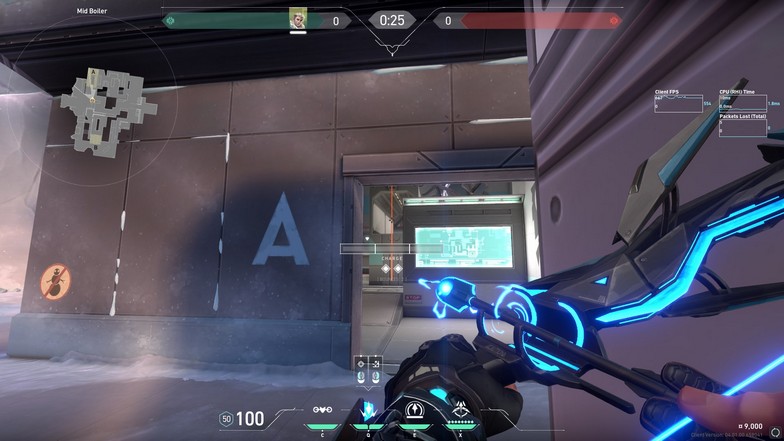
Aim where the rope and the A Nest wall intersects and use a two bounce two and a half bar charge Shock Bolt.
You can do the double Shock Bolt variation by entering A Screens fast with a jumping instant charge Shock Bolt while aiming at the top-left corner of the screen. You might look at your screen, but it is literally the screens on the A Site.
Just aim at the general direction of the default plant and shoot an instant charge. You can gauge how long you need it to go, and you will get better at it once you play more Sova games.
However, the double Shock Bolt variation is too dangerous because they already have the site. Even the first Shock Bolt position is compromised from the back site.
Mid Boiler to B Orb – Double Shock Bolts
Mid Boiler Position
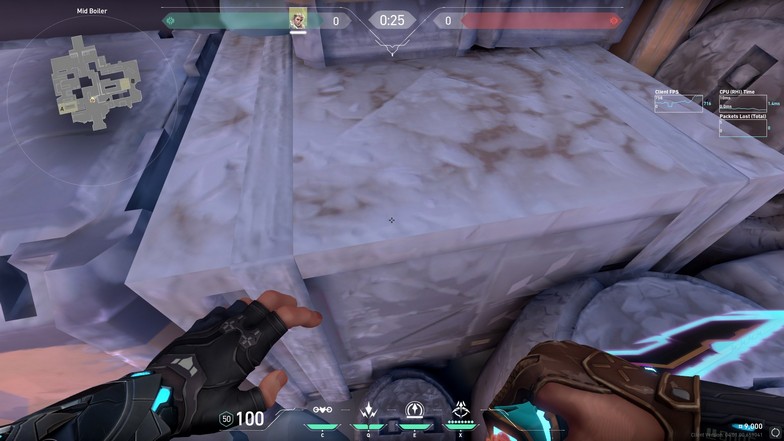
This position is different from the first one. You should be on top of the small barrel in Mid Boiler for this double Shock Bolt lineup.
Bounce: None
Charge: Two

Align Sova’s middle knuckle to the rooftop corner in front of you. Slightly move it below and use a no bounce two charge Shock Bolt, and it will land slowly to the B Green orb.
Bounce: None
Charge: One and a Half
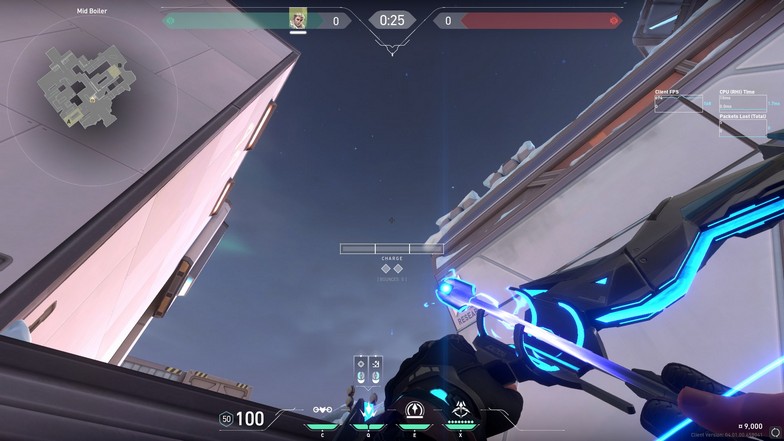
Lower your aim from the first Shock Bolt lineup until the lower-left HUD of your Shock Bolt tooltip hits the tip of the circle on the roof. Use a no bounce one and a half bar charge Shock Bolt.
When your team calls out a B Green push, you can immediately set this up because they will also push the same area even without getting the orb.
B Site Default Plant – Double Shock Dart
Bounce: None
Charge: Two
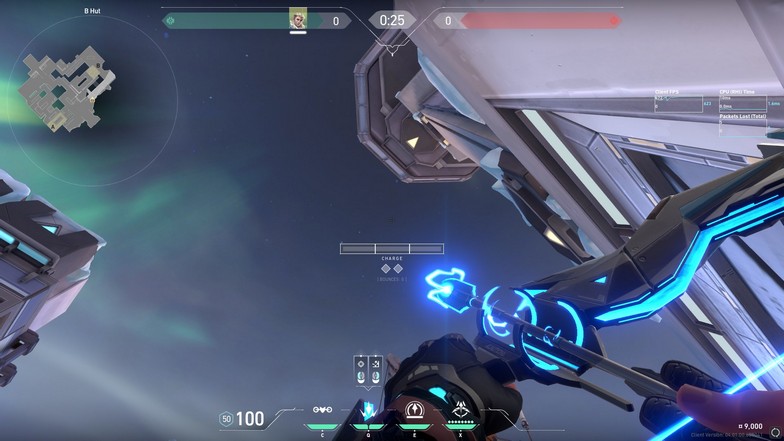
This one is hard to spot because the charge bar hides the star you are aiming for. Use the top-left corner of your charge bar and cover the star with it. The image above is not the perfect spot because the star is shown here for reference. You need to cover it before you shoot your Shock Bolt. Once you are in the game, you will know where it is.
Use a no bounce two charge Shock Bolt, and it will land on the default plant. If the Sage wall is perfectly placed, it might hit the top of the wall instead.
Bounce: None
Charge: One and a Half
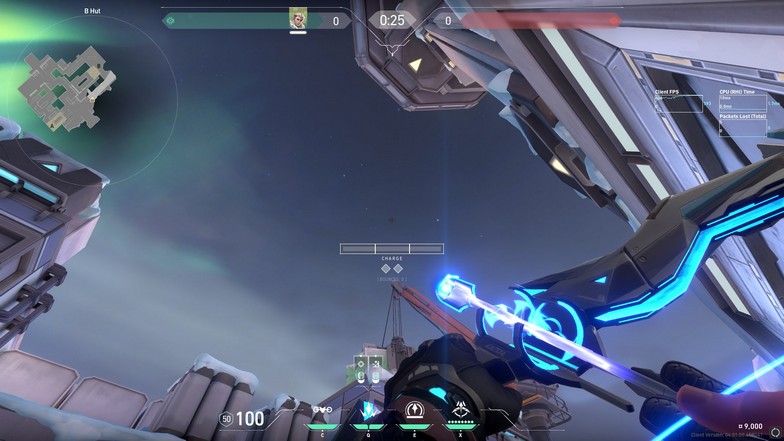
There are a lot of indicators for this next Shock Bolt lineup. You can look at the arrow below the Shock Bolt tooltip, the Owl Drone icon, or the letters C and E on the word [Bounces: 0]. Use a no bounce one and a half bar charge Shock Bolt.
Split
Split is a hard map to use Shock Bolts. Even the default plant on A Site isn’t always followed by the attackers because they have complete control of the site whenever the plant.
A Rafters to A Main – Double Shock Bolts
Bounce: One
Charge: Max
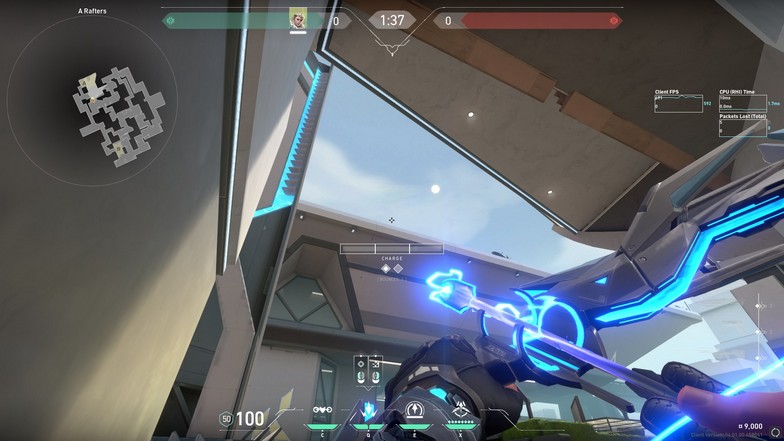
Position yourself on the corner of A Rafters and align the small slope on your HP HUD to the yellow diamond on the wall. Look at the image above for reference. Use a one bounce max charge Shock Bolt and it should hit A Main.
Bounce: One
Charge: Two
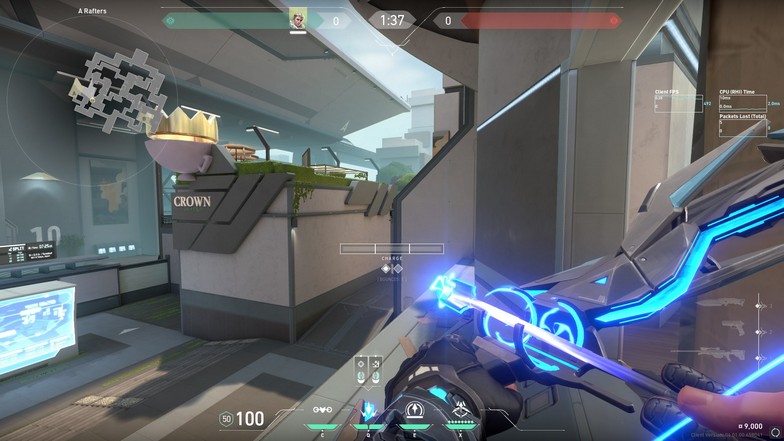
For the next one, aim at the tiny gap on the wall and use a one bounce two charge Shock Bolt. Because of the height of your position, the Shock Bolt will bounce down.
A Lobby to A Screens – Double Shock Bolts
Bounce: Two
Charge: Max
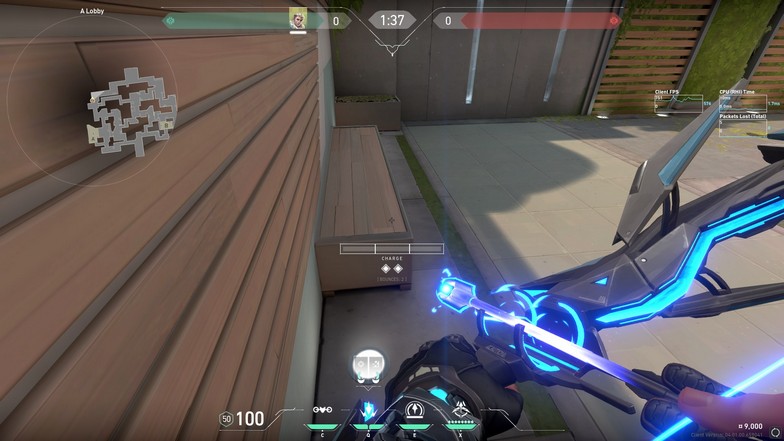
Position yourself on top of the planter box in A Lobby. Aim at the line on the bench exactly on the picture and use a two bounce max charge Shock Bolt.
Bounce: None
Charge: One
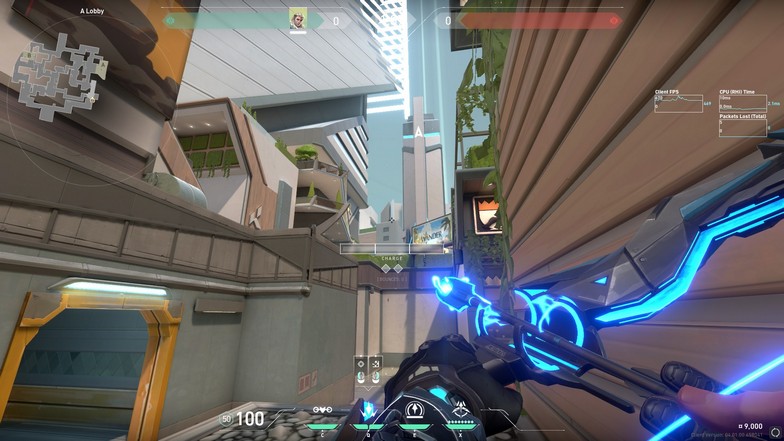
Aim at the tip of the smaller building and use a no bounce one charge Shock Bolt. Both Shock Bolts will land on A Screens. Players usually camp in that area even when smoked.
Attacker Spawn to Mid Vent – On top of Bicycle – Double Shock Bolts
Bounce: One
Charge: Max
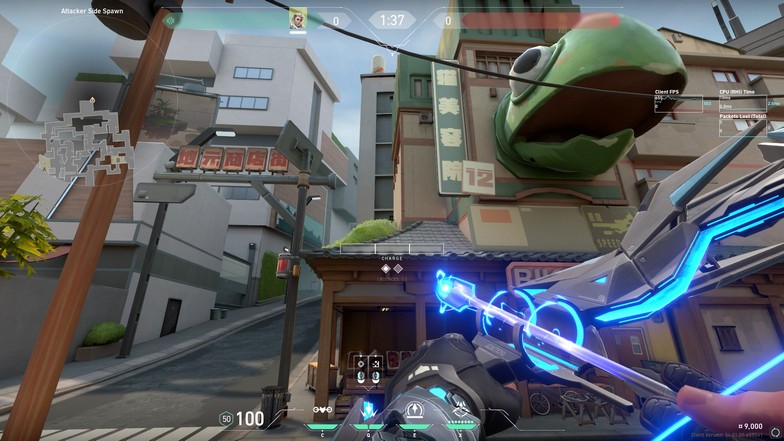
From Attacker Side Spawn, go on top of the bicycle and aim at the upper-right corner of the leaves and next to the wall. Make sure to slide your crosshair up the leaves because you might be using a big crosshair.
Use a one bounce max charge Shock Bolt, and it will land inside Mid Vent.
Bounce: One
Charge: One
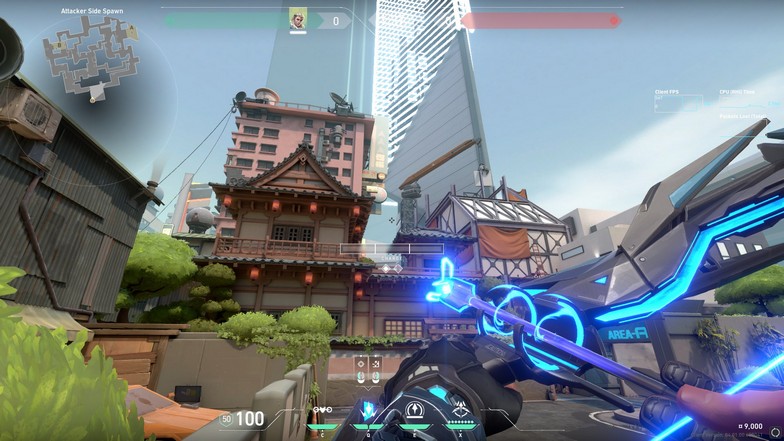
Align the bottom tip of your bounce bars on the curves of the rooftop seen in the image above. Use a one bounce one charge Shock Bolt, and it will land fast on Mid Vent.
You can actually use a no bounce if you want the Shock Bolt to hit closer to the exit of Vents. However, it will only damage the enemy significantly if they push. The first Shock Bolt hits the little corner inside Vents.
B Alley to B Site Default Plant – Double Shock Bolts
Bounce: None
Charge: One and a Half
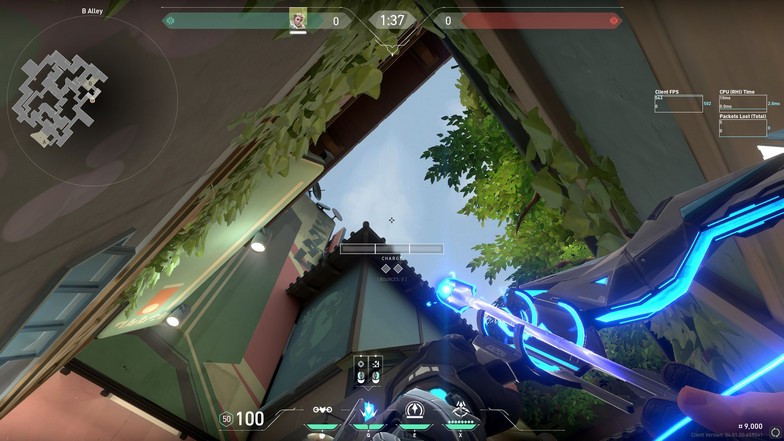
Hug the corner on B Alley and align the letter “E” on the word “CHARGE” on one of the wooden planks of the rooftop. Use a no bounce one and a half bar charge Shock Bolt, and it will land slowly on the B Site default plant near the box.
Bounce: Two
Charge: Max
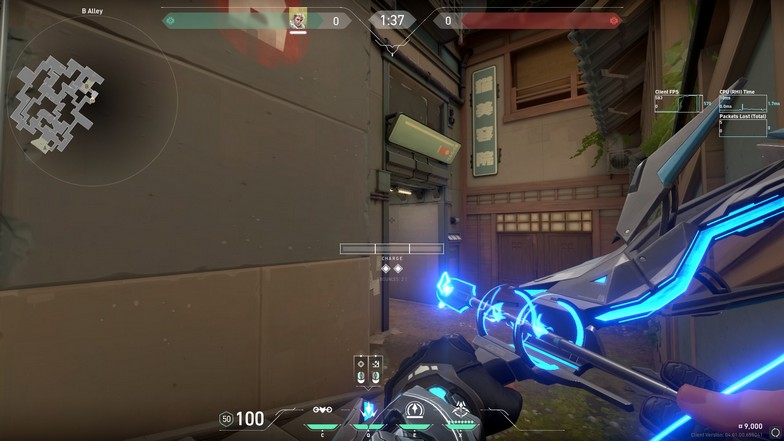
For the second Shock Bolt, you need to move and look at the B Alley exit to B Site. Draw an imaginary rectangle on where the crosshair is placed in the image above. Aim anywhere on the general area and use a two bounce max charge Shock Bolt, and it will zigzag towards the default plant.

