Haven is a classic Valorant map with three sites. Having three sites changes a lot of strategies and playstyles.
Attackers will have more options. It makes controlling space much more crucial on the map for both sides.
Because of the map layout, gathering info and being patient are key to winning rounds.
We’ll show you a detailed map guide covering everything from callouts to the best agents to pick.
Map Overview
Haven is a bit of an attacking-sided map. It has three sites, which makes it hard to rotate from A Site to C Site.
As a defender, you’ll have to gain information so you don’t get caught off-guard when covering the sites.
For example, if you play passive as a defender, you won’t know if they will hit A Site or C Site. Once the attackers execute, it’ll take a long time before defenders can rotate.
Haven is an extremely wide map. Attackers can even cut rotations from B Site and force defenders to run all the way from Defender spawn.
There are also a lot of long and narrow pathways. It makes agents like Breach and Jett extremely powerful on the map.
Operator-users will be effective as they can cover these long pathways in C Long, A Long, and even B Site looking to Mid Window.
Callouts
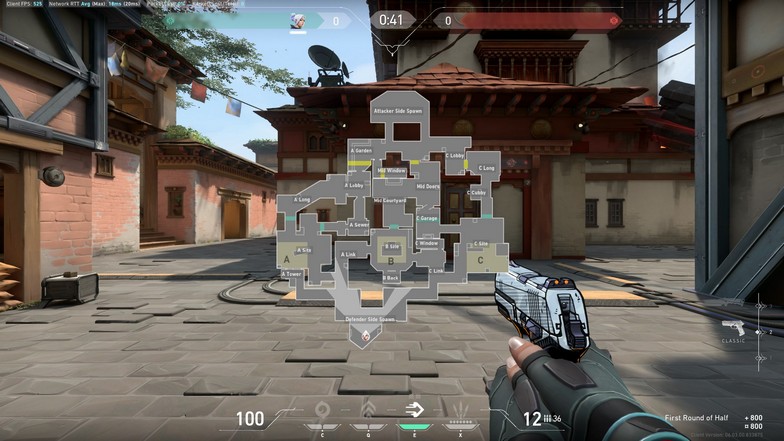
Here are the common callouts seen on the minimap:
- A Garden
- A Lobby
- A Long (A Main)
- A Sewer
- A Site
- A Tower (Heaven)
- A Link
- Mid Window
- Mid Courtyard (or just Mid)
- Mid Doors
- B Site
- B Back (or Gong)
- C Garage
- C Window
- C Link
- C Lobby
- C Long (C Main)
- C Cubby
- C Site
Other callouts are also crucial to know. These are the following callouts that aren’t seen on the minimap:
- A Hell – Cubby under A Tower or A Heaven)
- Graffiti – The long wall on the right of A Site (as a defender) with a graffiti
- Gong – The back of B Site (players usually callout ‘Back of B,’ but saying ‘Gong’ means they are literally at the back behind the wooden wall)
- Mid Cubby – Small cubby approaching B Site from Mid Courtyard
- Platform – C Site’s metallic platform near the back. Defenders hold this for deep coverage looking to C Garage and cross-firing attackers on C Long
Attacking Strategies
Split A Push

You’ll always want to push A Site through two fronts – A Sewers and A Long. Defenders normally check A Long and A Sewers to gain information and back out.
Attackers can punish this by using abilities like a Boom Bot or timed flashes when they peek. Defenders don’t necessarily overextend when they peek A Long.
Defenders have the advantage because they can hold the angle quicker than the attackers getting to A Lobby.
As an attacker, Jett usually Cloudbursts the A Lobby entrance from A Long to prevent defenders from picking off a teammate before the push comes.
Don’t use controller smokes here!
When you execute your A Site push, A Sewer and A Long need to push at the same time. Otherwise, you’ll get picked off in a crossfire.
Defenders will usually hold Graffiti and the back of B Site. High-ranked lobbies rarely hold A Tower (Heaven) because it’ll always get smoked by attackers.
Focus on clearing the site and planting the spike open to both A Sewers and A Long.
Once the spike is planted, immediately play for the spike. If you didn’t lose that many players, you can have a few players defend from the site.
Split C Push

While it is fine to push C Site from C Long alone, you’ll want to clear out C Garage. It is a line of fire you want to clear out before attacking because it is a cross-fire angle from players defending C Site.
If you want to go for a fast C push, you can smoke or wall it out.
The benefits of splitting your C Push are preventing C Garage from focusing on C Long, and attackers can also hear incoming rotations in C Garage.
When you push the C Site, combine your initiator’s utilities with a flash as you enter the site.
Check all corners and flash the back site again. Once it is clear, plant the spike and play for post-plant situations.
If you have C Garage, you can plant the spike open to both B Garage and C Long.
Try Faking

The biggest mistake players make in Haven is rotating too fast. Attackers can play it slow, covering A Lobby, Mid, and C Lobby.
You can even make a play by:
- One player delayed walk towards A Lobby and A Sewers
- One player holding Mid and pressure C Garage
- Three players show in C Lobby
When defenders use their utilities to delay a push from C Site (because they saw three players), attackers can throw a few abilities and rotate back to C.
The player walking towards A Sewer should hear defenders vacating the A Site. If not, they can continue walking and look for openings.
If someone is there anchoring, that player needs to fight and win. When the site is clear, rotate fast, and the player holding A Site should delay the enemy while playing safe.
If they lose, your team can execute at C Site or switch to B Site, depending on the situation.
There are also situations where this player walking on A Site still sees two players. When that happens, execute C Site quickly.
Fakes have a high rate of success because you gain a lot of information on randomly ranked lobbies. Even in high-ranked lobbies, it is the ‘usual’ slow play used to gain information.
Defending Strategies
Sage’s Barrier Orb
Sage walls are extremely efficient in blocking angles and rotations. The biggest one is walling B Site from attackers.
The reason why players do this are the following:
- It prevents a fast B Site push
- Defenders can safely rotate from C to A and vice versa using B Site
- Defenders can leave B Site and help A or C. Once the wall breaks, you should have a defender in B Site again
In 5-stacks, there are better ways to use the walls. This strategy is effective in randomly ranked lobbies because attackers rarely have a super-coordinated push.
Positioning

When the round starts, you want to use a 2-1-2 positioning.
The number refers to the number of players, and the sequence refers to A Site – B Site – C Site
Two players cover A Site (A Sewer and A Long). One player stays in B Site. If you have controllers like Brimstone or Omen, they would need to stay in B to smoke other sites quickly. The remaining two players cover C Site and C Garage.
On rotations, you want to go for 4-1-0 or 0-1-4 at times. When they attack A Site, you want one player holding B for the flank.
If the attacker gains control of B Site because of the early rotation, they can sandwich your position to either C Site or A Site.
Leaving one player in B Site to cover flanks is also good.
Another crucial point is maintaining control of C Garage. C Window can actually hear enemies in Mid and Mid Door.
Since attackers can easily choose to attack B Site or C Site in mid, you want to position yourself where you can hear where they are going.
Contesting A Lobby

While this is a risky strategy, defenders are a bit favored in A Long. They can hold the angle faster than the attackers.
When defenders peek at A Long, they can gain information about an incoming attack on A Site. However, even if they peek, attackers can easily trade the defender unless it is a Jett or a Chamber.
Since you have two players defending A Site, you can commit a few utilities to gain control of A Lobby.
This is where Breach, Omen, or Astra comes in handy. Omen or Breach can support by playing in A Link as they can stun or flash enemies in A Lobby from A Link.
Astra can support with a pull, stun, or even fake smokes from anywhere on the map.
It is OK to commit a few utilities to control A Lobby. Attackers will need to use their own to take it back again anyway.
Once you have control of A Lobby, your team can adjust to control other areas of the map.
Since you can also hear mid and rotations coming from C Lobby to A Lobby, you know where the attackers are at this point.
Agents
There are specific agents that are unbelievably good on Haven. Some of these agents will surely increase your win rate on the map if you use them correctly.
Breach
Since there are a lot of close-quarter areas and long and narrow pathways, Breach’s abilities are perfect for the map.
Breach can support A Site on defending on A Link. He can also prevent enemies from peeking A Long on the attacking side by stunning that area at the start.
His flashes are easier to use because of all the tight walls and objects on the map. It also makes Aftershocks more effective in clearing angles and corners.
Fade or Sova
Sova is only as useful as Fade if you memorize all the lineups. Otherwise, Fade is the best info-gathering agent on the map.
Nothing can replace Fade’s double Prowlers for clearing tight corners. Since Haunt is easier to use on the spot, it is much better than a Recon Bolt. As long as you time it correctly with a push, Fade is a lot better.
Sova’s Owl Drone is also great and does what a Prowler can do. It just depends on preference. Fade can use Nightfall to clear the sites, while Hunter’s Fury is more on post-plant situations or catching aggressive attackers on the long pathways.
Jett
Jett is a strong duelist in general. She can dash out of trouble, which makes it hard for enemies to punish her for being aggressive.
This is much more pronounced in Haven. Since you can play aggressively and leave untouched, Jett’s can take space and gain info by trying to fight in C Long or A Long.
Jetts are the designated Operator users. When she plays aggressively, she can get pick-offs with an Operator and run away safely with a Cloudburst and dash.
Another notable skill is her ultimate ability. She can Updraft from A Lobby to snipe defenders peeking A Long on an off-angle.
She can do the same on A Link when the enemies are trying to set up for a post-plant situation on A Site.
There are a lot of high boxes Jett can Updraft too. It adds another layer of defense on each site because it forces enemies to look for players on top of the boxes too.
Omen
Omen’s smokes are very cost-efficient. He is picked because he can smoke sites from far away while having a blind or flash to support.
Since there are a lot of long hallways, Omen’s blind works perfectly because it goes through a straight line.
It can also go through walls, which makes his blind go through A Lobby from A Link. With the same logic as Jett’s Updraft, Omen’s teleport can force enemies to look on top of the boxes when peeking out.
While Omen has one of the most underwhelming ultimates, it can be used for info-gathering, which is crucial in Haven.
He can also teleport the spike all the way from A Site to C Site and vice versa. You can run plays knowing you can do this fake as a team.
If you have a Cypher on your team, you can time the ultimate with Cypher’s ultimate and teleport to a place without players and flank.