The Tideripper is one of the deceptively dangerous machines in Horizon Forbidden West. Although it is most threatening when underwater, this machine can also be surprisingly dangerous on land.
Luckily, we know everything about this machine, and we’re about to share all this knowledge with you. Whether you’re looking for specific resources or the machine is preventing you from finishing a quest, this guide has everything you need.
The Tideripper is a large and powerful acquisition machine that filters sediment for resources. Whether on land or in water, it’s guaranteed to deliver devastating attacks. However, these attacks are not that intimidating once you understand how they work.
Keep reading to find out how to defeat a Tideripper in Horizon Forbidden West. Our guide will walk you through its attacks, weaknesses, and the rewards you get from them.
Where to Find Tiderippers
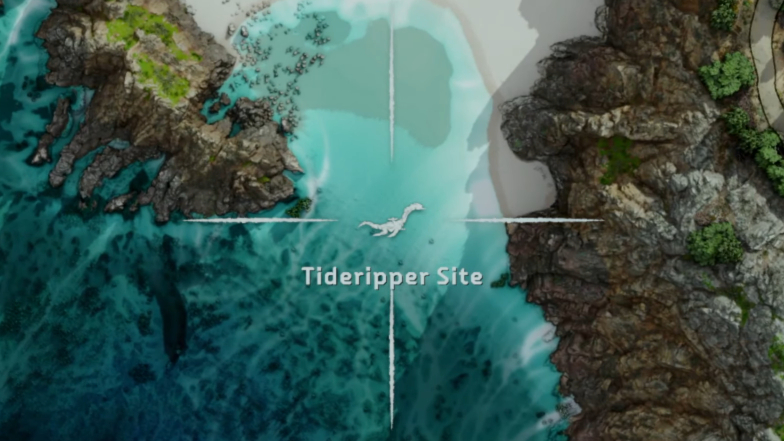
There is a Tideripper at the first Cauldron you will find in Horizon Fordibben West. Cauldron Mu is located to the northwest of Stone’s Edge, and there’s a Tideripper to the Southeast of it.
This machine will be roaming around this area with a few Redeye Watchers. You can also find other two Tiderippers in the nearby area, but they will be underwater.
You will find another one to the Southwest of Thornmarsh, on the coast. This Tideripper will be alone and underwater.
To the Northeast of the Quen Outpost, you will find another Tideripper underwater. This one will be a bit harder to locate due to the moving waters. Also, this location is not marked on the map, making it even harder to find this machine.
There is another unmarked Tideripper to the South of Cauldron Mu. This machine will be underwater, swimming around the Ruins of the Hoover Dam.
Strengths, Weaknesses, and Loot
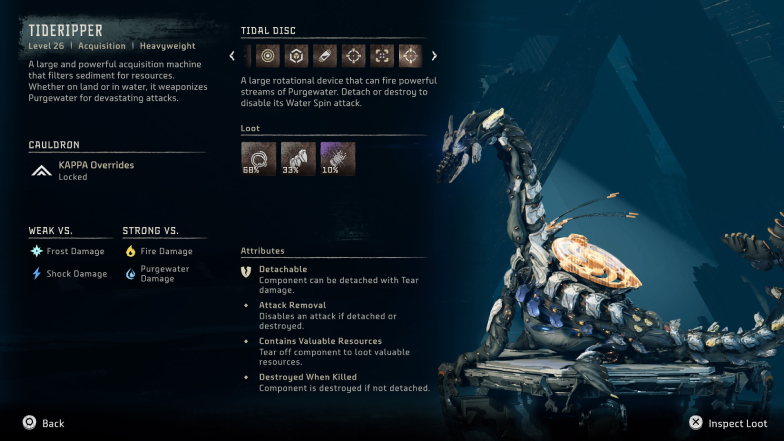
Tiderippers can shoot pressurized blasts of purgewater. This attack happens in a rotating motion, and the time it remains effective depends on the Tideripper’s current state.
This machine can also fire Purgewater from many different areas of its body, including its rotating discs and head.
The Tideripper is weak versus frost and shock damage, but it is strong versus fire and purgewater damage.
You will soon realize that as long as you have shock and frost arrows to attack its weak spots, the Tideripper is not that menacing. It might also be good to have a couple of plasma arrows to target its Glowblast Canisters.
Machines have different attack types, weapons, and weaknesses in Horizon Forbidden West. It can be a bit overwhelming to constantly come up with strategies to defeat each of the large machines in the game.
We made it easier for you, though. Here are all the Tideripper’s parts and why they matter:
- Chillwater Canister: This is a detachable part that is destroyed when the creature is defeated. It contains valuable resources. Besides detaching to collect its content, you also have the option of hitting it with frost damage to cause a chain reaction. However, you must remove its protective plates so you can target it.
- Exhaust Port: This is an indestructible weak spot, but you deal massive damage when you hit it. It has to be exposed before being targeted. A Tideripper’s Exhaust Port only shows up when its purgewater supplies are depleted.
- Glowblast Canister: This is a detachable part that contains valuable resources. It is destroyed when the Tideripper is defeated. However, it can also be detonated with plasma damage to cause massive damage to the machine.
- Heart: This is an indestructible weak spot, but you deal massive damage when you hit it. It has to be exposed before being targeted.
- Processing Capsule: This is a detachable piece that contains valuable resources. It is destroyed once the creature is defeated, so you must detach it before it happens if you want its content.
- Purgewater Cannon: The Tideripper’s Purgewater Cannon is one of its primary weapons. It shoots high-pressured purgewater. It’s a detachable weapon with valuable resources. It is destroyed when the creature is defeated. If detached or destroyed, the Tideripper won’t be able to use purgewater beams anymore.
- Purgewater Pouch: This is a destructible piece that contains valuable resources. Unlike other parts that have loot, this one persists when the machine is defeated and will contain resources if intact. It’s also an explosive part that you can attack to deal additional damage, but it’ll cause you to lose the loot. If you destroy all Purgewater Pouches, some of the Tideripper’s attacks will lose their purgewater effects.
- Purgewater Sac: This is a destructible piece that contains resources. Unlike other parts that have loot, this one persists when the machine is defeated and cannot be destroyed if you want its content. However, since it’s explosive, you can opt to attack it to forgo the extra loot and deal additional damage. On top of that, if you destroy both Tideripper’s Purgewater Sacs, its body slam attacks lose their purgewater effects.
- Sparker: This is a detachable part with valuable resources that is destroyed when the creature is defeated. It has protective plates covering it. Players can choose between removing it to collect extra loot or hitting it with shock damage to cause a chain reaction.
- Tail: This Key Upgrade Resource is destroyed when the creature is defeated. Detaching it prevents the Tideripper from using its tail attacks.
- Tail Canister: This is a detachable piece that contains valuable resources. It is destroyed once the creature is defeated, so you must detach it before it happens if you want its content.
- Tidal Disc: The Tideripper’s Tidal Disc is one of its main weapons. It is used to launch purgewater streams in a circular motion. It’s a detachable weapon with valuable resources that is destroyed when the creature is defeated. If detached or destroyed, the Tideripper won’t be able to use its circular purgewater attacks anymore.
Once you have been able to identify the most critical parts, such as its Purgewater weapons and containers, you will be able to quickly defuse most of what makes a Tideripper dangerous on land.
With time and practice, I can assure you that taking one of these machines down will be reasonably straightforward. Start by removing the weapons that you find most annoying.
You also have the option to challenge yourself and try to defeat a Tideripper without attacking its Purgewater Sacs and Purgewater Pouches for the extra loot.
These are the items that Tiderippers drop:
- Metal Shards: Used for crafting ammunition and purchasing items from merchants.
- Purgewater: This resource is obtained from machines that use purgewater weapons, or carry Purgewater Canisters, or intact Purgewater Sacs. Tear off the canisters to harvest more. It’s used for crafting ammunition and traps that deal purgewater damage to drench enemies, neutralizing their elemental attacks and increasing their vulnerability to frost and shock attacks.
- Large Machine Core: This rare resource is used for upgrading the most powerful weapons and outfits at the Workbench. It is far easier to get this weapon from Tiderippers than by defeating a Thunderjaw or a Slaughterspine.
- Tideripper Circulator: This item, which is unique to Tiderippers, is used for purchasing and upgrading weapons and outfits, or selling for Metal Shards.
- Slaughterspine Primary Nerve: This rare resource, which is also unique to Tiderippers, is used for upgrading weapons and outfits, or selling for Metal Shards.
- Volatile Sludge: This is a very rare resource obtained from the most powerful and dangerous machines. Sometimes, it can be obtained from any sort of Apex machine. It is used for crafting advanced and elite ammunition and traps.
- Machine Muscle: Used for crafting ammunition for Sharpshot Bows, Blastslings, Ropecasters, and Shredder Gauntlets.
- Braided Wire: Used for upgrading weapons at the Workbench.
- Crystal Braiding: This ammunition resource is usually obtained from machines with Stealth Generators, Force Leaders, Gravity Generators, laser weapons, or shields. It is used for crafting Berserk Hunter Arrows, Targeting Hunter Arrows, Staggerbeams, and Shieldwires.
- Luminous Brainstem: This is a very rare gear upgrade resource. It is rarely obtained from the most powerful and advanced machines. This item can be used for upgrading the most powerful weapons and outfits at the Workbench.
- Metal Bone: This is a rare Ammunition Resource that is used for crafting ammunition for Tripcasters, Spike Throwers, and Boltblasters.
- Sturdy Hardplate: Used for upgrading outfits at the Workbench.
Tideripper’s Attacks
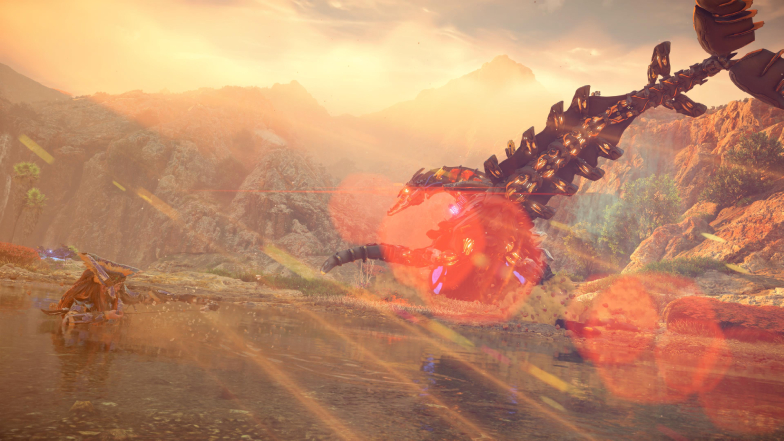
- Neck Sweep: It can also use its long neck to strike you when you are within range. This animation is telegraphed enough for you to dodge if you were paying attention to the machine’s movements.
- Charge: This is a very cool-looking move. The Tideripper uses its Purgewater Cannons to launch itself towards you. It moves surprisingly fast on a straight line, but this is a highly telegraphed movement that is easy to dodge as long as you are not too close.
- Body Slam: It will lift its fins before trying to hit you with its belly. Get out of the way since this attack deals massive damage and has purgewater effects. Although this machine is enormous, sometimes it performs this attack from really far away. Don’t be surprised if it propels itself and tries to land on top of you.
- Tail Sweep: If you are behind the Tideripper, it will use its tail to attack you. Before doing so, it turns its head to one side and the tail to the other side. Right after trying to sweep you away with its tail, the Tideripper will also try to hit you with its neck, so stay alert after dodging the first attack.
- Flipper Slam: This is a melee attack that is deceptively fast and powerful. Pay attention to when the Tideripper lifts only one of its flippers. It will jump towards you right after that and try to smash Aloy’s head.
- Headbutt: This attack is a bit harder to predict. Watch out for a really swift headbutt. Dodge away once you see this machine moving its head away. The Tideripper will slam its head against the ground. Make sure you’re not in this attack’s way.
- Tidal Disc Streams: The Tideripper’s Tidal disc is really annoying to deal with. It attacks with three streams of purgewater that are constantly circling around, making it incredibly hard and dangerous to get close to this machine. Make sure to detach it as soon as you can.
- Purgewater Cannon: These two weapons are on each side of the Tideripper’s head. The high-pressure purgewater shots come in a straight line, which is quite fast, but sometimes the machine uses them in a sweeping motion that is much easier to notice.
- Rock Attack: This caught me by surprise the first time I saw it. The machine will dive its head into the ground and grab rocks to throw at you from a distance. Luckily, the thrown rocks are somewhat easy to avoid.
Detachable Weapons

One of our tips to defeat the Slaughterspine and other large machines is to use their weapons once you remove them from the machines’ bodies.
However, unlike other large machines, the Tideripper has no detachable weapons that can be used by Aloy once they hit the ground.
You will have to deal with this creature with nothing but what you own.
Apex Tideripper
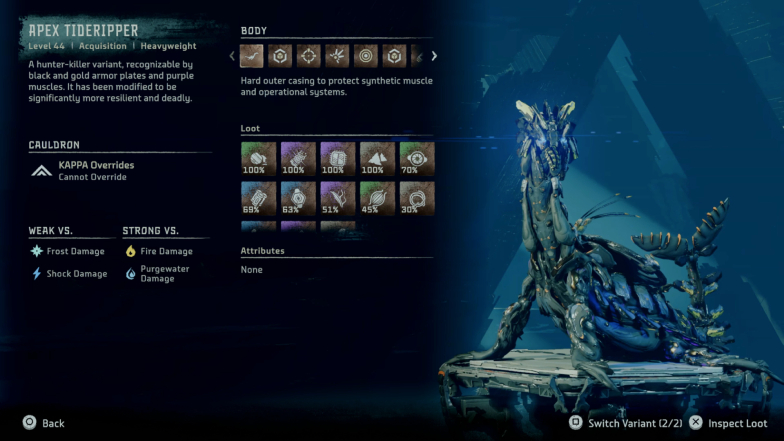
It is true that the Tideripper is not one of the hardest machines to take down, but things change when it comes to the Apex Tideripper.
They’re not especially hard to defeat by themselves. However, this variant’s impressive power might surprise you. This is especially true if you are unaware of how much more powerful the Apex version of this machine truly is.
Its level is much higher than the standard version of this machine. It is also a hunter-killer variant, recognized by black and gold armor plates and purple muscles. It has been modified to be significantly more resilient and deadly.
Many resources have a 100% chance of being dropped by the Apex Tideripper. Considering that it is not as hard to deal with as other machines with many weapons, this might be an excellent machine to farm.
Although its level is much higher, making it much more dangerous, it’s generally the same machine with the same weaknesses and strengths. If you master the art of defeating Tiderippers, you should be okay when facing an apex variant of this machine.

