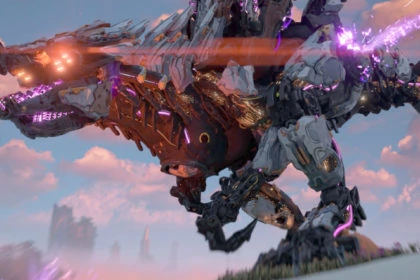
The Slitherfang looks like a giant snake with characteristics seen in cobras and rattlesnakes. It is one of the 22 new machines introduced in Horizon Forbidden West. Its name seems to come from a Cobra-like Transformer toy.
This 28th-level heavy machine was built for combat. Its purpose is to end any living thing it encounters in its path. Even the way it looks clearly shows that this is a dangerous foe.
Fighting a Slitherfang can be intimidating. This machine is not the easiest to deal with. However, this guide will show you everything you need to know on how to defeat a Slitherfang in Horizon Forbidden West.
Where to Find Slitherfangs

There are not many of these machines in the game, which makes them even more interesting once you finally see one.
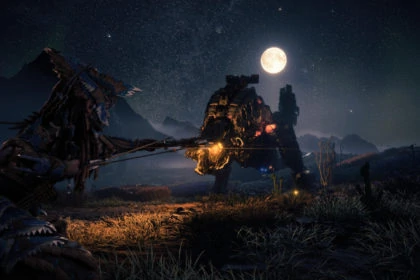
Check the north of Lost Vegas, on the edge of the Nevada deserts. A lone Slitherfang can be seen roaming around the rocks in that area.
You will find another lone Slitherfang in another desert. It’s on the north of the Scalding Spear settlement, located at the southern edge of the tribe’s territory, the Clan Lands. Although this Slitherfang is alone, there’s a catch. It’s buried under the sands and will only show up when it is close enough to hit you.
Both locations are fairly safe to fight the Slitherfang. There are no other machines near them, but the first spot is far better and safer since the Slitherfang there won’t try to surprise attack you from under the sands.
When it comes to unmarked locations, as far as I know, there are none. However, you will have to fight one when playing the story since it’s one of the first boss fights of Horizon Forbidden West.
Strengths, Weaknesses, and Loot

The Slitherfang is a huge, dangerous machine. This means that it has plenty of important parts that you can strike or detach for loot.
However, fighting one of these snakes is no easy task. You better prepare yourself for the battle by carrying the proper ammunition and learning everything you can about their behavior.
The Slitherfang is weak versus Fire, Frost, and Plasma Damage. It is also strong versus Shock, Purgewater, and Acid Damage.
Like many machines of its size, it has a hard outer casing to protect synthetic muscle and operational systems.
It can be a chore to frequently develop strategies to defeat each large machine in Horizon Forbidden West. They all have different attack patterns, weaknesses, strengths, and weapons.
Don’t worry, though. We decided to make it easier for you. You will find all the Slitherfang’s parts below and why they matter:
- Purgewater Canister: Hit this part with Purgewater damage; it can cause a chain reaction and make it detach. This piece contains valuable resources and is destroyed when the machine is defeated.
- Data Nexus: It will be protected by a metal plate, so you must with that before targeting it. The Data Nexus is an indestructible weak spot, but you deal massive damage when you hit it.
- Acid Canister: Hit this part with acid damage; it can cause a chain reaction and make it detach. This piece contains valuable resources and is destroyed when the machine is defeated.
- Shock Orb: The Sligther fang has orbs in its body that spin to charge its shock attacks. It’s a detachable weapon with valuable resources. It is destroyed when the creature is defeated. If all of them are detached or destroyed, the Slitherfang won’t be able to use shock-based attacks anymore.
- Earthgrinder: This Key Upgrade Resource is destroyed when the creature is defeated. Detach this piece to be able to collect it.
- Glowblast Canister: This is a detachable part that contains valuable resources. It is destroyed when the Slitherfang is defeated. However, it can also be detonated with plasma damage to cause massive damage to the machine.
- Resource Containers: As the name suggests, this is another detachable part that contains valuable resources. It is destroyed when the creature is defeated.
- Metalbite Sac: This one is tricky. This piece contains resources if intact, and it persists when the creature is defeated. However, it also explodes with a well-placed shot. Destroying this piece will disable the Slitherfang’s acid attacks.
- Sonic Hood: These are the parts that make the Slitherfang look like a cobra. This detachable part contains valuable resources. It is destroyed when the Slitherfang is defeated. Detaching it prevents the Slitherfang from using its sonic attacks.
- Purgewater Sac: This is a destructible piece that contains resources. This one persists when the machine is defeated and cannot be destroyed if you want its content. However, since it’s explosive, you can opt to attack it to forgo the extra loot and deal additional damage. On top of that, if you destroy it, the Slitherfang won’t be able to use Purgewater attacks.
- Sparker: This is a detachable part with valuable resources. It is destroyed when the creature is defeated. Players can choose between removing it to collect extra loot or hitting it with shock damage to cause a chain reaction.
Now that you know how each of its parts works, it won’t be that complicated to deal with one. You can start by identifying the attacks that cause you the most problem and detach the parts that would disable them.
For instance, I like going for the Sparker and the Metalbite Sac first. It all depends on how you want to approach the fight and what you find more troublesome when dealing with a Slitherfang.
Once you have enough practice and confidence, you can try defeating a Slitherfang without attacking Metalbite Sacs and Purgewater Sacs. That way, although the fight will be more dangerous, you will get even better loot.
These are the items that Slitherfangs drop when defeated:
- Metal Shards: Used for crafting ammunition and purchasing items from merchants.
- Metalbite: This resource is obtained from machines that use Acid weapons, or carry Acid Canisters, or intact Metalbite Sacs. Tear off the canisters to harvest more. It’s used for crafting ammunition and traps that deal Acidwater damage to corrode enemies, weakening their armor and damaging them over time.
- Crystal Braiding: This ammunition resource is usually obtained from machines with Stealth Generators, Force Leaders, Gravity Generators, laser weapons, or shields. It is used for crafting Berserk Hunter Arrows, Targeting Hunter Arrows, Staggerbeams, and Shieldwires.
- Braided Wire: Used for upgrading weapons at the Workbench.
- Slitherfang’s Calculator: Obtained only from Slitherfangs. Used for purchasing and upgrading weapons and outfits, or selling for Metal Shards.
- Large Machine Core: This rare resource is used for upgrading the most powerful weapons and outfits at the Workbench.
- Slitherfang Primary Nerve: This rare resource, which is also unique to Slitherfangs, is used for upgrading weapons and outfits, or selling for Metal Shards.
- Volatile Sludge: This is a very rare resource obtained from the most powerful and dangerous machines. Sometimes, it can be obtained from any sort of Apex machine. It is used for crafting advanced and elite ammunition and traps.
- Machine Muscle: Used for crafting ammunition for Sharpshot Bows, Blastslings, Ropecasters, and Shredder Gauntlets.
- Luminous Brainstem: This is a very rare gear upgrade resource. It is rarely obtained from the most powerful and advanced machines. This item can be used for upgrading the most powerful weapons and outfits at the Workbench.
- Metal Bone: This is a rare Ammunition Resource used to craft ammunition for Tripcasters, Spike Throwers, and Boltblasters.
- Sturdy Hardplate: Used for upgrading outfits at the Workbench.
Slitherfang’s Attacks

Slitherfangs are enormous, fast combat machines that can lash out from long range. Once they assume a coiled stance, they have access to their full arsenal, and their rotating body parts snap into place.
These acid-spitting, solitary machines are aggressive and change behavior as they take damage from Aloy.
- Pressured Purgewater: When it uses its Purgewater Sac, the Slitherfang will be ready to shoot a jet of pressured Purgewater at Aloy. It doesn’t aim directly at her, giving you enough time to dodge it.
- Bite: It opens its jaws and launches its head towards you. You can simply dodge to the side to avoid this attack. You can tell that this attack is coming because the Slitherfang’s eyes will shine right before it tries to hit you.
- Sonic Blasts: By using its sonic hood, it can fire several sonic orbs that will temporarily incapacitate you if you’re hit.
- Charging Bite: This attack is scarier than the normal bite. The Slitherfang will quickly move towards sweeping the ground. Its jaw will be open and ready to catch you.
- Tail Sweep: It’s hard to say where a snake’s tail starts and where its body begins. The Slitherfang’s tail attack is quite deceiving for that reason. It has a long-range, and a deals a lot of damage. On top of that, it might be electrified. The best way to tell when this attack is coming is by heading the tail charging.
- Pressured Purgewater: When it uses its Metalbite Sac, the Slitherfang will be ready to shoot a jet of pressured acid at Aloy. It doesn’t aim directly at her, giving you enough time to dodge it.
- Head Sweep: This attack can cause you trouble because the Slitherfang’s eyes shine before it attacks, like when it performs a bite. Since the Slitherfang’s body doesn’t make it easy to read its patterns, it might be easier to stay away and deal with the machine’s ranged attacks.
- Lightning Strike: The Slitherfang will start shaking its rattle, and you will be able to hear the noise of its sparks charging up very loudly. It means that the machine will use a devastating electric attack. Keep moving in a straight line to avoid it.
- Shocking Coil: This one is pretty obvious. Don’t get surrounded by the Slitherfang’s body. It will coil and shock you, dealing a lot of damage.
Detachable Weapons

Coil Blaster: This weapon can fire 20 electric orbs. Although gravity affects them, these orbs have a pretty long range.
The Coil Blaster’s rate of fire is not great, but it does become faster as you hold the trigger. It’s usually better used against smaller machines.
Apex Slitherfang

The Apex Slitherfang is a 48th-level combat heavyweight machine. If this sounds scary, it’s because it is. This machine is vicious and far more dangerous than the regular Slitherfangs.
This hunter-killer variant can be recognized by black and gold armor plates and purple muscles. It has been modified to be significantly more resilient and deadly.
It is weak versus Fire and Plasma damage, but it is strong versus Frost, Shock, Purgewater, and Acid damage.
This Apex variant machine has 100% drop rates for Crystal Braiding, Metalbite, Metal Shards, Apex Slitherfang Heart, and Luminous Brainstem. The Apex Slitherfang Heart is a very rare Gear Upgrade Resource.
It is obtained only from Apex Slitherfangs and is used for upgrading weapons and outfits, or selling for Metal Shards.
When it comes to its attack patterns and behaviors, the Apex Slitherfang fights pretty much the same way. The significant advantages are its outstanding durability and power. The Apex variant can both deal and take a lot more damage than the regular metal snake.
If you manage to take down the Apex Slitherfang, you’re certainly ready to defeat the Slaughterspine — even if you are targeting an Apex Variant of it.