
The Slaughterspine is one of the 22 new machines introduced in Horizon Forbidden West.
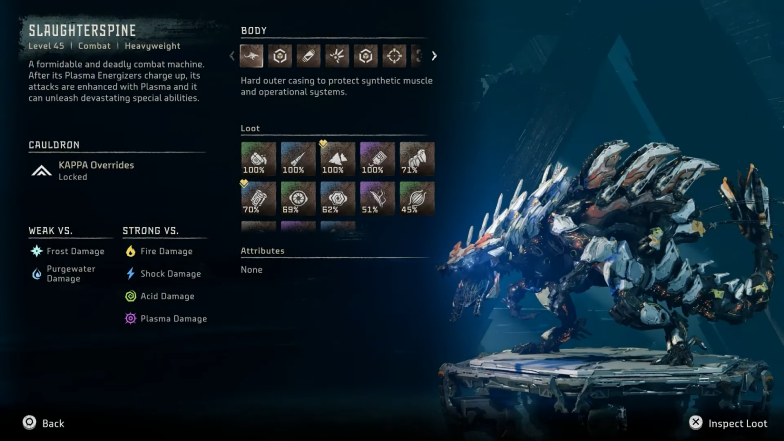
It is a formidable and deadly combat machine. After its Plasma Energizers charge up, its attacks are enhanced with plasma, and it can unleash devastating special abilities.
You will fight a Slaughterspine at the end of the Gemini mission. Overcoming this challenge will be harder than learning how to defeat a Thunderjaw. It even carries more weapons than the franchises mascot.
If you had any trouble dealing with this enemy, you just found the guide that you needed, so keep reading to find out how to defeat a Slaughterspine in Horizon Forbidden West.
Where to Find Slaughterspines

As mentioned above, you will be forced to fight one near the end of the Gemini mission. That’s the 14th main mission of the game. This happens a little before you are able to fly a Sunwing in Horizon Forbidden West.
However, there are other Slaughterspines roaming throughout the world map.
One of them is in the mountains. You will find it to the south of the Bulwark, west of the grove. This Slaughterspine will be surrounded by Leaplashers. The lesser enemies will alert the big machine if they detect you.
There is another Slaughterspine on the coast. It’ll be further south from the previously mentioned spot. This is to the north of the Outpost, where you can get the boat to the San Francisco ruins.
This is an excellent spot to practice fighting a Slaughterspine because this one will be completely alone. There are no other machines to warn it or get in your way.
If you are looking for a challenge, you can go to the north of the San Francisco ruins to the east of the Stormbird site. There’s an unmarked Slaughterspine there, and it is not alone. It will be accompanied by red eye watchers that can alert the giant machine of your presence.
There’s another lone Slaughterspine to be found at the south of the San Francisco ruins, which means another opportunity to try out your strength without worrying about any machines interfering.
Strengths, Weaknesses, and Rewards
The Slaughterspine is a formidable foe. You should have a leveled up Aloy and do plenty of crafting and prepping before going after one of these dangerous machines.
They are strong against fire, shock, acid, and plasma damage. However, these machines are also weak to frost damage and purgewater damage.
It is undeniable that Horizon Forbidden West is a very detailed game. Some machines have more than a dozen pieces, each with its own properties.
This is undoubtedly the case here. Besides their damage weaknesses, Slaughterspines have a few weak points that can be explored and many parts that you should be aware of before fighting it.
Here are all the Slaughterspine’s parts and why they matter:
- Purgewater Canister: Hit this part with purgewater damage; it can cause a chain reaction and make it detach. This piece contains valuable resources and is destroyed when the machine is defeated.
- Spinetail Lancer: There are three of these weapons at the end of the Slaughterspine’s tail, and they will be hard to deal with. This is a piece that you must detach as soon as possible. Doing so grants you a weapon while taking away a weapon from your foe.
- Metalbite Sac: This one is tricky. This piece contains resources if intact, and it persists when the creature is defeated. However, it also explodes with a well-placed shot.
- Chillwater Canister: This is another detachable part that is destroyed when the creature is defeated. It contains valuable resources. Besides detaching, you also have the option of hitting it with frost damage to cause a chain reaction.
- Plasma Energizer: There is one on each hip of this machine. It can’t be destroyed, but you must pay attention to them. When they charge up, the Slaughterspine will deal increased damage. However, you can prevent that by shooting them while they are charging.
- Capacitor Capsule: It doesn’t really interfere with your fight, but it is a piece with valuable resources that can be detached. Like others, it is destroyed when the Slaughterspine is defeated.
- Plasma Earthblaster: This is another piece with valuable resources that is destroyed when the Slaughterspine is defeated. This is far from your only reason to detach it, though. This piece allows this machine to use powerful plasma attacks. Detaching it prevents the Slaughterspine from using its plasma geysers and plasma waves.
- Plasma Core: This is an indestructible weak spot that you can hit with ranged attacks.
- Processing Capsule: This is just another detachable piece that contains valuable resources. Like others of the same type, it is destroyed when the machine is defeated.
- Tail Canisters: This is yet another detachable piece that contains valuable resources. Like others of the same type, it is destroyed when the machine is defeated.
- Plasma Spine Launchers: These are usable, detachable weapons that persist when the machine is defeated. Each Slaughterspine has four of them. Detaching them prevents the machine from using some of its attacks.
If you have been trying to take down one of these creatures, but it’s taking too long, make sure to check the type of damage of the weapons you’re using since it might be the root of your problems.
Players might want to defeat Slaughterspines due to its loot, which is especially valuable when you are approaching the late game of Horizon Forbidden West.
These are the items that Slaughterspines drop:
- Glowblast: Used for crafting ammunition that deals plasma damage to prime enemies for a plasma blast.
- Piercing Spike: Used for crafting ammunition that can pierce armor or inflict high tear damage.
- Metal Shards: Used for crafting ammunition and purchasing items from merchants.
- Crystal Braiding: Used for crafting Berserk Hunter Arrows, Targeting Hunter Arrows, Staggerbeams, and Shieldwires.
- Sturdy Hardplate: Used for upgrading outfits at the Workbench.
- Large Machine Core: This rare resource is used for upgrading the most powerful weapons and outfits at the Workbench. It is one of the main reasons players want to hunt Slaughterspines.
- Slaughterspine Circulator: This item, which is unique to Slaughterspines, is used for purchasing and upgrading weapons and outfits, or selling for Metal Shards.
- Slaughterspine Primary Nerve: This rare resource, which is also unique to Slaughterspines, is used for upgrading weapons and outfits, or selling for Metal Shards.
- Volatile Sludge: This is a very rare resource obtained from the most powerful and dangerous machines. Sometimes, it can be obtained from any sort of Apex machine. It is used for crafting advanced and elite ammunition and traps.
- Machine Muscle: Used for crafting ammunition for Sharpshot Bows, Blastslings, Ropecasters, and Shredder Gauntlets.
- Braided Wire: Used for upgrading weapons at the Workbench.
- Luminous Brainstem: This is a very rare gear upgrade resource. It is rarely obtained from the most powerful and advanced machines. This item can be used for upgrading the most powerful weapons and outfits at the Workbench.
- Metal Bone: This is a rare Ammunition Resource that is used for crafting ammunition for Tripcasters, Spike Throwers, and Boltblasters.
Detachable Weapons

As mentioned before, certain weapons can be detached from machines. In the case of the Slaughterspine, there are two kinds of weapons that players can detach and use. It also prevents the machine from using some of its attacks.
Once a part is detached, it’ll stay on the ground, and you will have to pick it up to use it.
This machine has many plasma-based parts, so it only makes sense that you’d be able to pick up a few and use them.
You can use these parts against the Slaughterspine itself or even against other machines in the area once your larger foe is defeated.
- Spinetail Lancer: Aloy can use this weapon as some sort of heavy plasma rifle. It shoots a plasma beam, and it quickly overheads. It doesn’t leave a blazing trail on the areas it hit, though, which is a bit disappointing.
- Spinetail Launcher: This weapon can only fire three times. You might want to take it and use it immediately before going back to whatever ammunition you were using. It shoots a plasma orb that causes a small explosion on impact but deals massive damage.
Slaughterspine’s Attacks

Slaughterspines have several different attacks that they can use to defend themselves. Those attacks are the same for normal and apex Slaughterspines.
You must learn to identify these attacks since some of them might be able to put you down instantly.
Also, note that letting the Slaughterspine get too close might make it harder to identify and avoid its attacks.
It shouldn’t be too hard if you are over level 30 and have all the needed weapons, but it doesn’t mean it won’t be challenging. In high difficulty levels, you might have to always dodge it perfectly since its damage is way too high.
The fight will become much more manageable once you get used to all that this machine can do. However, you still need to prepare and bring the proper ammunition for the battle.
- Charging Bite: The Slaughterspine drops its jaw to the ground and charges at you. This is a relatively easy attack to avoid, but you don’t want to be caught by its teeth.
- Energy Beam: The machine can fire an energy beam from its mouth. It looks a lot like the one that Godzilla fires. It deals damage when it directly hits you and burns the area it touches. This is a telegraphed attack that is pretty easy to avoid, but it has the potential to one-shot you.
- Plasma Ball: The Slaughterspine shoots you with a high damaging plasma ball. If you are paying attention to it, you will be able to react and dodge this attack.
- Plasma Earthblaster: The Slaughterspine sticks its tail into the ground and attacks with plasma geysers. Keep moving and weaving to avoid these attacks.
- Spinelauncher Plasma: You will see the Slaughterspine’s back glowing as it fires plasma orbs into the air. They will slightly pursue you, so keep moving and dodge all the shots. One-shot won’t take you down, but there’s a good chance that you will be hit by more than one if you don’t dodge them properly.
- Spinetail Lancer Plasma: After lifting its tail, the Slaughterspine fires plasma beams that move toward you while hitting the ground. They will spread as they move forward, providing you with a safe between the beams, but it might be a bit tricky to avoid. It also burns the area where the plasma touches, much like the one this machine fires from its mouth.
- Stun Attack: The Machine will yell, and you will be able to see a distortion, like a shockwave, in front of it. You can dodge this attack, and you better do so since it will completely stun Aloy if you don’t succeed.
- Tail Strike: The Slaughterspine jumps toward you and uses its tail to strike. It’s another attack that is easy to see coming, but it causes way too much damage when it connects.
The Apex Slaughterspine
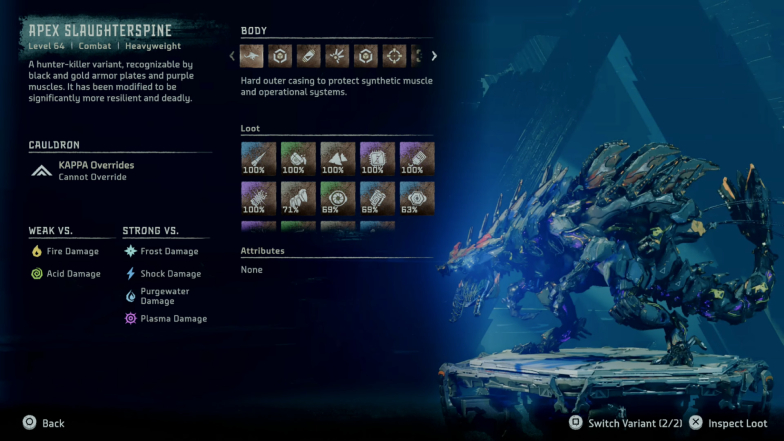
The Apex Slaughterspine is a hunter-killer variant, recognizable by black and gold armor plates and purple muscles.
It has been modified to be significantly more resilient and deadly. Like the standard version, its body has an outer casing to protect synthetic muscle and operational systems.
Keep in mind that this creature cannot be overridden.
Unlike normal Slaughterspines, the Apex version of this machine is strong against frost, shock, purgewater, and plasma damage. I’m not sure if that makes any sense lore-wise, but that’s how it goes. Its weaknesses are fire damage and acid damage.
This is your go-to Slaughterspine type if you are searching for loot since it has a 100% drop rate for Piercing Spikes, Glowblast, Metal Shards, Apex Slaughterspine Heart, Crystal Braiding, and Luminous Brainstem.


