
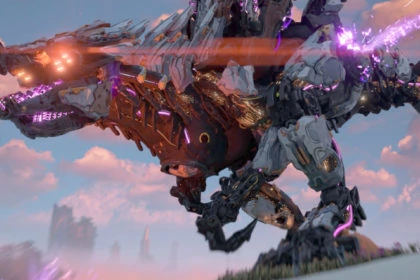
The Rollerback is by far one of my favorite new machines in Horizon Forbidden West.
Its armadillo-like design makes it look very distinct from other machines. Also, its plate armor is a feature that makes Rollerback very scary when trying to roll over you.
Although it looks slow and heavy, this is a machine with powerful muscles and thrusters. It can be quite fast in combat by rolling instead of walking, so don’t let its appearance deceive you.
This machine is not as dangerous as Slaughterspine can be. Still, if you need help on how to defeat a Rollerback in Horizon Forbidden West, this is the guide you were looking for.
Rollerback Location

To the south of Mono Lake, you can find two Rollerbacks. This is a marked site. For some reason, this sport seems to have a higher chance of spawning Apex Rollerbacks if that’s what you are looking for.
There’s a marked site to the northwest of Caldron: Chi. This place has two Rollerbacks, just like the previous one. There are no other machines nearby.
Finally, there is another place where you can find two Rollerbacks roaming together. There’s an unmarked spot between Salt Bite and The Memorial Grove. Unlike the marked sites, these two Rollerbacks will be accompanied by other machines, which can make things much more complicated.
Strengths, Weaknesses, and Loot

The Rollerback is a level 22 Midweight machine. It is a heavily armored transport machine that can launch into a rolling attack.
Its Gravity Generator allows it to reattach armor plates after they have been torn off.
This machine is weak versus Acid Damage and strong versus Frost and Shock Damage.
Since it’s not a large machine, it might lack the rare resources you might find after defeating a Slitherfang or other large machine. However, they come in pairs, and their loot is decent enough for a fight that doesn’t need to be that tough.
Still, fighting two machines instead of one can be annoying, and knowing its parts and what they do might be helpful.
Here is a list of each of the Rollerback’s parts and why they matter:
- Acid Canister: Hit this part with acid damage; it can cause a chain reaction and make it detach. It is protected by metal plates, so you must detach them before being able to target the Acid Canister. This piece contains valuable resources and is destroyed when the machine is defeated.
- Hammer Tail: This Key Upgrade Resource is destroyed when the creature is defeated. Detach this piece to be able to collect it. In addition, once detached or destroyed, the Rollerback won’t be able to use it as a weapon anymore.
- Resource Containers: As the name suggests, this is another detachable part that contains valuable resources. The Rollerback has four of them on its back, under its protective metal plates. It is destroyed when the creature is defeated.
- Cargo Holders: This detachable part contains valuable resources that you can collect by detaching or destroying this part.
- Cooling Block: This detachable part contains valuable resources that you can collect by detaching or destroying it. Rollerbacks have two of them.
- Thrusters: These parts grant the Rollerback all its surprisingly fast movements. Once overheated, you can target them for extra damage. This is not a destroyable part.
- Gravity Generator: These are the parts that allow the Rollerback to reattach removed armor parts. This piece contains valuable resources if intact, but it can be targeted to cause a massive explosion. Destroying it prevents this machine from retrieving its armor plates.
- Adhesive Sac: These are the parts hidden under the Rollersack’s shoulder armor plates. This piece contains valuable resources if intact — Stickpaste, but it can be targeted to cause a massive explosion. Destroying it prevents this machine from retrieving its armor plates.
As you can see, even though it is not a heavyweight machine like the Tideripper, it still has a decent number of parts with unique functions.
All these details are one of the many good things about Horizon Forbidden West. It all makes it so much more fun to engage with the machines of this game’s world.
On top of that, knowing what each piece does helps you choose your approach when fighting it. After all, you get to choose what resources you need the most and which parts you are willing to blow up to make the fight easier.
These are the items that a Rollerback might drop when defeated:
- Metal Shards: Used for crafting ammunition and purchasing items from merchants.
- Metalbite: This resource is obtained from machines that use Acid weapons, or carry Acid Canisters, or intact Metalbite Sacs. Tear off the canisters to harvest more. It’s used for crafting ammunition and traps that deal Acidwater damage to corrode enemies, weakening their armor and damaging them over time.
- Crystal Braiding: This ammunition resource is usually obtained from machines with Stealth Generators, Force Leaders, Gravity Generators, laser weapons, or shields. It is used for crafting Berserk Hunter Arrows, Targeting Hunter Arrows, Staggerbeams, and Shieldwires.
- Braided Wire: Used for upgrading weapons at the Workbench.
- Slitherfang’s Calculator: Obtained only from Slitherfangs. Used for purchasing and upgrading weapons and outfits, or selling for Metal Shards.
- Large Machine Core: This rare resource is used for upgrading the most powerful weapons and outfits at the Workbench.
- Slitherfang Primary Nerve: This rare resource, which is also unique to Slitherfangs, is used for upgrading weapons and outfits, or selling for Metal Shards.
- Volatile Sludge: This is a very rare resource obtained from the most powerful and dangerous machines. Sometimes, it can be obtained from any sort of Apex machine. It is used for crafting advanced and elite ammunition and traps.
- Machine Muscle: Used for crafting ammunition for Sharpshot Bows, Blastslings, Ropecasters, and Shredder Gauntlets.
- Luminous Brainstem: This is a very rare gear upgrade resource. It is rarely obtained from the most powerful and advanced machines. This item can be used for upgrading the most powerful weapons and outfits at the Workbench.
- Metal Bone: This is a rare Ammunition Resource used to craft ammunition for Tripcasters, Spike Throwers, and Boltblasters.
- Sturdy Hardplate: Used for upgrading outfits at the Workbench.
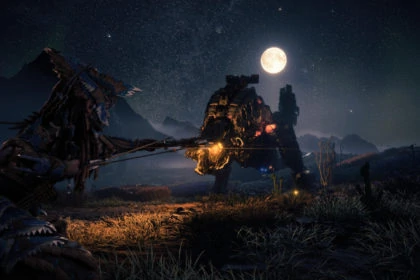
Rollerback’s Attacks

Rollerbacks might not be the largest and most dangerous machines in the game, but they fight in pairs and have many different attacks.
Fighting two simultaneously might be tricky, especially if an Apex is involved, so you better learn its attacks and patterns before engaging.
Be very careful, though. The Rollerback often combines different attacks to make its pattern harder to read. Play defensively and wait until it uses an attack with a long recovery time.
Here are all attacks a Rollerback can perform:
- Rolling Charge: This is the Rollerback’s signature attack. It curls and attempts to roll over you. This is a surprisingly fast attack, so it might be pretty hard to dodge if you are close to the machine.
- Rock Attack: The Rollerback might cause some rocks to fly in Aloy’s way when rolling around.
- Rolling Slam: This attack is scary, and it can be very damaging, but it’s easier to avoid. The Rollerback will use its thrusters to propel itself high up in the air while rolling. Then, it will attempt to land on Aloy.
- Spinning Tail: This attack is annoying to avoid since the Rollerback’s tail is long. The machine will start spinning while it sweeps its tail in an attempt to hit you. It will keep spinning until it loses its balance.
- Tail Slam: The Rollerback will use its hammer tail to try to slam Aloy. It will do it multiple times with its back turned to you.
- Flamethrower: If you are behind the Rollerback, it can use its thrusters to launch flames against you. It can happen right after its Tail Slam.
- Adhesive Blob: This is a ranged adhesive attack. The Rollerback might try to spit an Adhesive Blob at you, but it is easy to dodge.
Apex Rollerback

The Apex Rollerback is a level 35 Transport machine. This hunter-killer variant is recognizable by black and gold armor plates and purple muscles.
It has been modified to be significantly more resilient and deadly. Although it is not as scary as an Apex Thunderjaw or other large Apex machines, it still is more dangerous than many regular heavyweight machines.
The Apex Variant has a few other differences. For instance, it also has a chance of dropping these items:
- Volatile Sludge: This is a very rare resource obtained from the most powerful and dangerous machines. Sometimes, it can be obtained from any sort of Apex machine. It is used for crafting advanced and elite ammunition and traps.
- Apex Rollerback Heart: A Very Rare item obtained only from Apex Rollerbacks. It can be sold for quite a lot of metal shards.
And instead of Acid Canisters, it carries Sparks:
- Sparker: This is a detachable part with valuable resources. It is destroyed when the creature is defeated. Players can choose between removing it to collect extra loot or hitting it with shock damage to cause a chain reaction.


