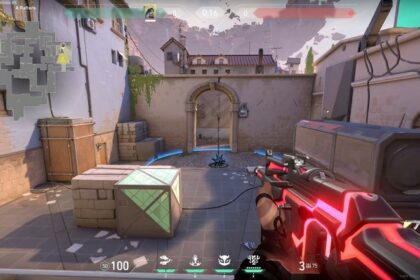
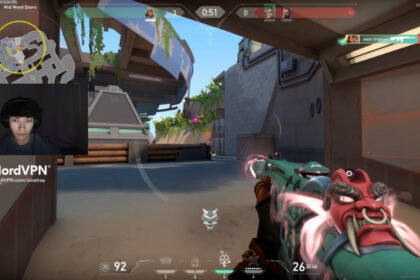
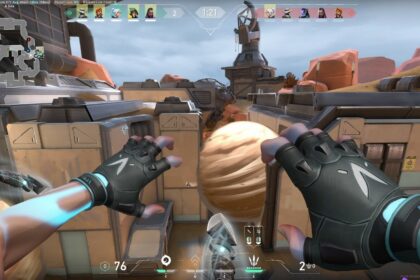
Neon is like your typical duelist that is comparable to playing Jett. She has more entry skills for the team, but Jett is still good because of her aerial entries, instant dashes, and insane ultimate ability that can one-tap enemies.
However, Neon has concussive blasts, energy walls, and incredible mobility, perfect for entries. Neon is hard to master and requires utilities such as flashes from other agents. She has a unique kit that combines some of the valuable skills from different agents (like Breach, Phoenix or Viper, and Jett).
In this guide, we will show you how to play Neon in Valorant and learn all the Relay Bolt lineups, Fast Lane setups, and other skill usages to help your team win more.
Neon Team Synergies
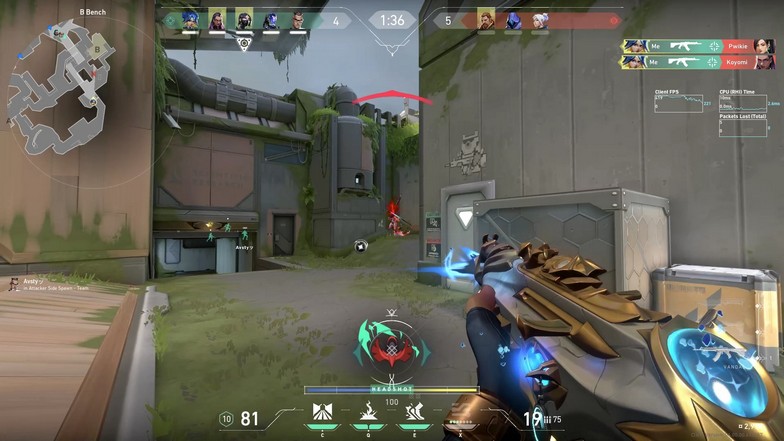
Neon is a bit hard to use as a team’s duelist. It is the same reason why Phoenix is not that popular in competitive matches (though her walls are arguably better). Her kit is subpar because she needs a lot of help setting up.
For example, her walls need support from clearing all the angles you missed while pushing. They also only last for a short time so you need blinds or stuns to clear areas fully.
Cutting a site in half is done better by Viper, but you could still make it work with good coordination. Clearing or checking the angles are easily done by initiators like Sova and Skye, which are almost in all high-ranking competitive matches.
They last for a short time so you would need blinds or stuns to clear areas. Cutting a site in half is done better by Viper. Since Viper can turn to bring her wall up and down on command, your initiators can time their blinds at the other end of the wall.
Neon could still make it work with good coordination. Clearing or checking the angles are easily done by initiators like Sova and Skye, which are almost in all high-ranking competitive matches.
Breach and Skye are both terrific agents to complement Neon with her entries. It also means that you would be sacrificing some of your defensive utilities as a team if you opt to complement a Neon.
A few examples of a team that can fit Neon are the following.
- Neon, Jett, Skye, Viper, and a Sentinel
- Neon, Jett, Breach, Viper, and a Sentinel
- Neon, Reyna, Sova, Omen, and Sage
These are only examples and you can make other agents work with your teammates or friends if they are used to playing other agents. The goal is to clear the angles and plant the spike as fast and as clean as possible.
You can prepare for a post-plant situation and delay the enemy team. Neon can use Relay Bolts to delay the enemy team once they use their utility skills to clear out during a post-plant situation. You can also close the distance really fast.
Popular lineups for post-plant situations from Brimstone, Sova, Killjoy, and Viper could be compromised and Neon can support them fast by sprinting around.
Getting information is always key in any team composition and this is probably why Skye and Sova are some of the most picked agents in competitive matches.
Neon’s Skills
All skills listed are the word-for-word description inside the game and the mechanics will be discussed thoroughly later on in the guide.
Fast Lane
One charge – 300 credits
Fire two energy lines forward on the ground that extends a short distance or until they hit a surface. The lines rise into walls of static electricity that block vision and damage enemies passing through them.
Relay Bolt
Two charges – 200 credits
Instantly throw an energy bolt that bounces once. Upon hitting each surface, the bolt electrifies the ground below with a concussive blast.
High Gear
One charge – free (recharges every two kills)
Instantly channel Neon’s power for increased speed. When charged, ALT FIRE to trigger an electric slide. Slide charge resets every two kills.
Overdrive
Seven points
Unleash Neon’s full power and speed for a short duration. Fire to channel the power into a deadly lightning beam with high movement accuracy. Both duration and slide reset on each kill.
What to Buy
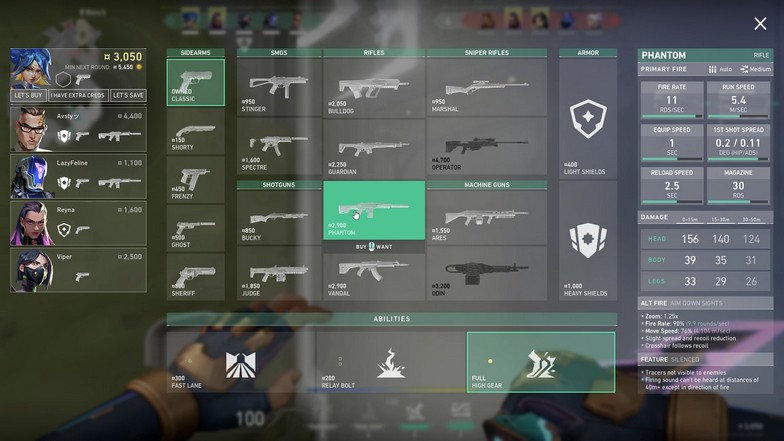
Pistol rounds
For Neon players, there are a lot of options for your secondary weapon. You can use a Shorty, Frenzy, or a Ghost for the pistol rounds in defending. Shorty is probably the worst one out of the three, but it is only for getting in those sneaky smoke plays or flanking an enemy you know is completely alone.
I prefer buying the Frenzy in combination with Neon’s High Gear slide. It is almost impossible to miss the whole clip on a single enemy. It even has the potential to get three quick kills if you can control it properly.
Ghost is always the best pistol for the first round. It is accurate and can one-tap enemies who do not buy half shields at the start. Since most agents prefer buying utilities or skills, the Ghost can kill a whole team in a single clip.
For Neon’s skills, one Relay Bolt is enough. Fast Lane isn’t that reliable for controlling a site, which is why you need to rely on smokes or Viper’s wall to cover angles. The most common pistol round buys should be the following.
- Frenzy + Relay Bolt
- Ghost + Relay Bolt
- Half shield + Relay Bolt
Eco rounds
Eco rounds are rounds that you try to save enough credits for a full buy next round. If your credits are hovering around 1,900 without any losing streak bonus, you will be forced to save.
As long as you get enough credits to a full buy next round, you can opt to buy a single Shorty or a Frenzy. Since you will probably be dealing with enemies holding Vandals and Phantoms, your goal is to hurt their economy. In rare cases, you might even get the win.
Use a Shorty or Frenzy to surprise an enemy with your High Gear and try to steal their gun. A Relay Bolt will help you as well if you can afford it.
Half buy rounds
Half buy rounds or sometimes called a “force buy,” are rounds where you do not have enough credits to buy a Vandal or Phantom along with full shields. With credits 3,500 credits, you can force to downgrade your Phantom or Vandal to an Ares or Spectre with full shields and all your abilities.
Relay Bolts are good for delaying enemies or pushing through sites. If you opt to get a Vandal or Phantom, you will not have enough credits for these skills. Half shields are always important as it allows you to take one more bullet from a Phantom or Vandal (assuming you do not get one-tapped).
With fewer credits, you can adjust and go for an Ares or Spectre with half shields and a Relay Bolt.
Full buy rounds
Full buy rounds are self-explanatory. You buy all your skills with a Vandal or Phantom and full shields.
Ultimate is Ready!
Neon actually helps your team’s economy by opting to buy only full shields when her ultimate is up. You can give other teammates a Phantom or a Vandal if someone on your team needs one. Jett and Chamber can do the same thing, but Neon should be played differently.
Since Neon’s Overdrive (ultimate) does not have a permanent duration, you will have to time your usage on it. I highly suggest buying a Sheriff to pair alongside it. You can play more conservatively and wait until there is a forcing fight to use your ultimate.
How to Use Relay Bolts – Neon’s Relay Bolt Lineups
Relay Bolts act like a combination of Breach’s concussive blast and Sova’s recon. It is hard to use, especially for beginners, because you may end up concussing yourself and maybe your teammates upon entry.
The concussive blasts explode on each surface landed, and since it bounces twice, it will blast two spots almost simultaneously because of the speed of the projectile. It is crucial to use lineups or just be good with geometry (you become better eventually) since you might not have the option to prepare for each situation.
Ascent Lineups
B Main Attacking
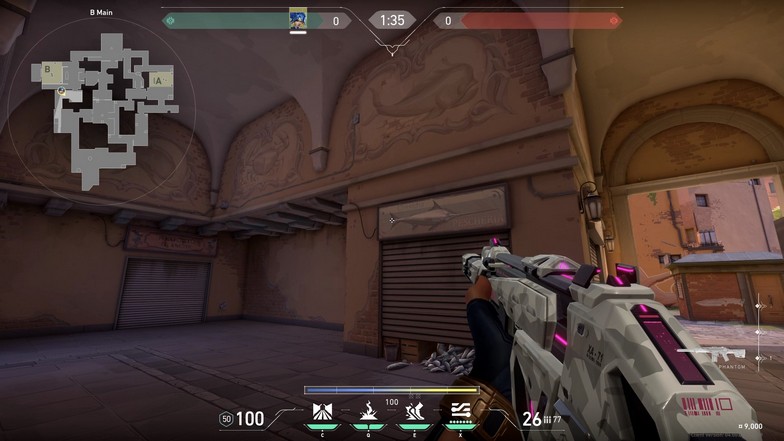
This lineup on the image above hits Market. Players usually hold this spot because they try to contain mid, especially if there isn’t a Sage on their team to wall mid completely.
Hug the wall next to the box, where there is an ultimate orb. Aim directly at the swordfish’s tail (exactly like the image above). The first concussive blast will drop on the swordfish, but it shouldn’t hit you if you stick to hugging the wall while entering.
However, you have to communicate with your teammates so they don’t get concussed from the first blast.
A Main Attacking
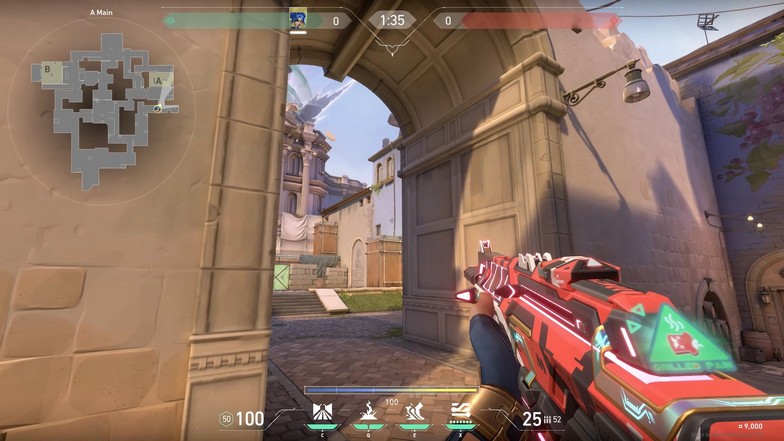
The first lineup is just above the box next to the pipe. The concussive blast will hit both the box and Heaven. While there are a ton of areas to clear when entering the A site, Neon can completely cover almost all areas.
After using the Relay Bolt, you can use Fast Lane and get two energy walls covering Tree and the triple box on the right side. Since the walls don’t cover Heaven, this lineup is useful for pushing back the player on Heaven.
You have to rely on your teammates to flash, recon, or use clearing utilities while the wall is up. While the lineup above may seem open, you usually use this lineup when this entry is smoked. Defenders will usually smoke this area when they hear players running to A Main.
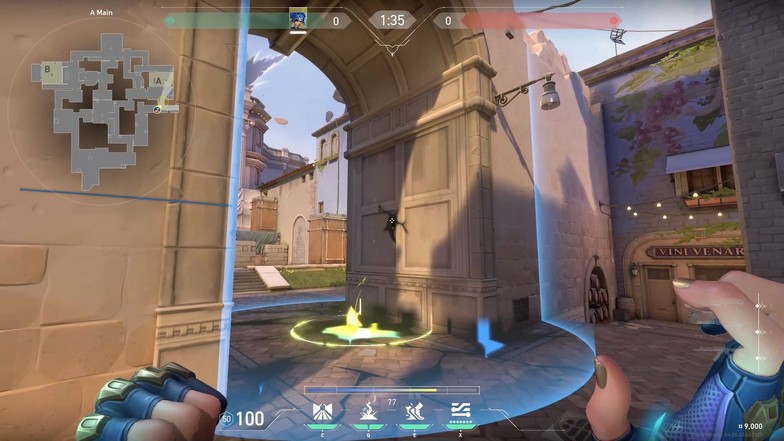
Another popular spot for defending is the Generator (Genny) on the A site. This Relay Bolt on the image above hits the Generator, but you have to wait for a few seconds to wait for the first concussive blast to finish before entering.
A site is extremely hard to push because of all the angles. Chamber, Cypher, and Killjoy can make it even harder, so you always have to keep that in mind while playing Neon.
Bind Lineups
A Site Bath
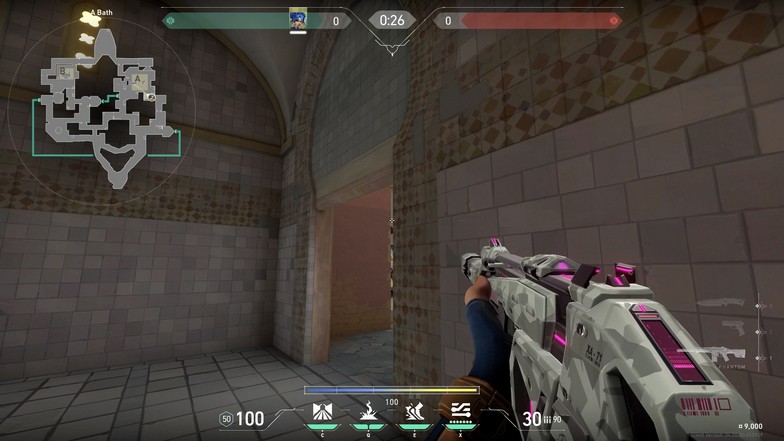
The image above shows a lineup from A Bath. The two concussive blasts hit Lamps (peeking showers) and Heaven. You need to hit the pixel exactly shown on the image, or else the 2nd blast will not hit heaven. You might even hit yourself or your teammates.
Neon is good at pushing Bath and supports the team pushing A Mid. Other agents have better utility for clearing Lamps and the site.
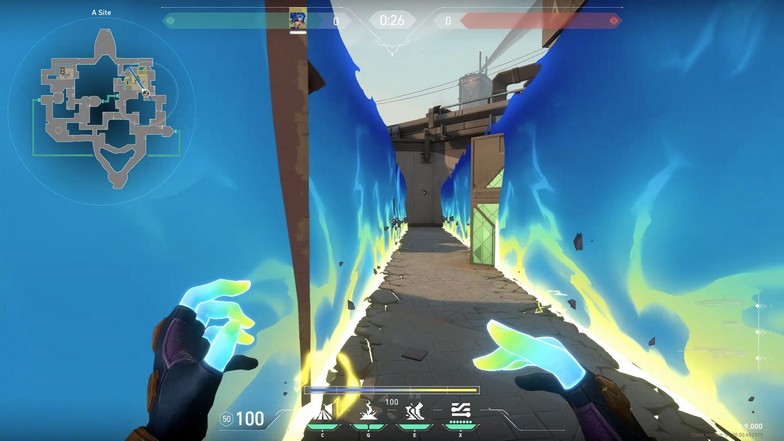
Use the wall above to cut the site in half. It allows your team pushing A Mid to focus on Lamps and half of the site. You can also support them by entering the site and pushing left.
Breeze Lineups
Breeze A Site Halls
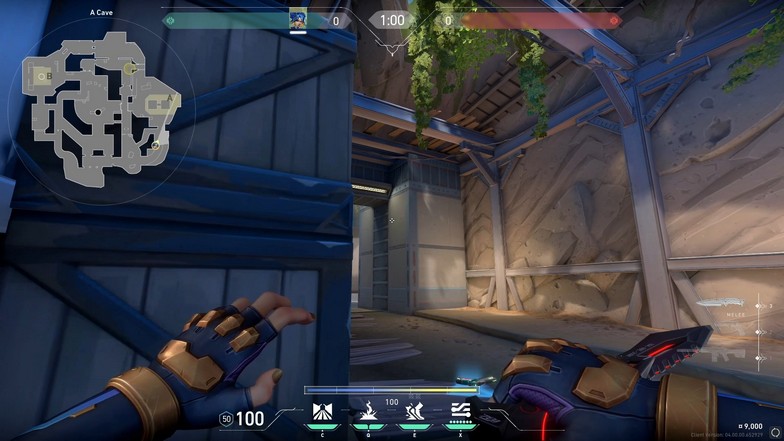
The lineup above will show a Relay Bolt hitting A Halls from the cave. This will help you take control of A Halls to attack the A Site from two or three angles. You should coordinate with a teammate for this lineup.
It will be easy to catch the A Halls defender off guard because that player will never see this coming.
A Site Stairs
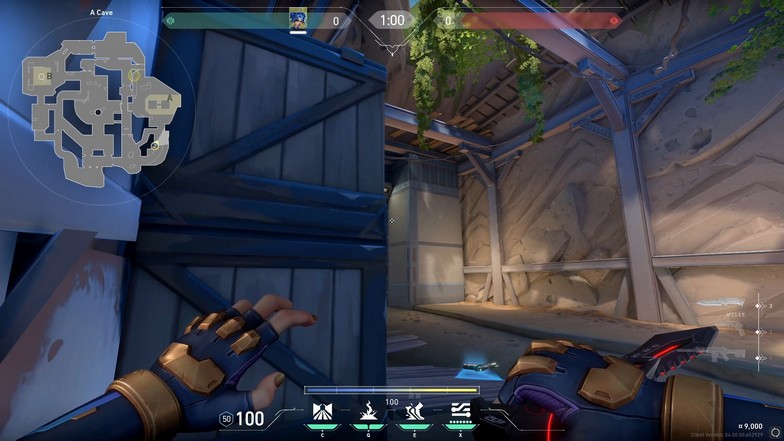
This lineup will land on the stairs for players holding that angle. With so many angles to check when entering A Site, you can have other teammates use utility skills to clear them out. You can also use your wall to cut the site in half temporarily while doing these lineups.
B Site Two Boxes
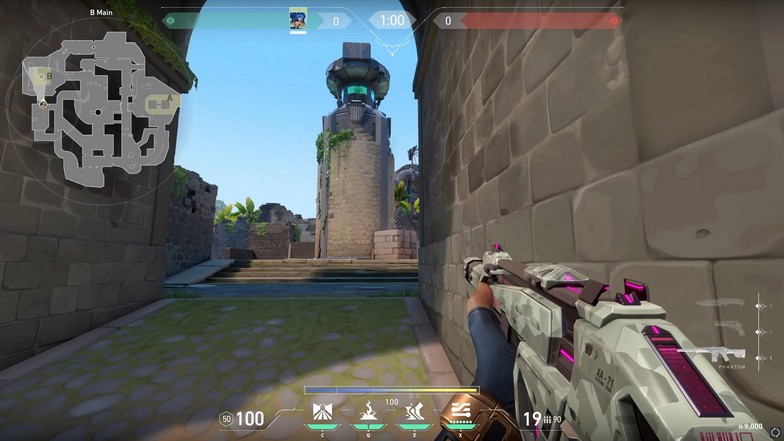
This isn’t much of a lineup, but this spot above is good for concussing two common peeking areas for defenders. It prevents them from peeking, especially with your double-wall up. You can proceed to take control of the back site of B by entering on the left with a flash.
B Site Arch
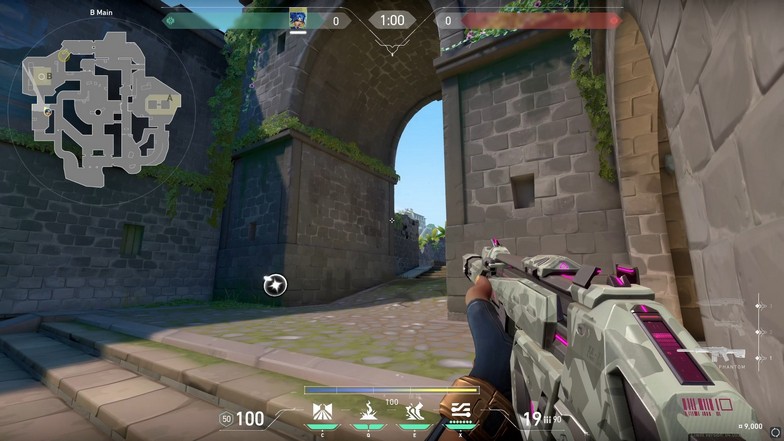
B Site Arch isn’t a common spot anymore with the added boxes inside B Site. However, it can prevent some defenders from rotating fast if you haven’t planted the spike yet.
Fracture Lineups
B Site Canteen
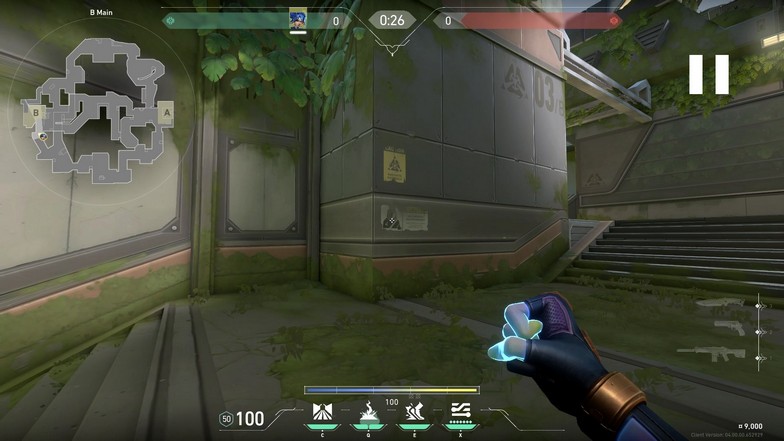
This may be a weird lineup, but you have to execute this one fast while pushing. Imagine setting up your wall on the way to the site and doing this while pushing.
That tower pixel you see on the image is dangerous without your wall up. This Relay Bolt hits the one on the Canteen.
B Site Tower and Site
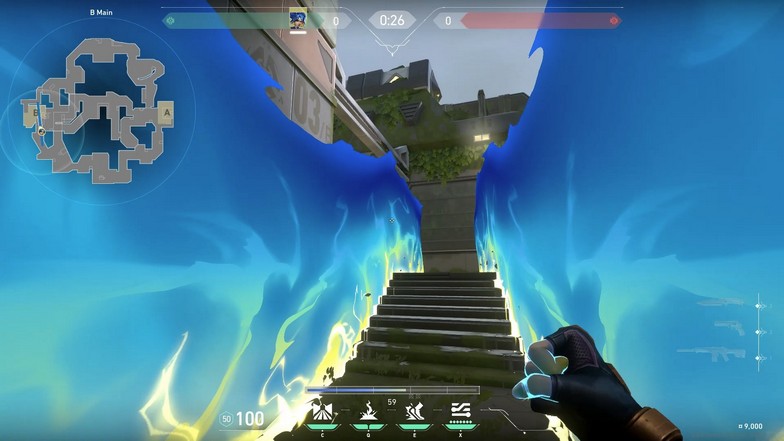
The image above shows an angle while pushing that concusses both the Tower player and the one camping the site from the corner. Players don’t usually camp the site, but it is still good to have the ability to hit two areas at once.
Even if the Relay Bolt hits the wall of the tower, it will still concuss the one inside or prevent him from peeking by dodging the blast.
A Site Tower
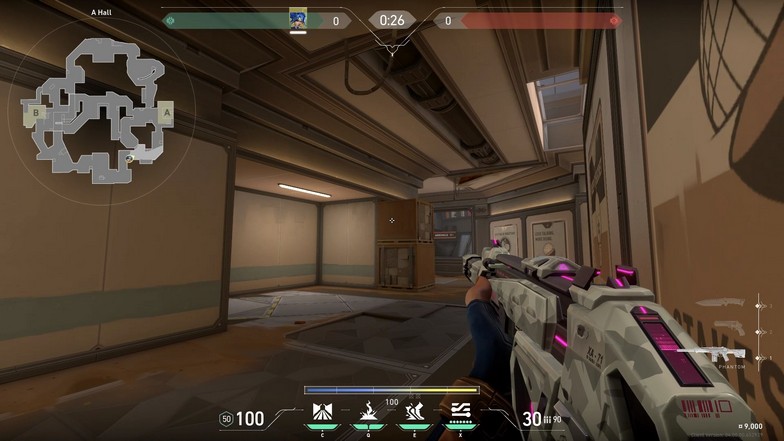
Do not worry about the door; it will automatically open up when projectiles are coming. Use the lineup shown above to hit the A Site Tower and try to take control of A Site from another angle.
Haven Lineups
A Site Back Site
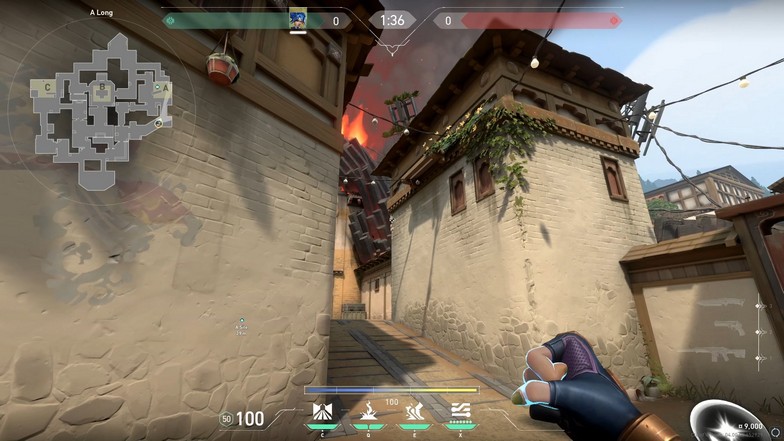
The lineup above hits the back of the boxes in the A Site. Players commonly hold this area so they can hold Sewers and A Main easily. The defending player will be prevented from peeking or even retreating to A Link.
Haven’s A Site is one of the hardest sites to retake as a defender. It is also hard to play against a good Sentinel when pushing. Expect some resistance if they do not want to give the site for free.
A Site Heaven
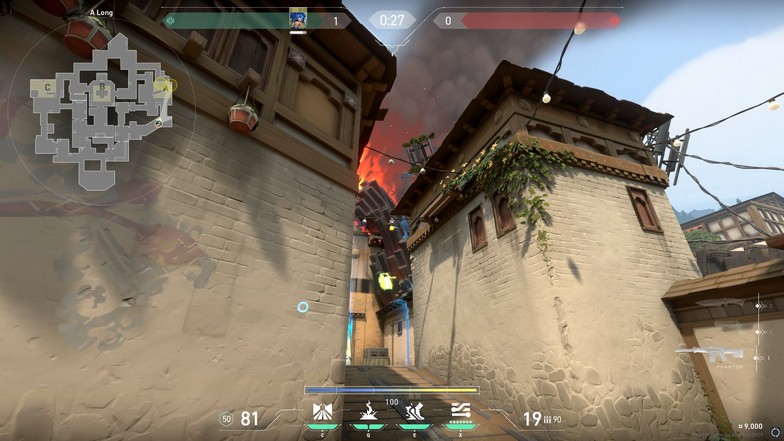
To set up this lineup, you need to hug the upper-left corner of the box in A Main. You can also use the lantern on top as a guide to where to stand on the box.
The spot should make you safe from the Heaven player but open from players peeking in the A Site. Since this entrance is commonly smoked, you can set this lineup safely before the smoke dissipates. Aim the upper bulb shown on the image above. This should hit out of bounds, and the second blast should hit Heaven, as seen in the image.
Haven B Site Back
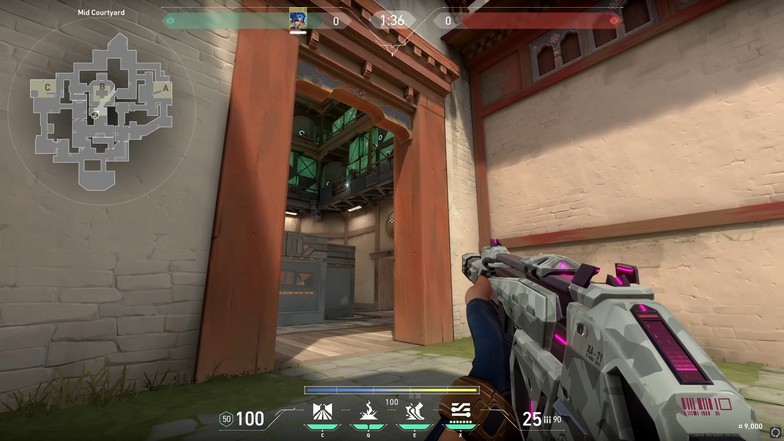
Aim the gong on the upper-left side, and the Relay Bolt should hit both the entrance from A to B and the back site of B. You can have your team set up more smokes to cover the other angles and take control of the B Site.
Haven C Site Back and Front Corners
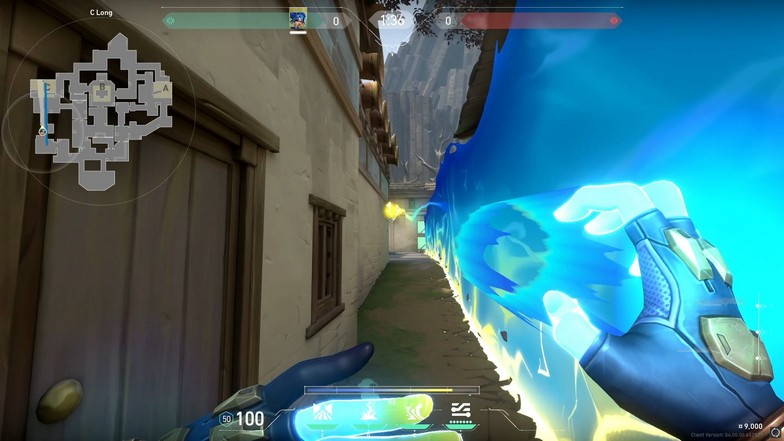
Again, not really a lineup, but a way of concussing two usual camping spots for C Site defenders. The wall already prevents the defenders from the back of B Site to peek at the entrance, but you should also be careful if they ever push the wall.
Icebox Lineups
A Site Heaven and Site
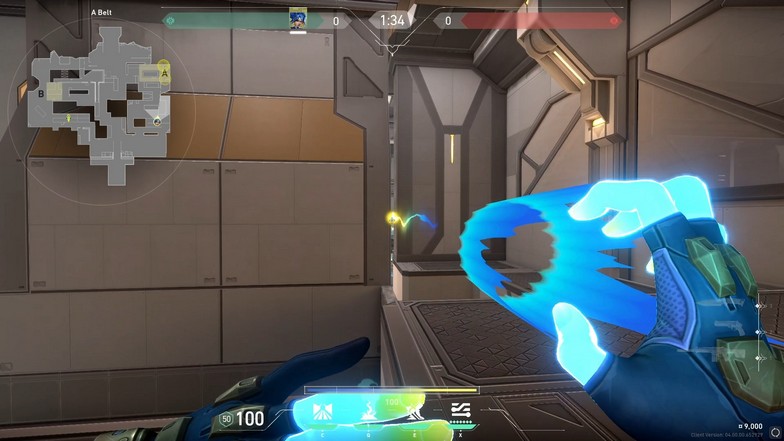
Since the concussive blast has a wide radius, you can use this pixel peek to blast both the Heaven and A Site.
A Site Top of Box
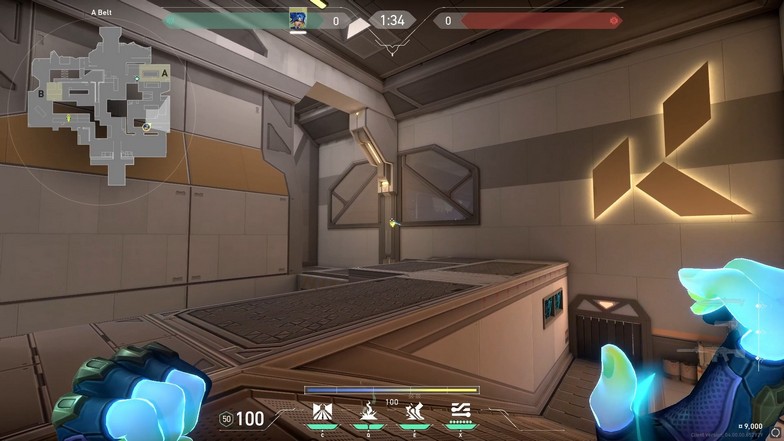
After going up the ramp, stop immediately at the flat end surface of the ramp and fix your crosshair like in the image above. The minimap is pinged where the second concussive blast should hit.
It should hit the defending player holding the top of the box near A Screens. Any agent can get on top of Screens if they do the jump correctly.
B Site Box
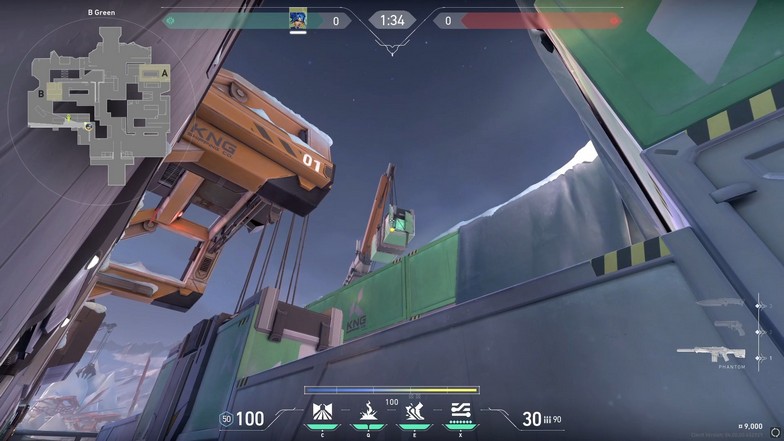
After taking control of B Green, you can lineup this juicy Relay Bolt to hit the players on the B Site. The most common tactic in pushing the B Site is to have Sage wall up and plant at the corner of the B Site.
Defending players will try to break the wall fast and prevent the plant by camping on the box in B Site. You can coordinate this lineup, so you can prevent them from pushing the Sage while planting.
Split Lineups
Neon A Site Elbow
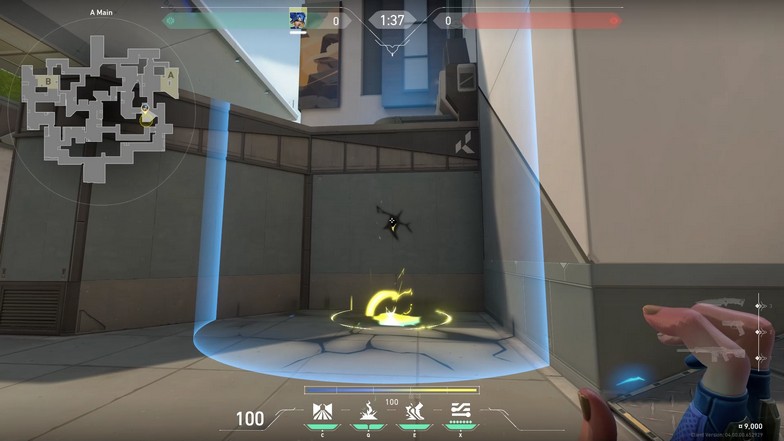
This lineup needs you to cross first near A Ramps. Hug the corner of the entrance and lineup this Relay Bolt to hit Elbow without hitting your teammates from the first blast.
B Site Triple Box and Site
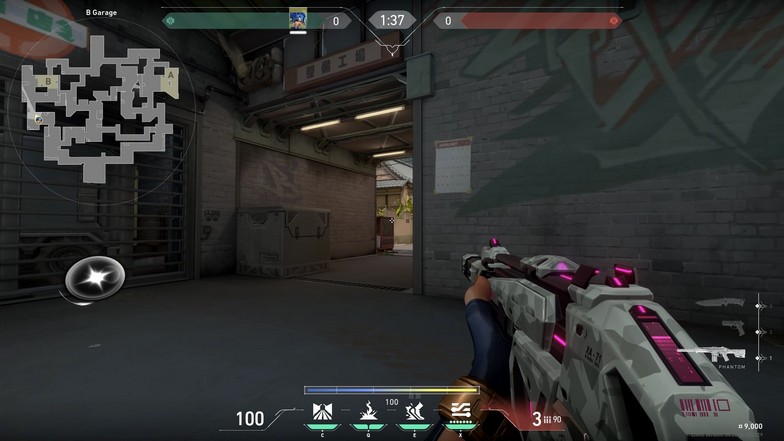
This lineup will hit the triple box and the player holding the back of B Site. Like in Neon’s trailer, you can use the straight wall to prevent campers on the left corner from shooting clearly while having cover from Heaven.
How to Use Fast Lane – Double Wall
The ability puts Phoenix’s Blaze Wall to shame. With an insane range and the same duration, you can create more cover. However, the duration isn’t that good. Players who are behind might lose the cover from the wall when they push a little slower.
If you know how to play Phoenix, you would know that it is a good idea to throw flashes outside the wall from the inside. You can use the same tactic here, but for other agents with blinds.
Fast Lane (double wall) can be confusing to some new players, but you just have to remember that this ability is a projectile. Neon fires two energy lines, but you will see a projectile hit the center on your crosshair.
When the projectile hits, two walls will spawn on both sides of the projectile from your position to the end of the projectile. The max distance is basically from A Cave to the back of A Site in Breeze. In short, it is pretty long.
The length of the wall depends on where the projectile hits. If you are in Ascent looking from A main to Heaven, the walls will reach all the way to Heaven. If you aim in the middle or even hit the wall next to you, the two energy walls will be shorter.
How to Use High Gear
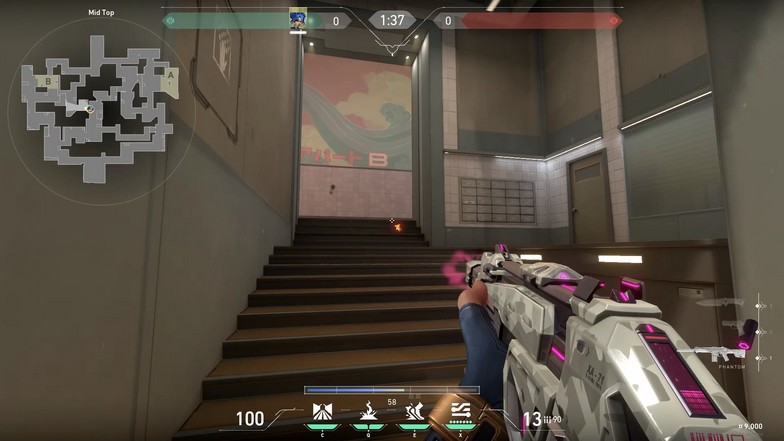
Neon’s electric slide (High Gear) is amazing for wide peeks. You can instantly shoot after the dash, unlike Jett, who has to wait for a little bit before she can shoot again.
You are also crouched while sliding, and you will have to hold the crouch button if you want to maintain your aim after the dash. Since good players will always aim at head-level, they might get surprised by the sliding dash and miss.
You will always have one sliding dash free, and it refreshes after every kill like most duelists. Using High Gear for the dash will alert some of the players because of the sound. They might even lower their aim if they are expecting a Neon pushing.
It is a great free ability that allows Neon to cover distances quickly. You will see a bar on top of your skills which shows the energy left for High Gear. When you activate High Gear, it will slowly drain the energy bar.
Turning it off will slowly refill the gauge again. When you are stuck in a 1v1 situation, you can spot the enemy first before pushing a site as an attacker. Once you can confirm that the defending player is on the other site, you can immediately use High Gear and run to the other site to plant.
High Gear gives you one chance to slide and if you get hit, your momentum gets slowed and you will not have a chance to use the slide. Activating High Gear to use a slide requires you to build up speed first before you can use your slide.
Here is where it gets interesting.
How to reverse slide
You might have probably seen clips of Neon making flashy plays with her slide. The best thing about her High Gear is you can use the slide in any direction you want. For a reverse slide, you will need to gain momentum first by activating High Gear and running forward.
When you want to do the reverse slide, you need to jump to do the reverse slide. Before you start the jump, you are already holding “W” to move forward. Before you hit the space bar for the jump, you need to strafe (press “A” or “D”) with perfect timing.
As you land, you will want to time your landing by moving backward and right-click to slide immediately. If you do this correctly, you will slide backward. If you press right-click before pressing “S” to move backward, you will just slide forward. If you press “S” a millisecond too late after pressing right-click, you will just stand there with High Gear activated.
It takes some time to practice and once you get used to all these sliding tactics and Neon’s High Gear speed boost, she is really fun to play because it adds some flexibility to her entries to confuse her opponents.
Reverse sliding is kind of pointless because using it to retreat is almost impossible. Once you get hit, you will be unable to slide anyway. If you get used to Neon enough, you can use it for some fancy play similar to the 360 no-scopes.
How to do a diagonal slide
For diagonal slides, you can just strafe by pressing “A” or “D” before right-clicking for a slide when High Gear is activated and you have enough momentum for a slide. This one is easier to do and is actually a common way to duel opponents.
Enemies will find it hard to chase a Neon with their crosshair when she is sliding especially those who are used to aiming at head-level. You can slide to whichever angle you want by combining your crosshair aim with “A” to slide left or “D” to slide right.
It will take some time to get used to, but unexpected slides can catch enemies off their toes as they will always expect a forward dash when they hear you coming.
How to Use Overdrive
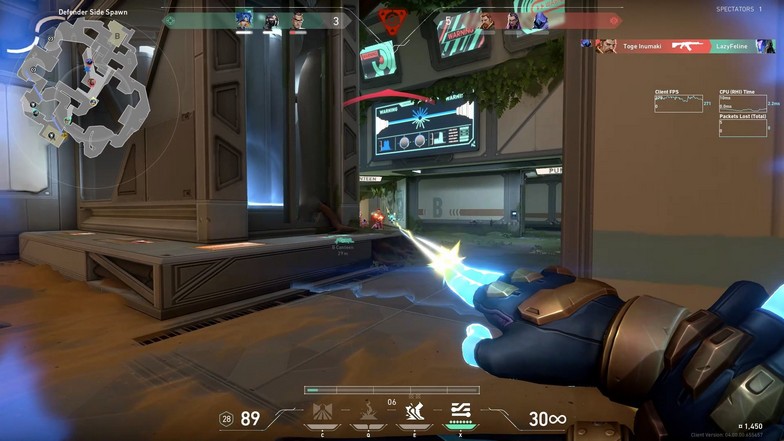
Overdrive is a good offensive ultimate ability that can help you save some money and get kills at the same time. Just like Jett, you can opt to skip buy rounds and use Overdrive to kill.
However, the duration is quite short, but it refreshes with each kill. Once you activate Overdrive, your energy gauge will replenish back to 100, and High Gear will be activated (speed boost). If you choose to switch to the weapon, your energy gauge will still deplete, and you will also lose your speed boost until you switch back to your ultimate ability.
Overdrive is easy to use because you can spam it and the ammo replenishes fast. However, you need to get kills to prolong the duration of your Overdrive. It is hard to manage in a sense where you might feel you want to push especially if you did not buy a gun.
As mentioned earlier in the buy rounds section, you always want to have a cheap alternate weapon instead of a classic. It isn’t always correct to push enemies when your ultimate is about to run out and you want to extend it.
The usage timing of Overdrive should always be used when there is a high chance of fighting. As a defender, you will already know when enemies will commit to a push (any ultimate committed to a site such as KJ’s and Viper’s). In attacking, it is good to keep track of the enemy’s utilities before really committing to a site.
Damage Test
It doesn’t matter which body part you hit. The damage is the same for each body part—only the distance matters.
- 50m – 10 damage per tick
- 30m – 15 damage per tick
- 20m – 20 damage per tick
- 5m and 10m – 22 damage per tick
When you are pushing closed areas, the damage of Overdrive is insane as long as you do not get one-tapped immediately. The damage for close-range combat will delete players in a second as long as you hold your crosshair on them.
It does not have recoil, and it is also accurate from a distance. You have a total of 40 energy to shoot, but it will replenish immediately when unused.
Some fights aren’t even worth taking when a Vandal or a Phantom can one-tap you. You will always use Overdrive along with your Relay Bolts and High Gear slides.
When you reach the level of players where headshots are all you see on the kill feed (diamond rank and above), Neon’s Overdrive becomes underwhelming. You have to pair it with great Relay Bolt entries before trying to hit them with Ovedrive.

