
Harbor is an excellent controller in Valorant. Some teams even use Harbor as a secondary controller to create more space for the team.
While he effectively supports and takes over areas of the map, it still depends on how well you use them.
You must still prepare your lineups and time them perfectly on pushes or retakes.
In this guide, we’ve compiled some of his most effective lineups for every Valorant map.
These lineups are sectioned by map. If you want to look for a specific lineup, search for the map first. Each map is divided into either Harbor’s High Tide or Cove abilities.
Ascent
High Tide
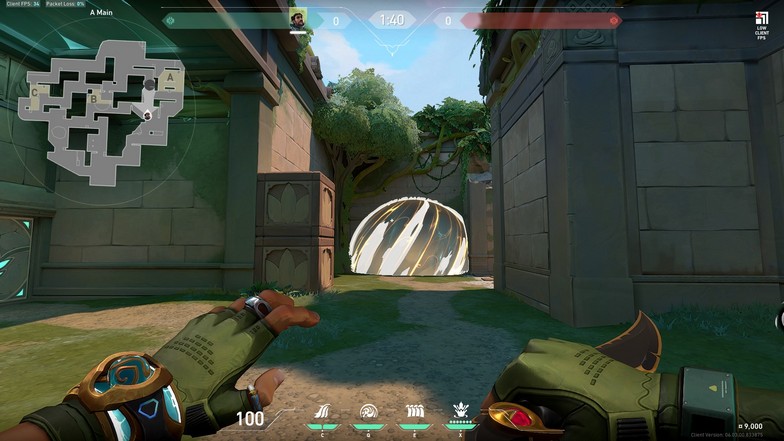
A Default

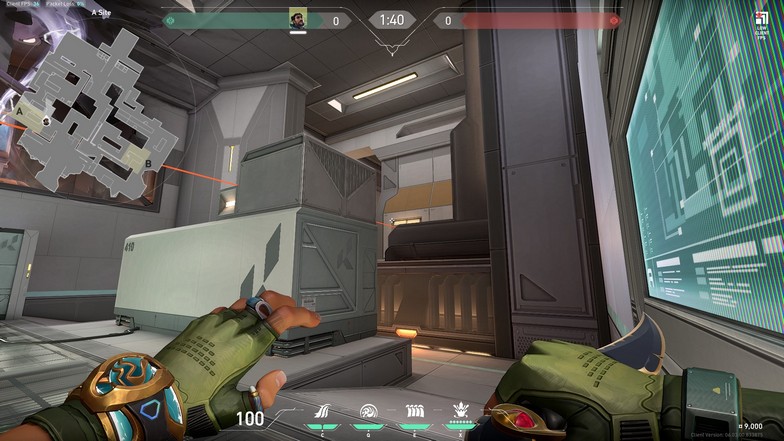
Place yourself on the edge of this cubby at A Main in such a way that you are facing the wall between A Door and A Long. Activate High Tide by pressing E. Hold the fire button and curve the wall so that both A Doors and A Heaven are blocked off.
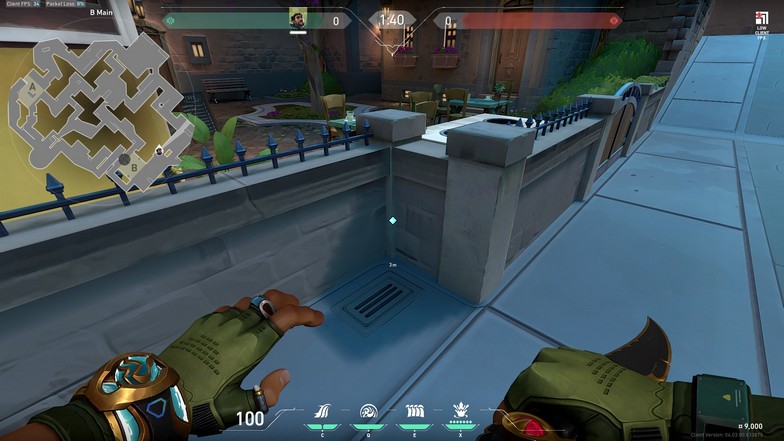
B Default

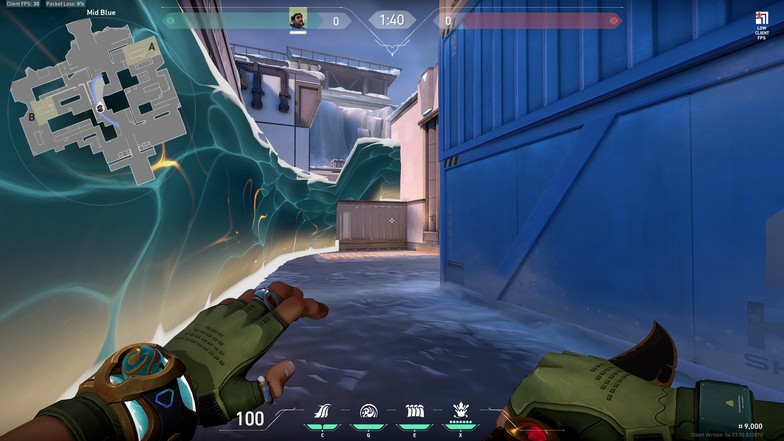
Stand on tiles at Mid Link while facing B. Activate Use High Tide by pressing E. Hold the fire button and curve the wall (by mouse movement), so it covers both Market Door and Defenders Spawn.
B Stairs

Another way is to stand in the same place and curve the wall in such a way that it covers Market Door and B stairs, making it easy for you to push into B Lane.
Cove
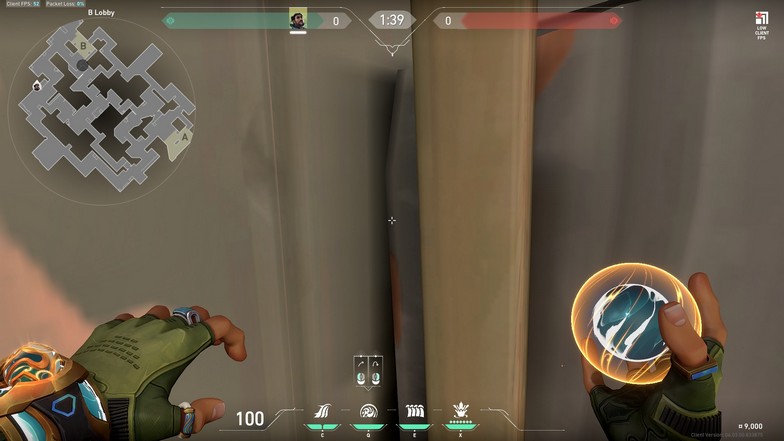
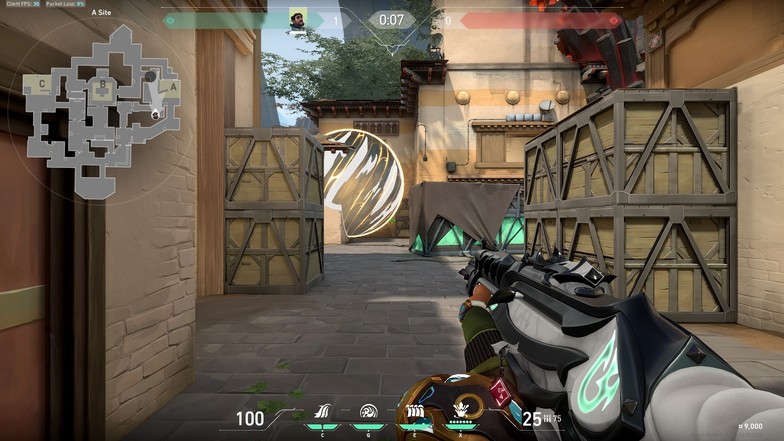
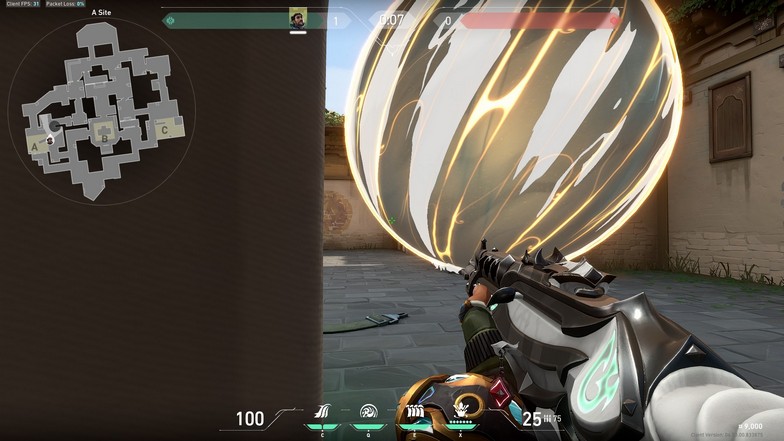
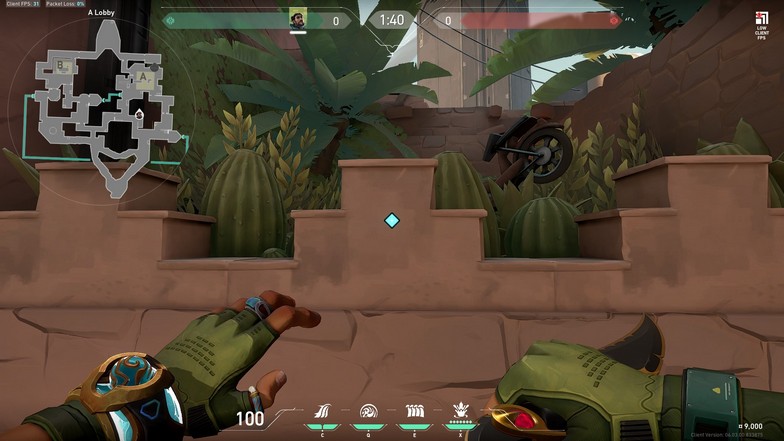
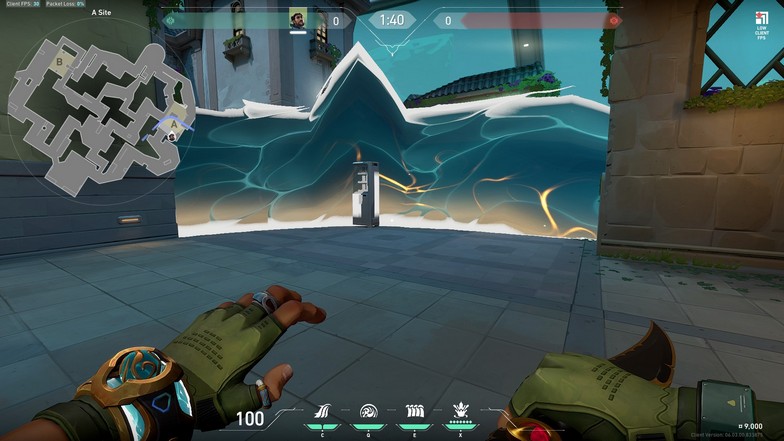
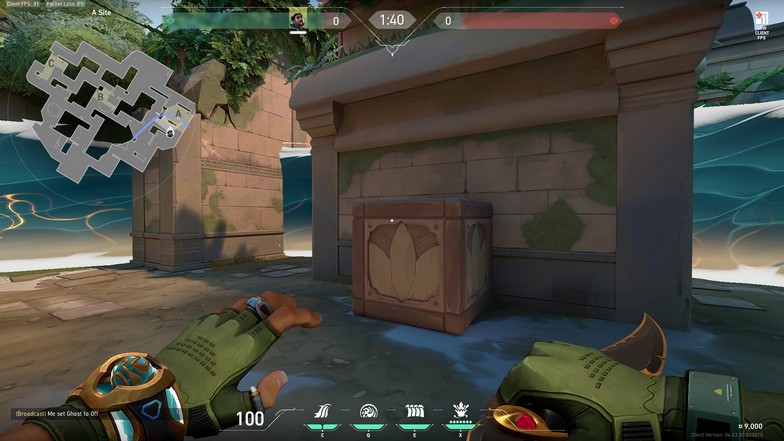
A Site from A Lobby


Stand at the right bottom of this lid. Aim a little under that cloud in the sky, as shown in the pictures below. Take out your Cove and throw it. It will land on top of green boxes on site and provide you with a cover from A Heaven when you push the site.
This lineup can also set up Gekko’s Wingman to plant the spike inside the Cove.
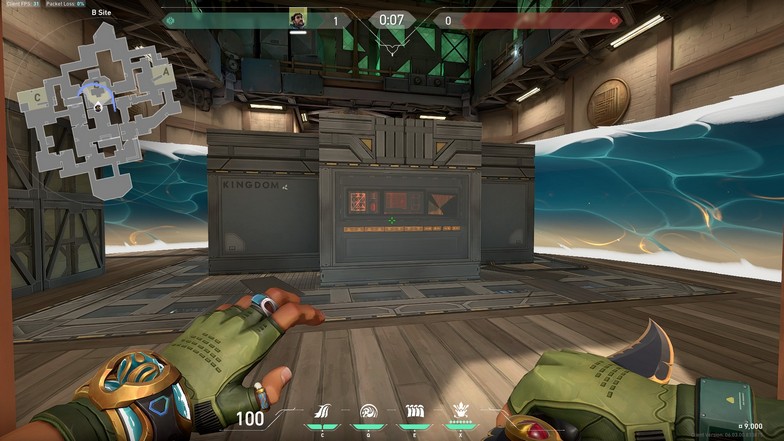
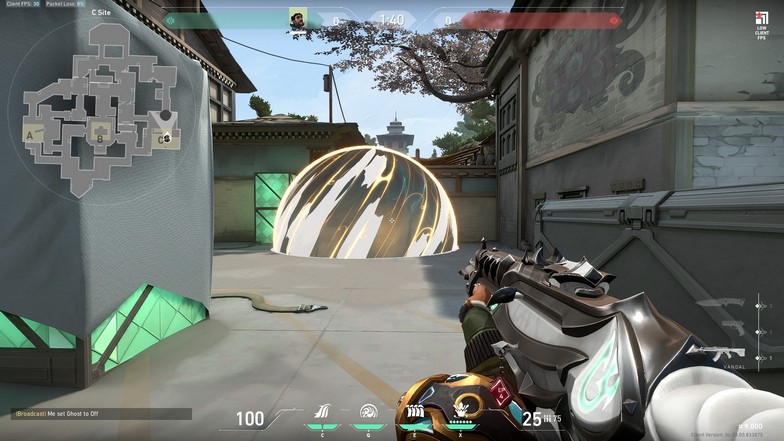
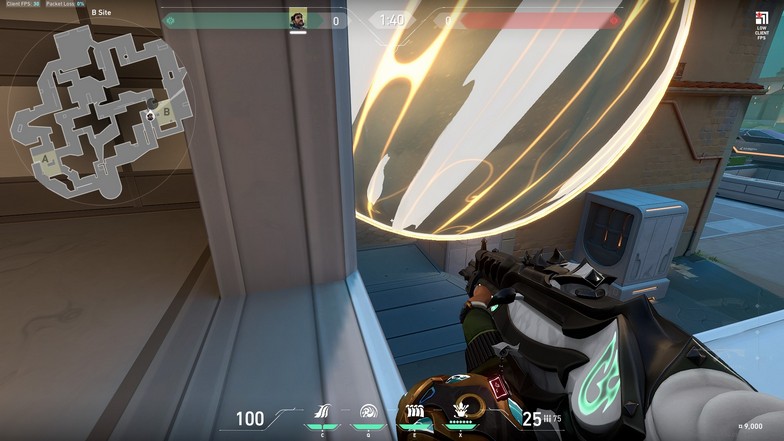
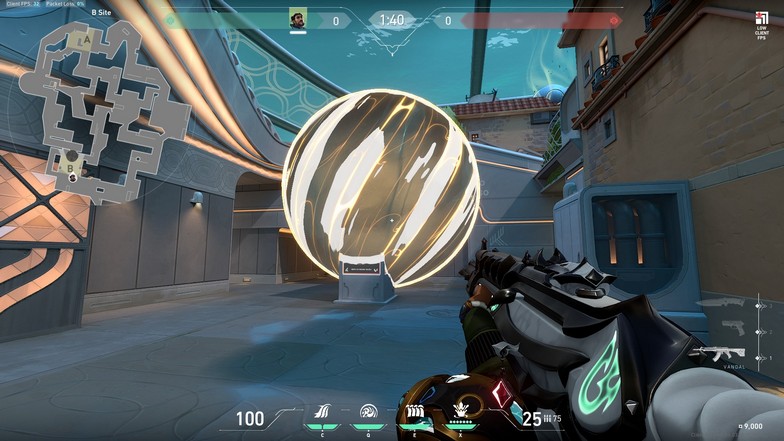
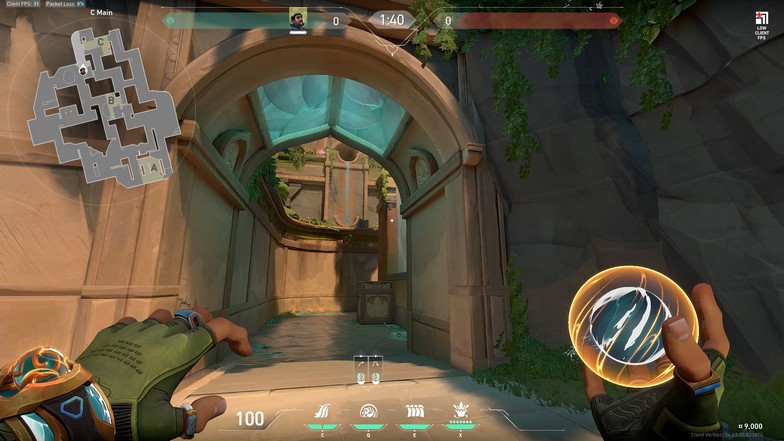
B Lane One Way
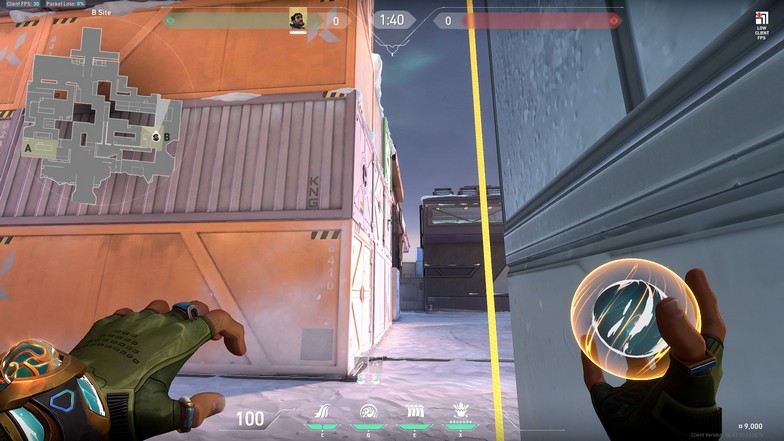
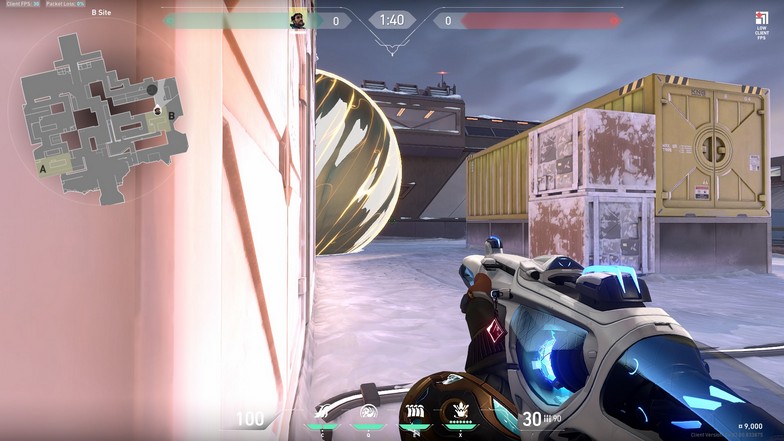
Stand anywhere at the edge of B Lane near the Shop. Take out your Cove by pressing Q. Aim above the shop, run, and right-click to throw the Cove on top of it. It will work as a one-way if anyone pushes you to B Lane.

This is a great strategy if you have a Killjoy on your team. Killjoy usually sets up in B Site because it is extremely hard to push the site with tons of traps set up for the attacking team.
Once the attackers know Killjoy isn’t here, you can set this one-way smoke up, as they’ll likely avoid the Killjoy or even a Cypher.
Split
This map has comparatively narrow pathways and multiple angles, making Harbour effective compared to other controllers. Below are a few match-winning lineups of Harbor’s Cove and High-Tide.
High-Tide
A Default

Start by hugging this corner at A lobby. Activate High Tide by pressing E. Hold the fire button and curve the tide to cover ramps for your crossing, A Tower, and A screens. This will help cut all the choke points and help you take kills on the site.
A Main and Ramps

Stand anywhere on the site while facing A main. Activate High Tide and hold the fire button to curve the wall. Make sure you cover A Main entrance as well as A Ramp.
The benefit? It will help you defend the site while assisting your teammates that are playing tower and close ramps.
A Retake

The major goal of this lineup is to help you take out enemies hiding at A Back and A Site
Start by hugging this corner near A Screens. Activate High Tide and make sure you’re aiming in a way that your straight wall will cut off the A Main, under rafters, and A Tower for you.
Mid to B Tower

Start by hugging this box at the mid-bottom near the sewers. Activate High Tide and use your mouse to curve the wall, so it blocks off A Vents and B Stairs. That will allow you to make your way to the B Mail and B Tower.
B Default
Use this lineup to push onto the B Site without worrying about the choke points.
Start by hugging this corner at B Lobby. Activate High Tide and aim toward the B Rafters and curve the wall to block B Rafters and B Alley.
B Site is usually the hardest site to attack in Split. You might need more support or even another controller smoke to block more angles away from B Garage.
Cove
A Rafters from A Lobby

This Cove lineup helps you block off A Rafters. Throw it from A Lobby without exposing yourself to enemies.

Stand on the corner of this first tile on the right side and then aim at the second bulb above the rafters. Now throw your Cove to block enemies trying to peek from A Rafters.

B Rafters from B Lobby

This cove lineup will block Rafters when you’re pushing the B Site.
Hug the corner at B Lobby and aim above on that wire, and then place exactly a little left of the right edge of that building above. Jump and throw the Cove mid-air.

Haven
High Tide
A Default from A Short

You need A short control to use this High Tide lineup. You can always use your Cascade towards short from A lobby as it will give you a lot of space to clear angles at short.
Start by hugging this small box at A sewers. Aim towards the spawn entrance and activate High Tide by pressing E. Hold the fire button and curve the tide using your mouse in a way that it cuts off defends entrance as well as A Tower.
A Defend and Retake
This lineup works best to take your enemies down off guard from unusual angles when they are pushing the site. You can also use this when you are re-taking the site.
Start by hugging this corner at A link. Take out your High Tide and activate it by pressing E, and simply cut off A short and A long entrance using your mouse.
B Default
Hug this corner under the Mid window. Press E to take out your High Tide. Activate it using the fire button and curve your mouse in a way that cuts off the A link as well as the C link.
C Default
Start by hugging this box in the C lobby. Aim towards garage exit to C and defenders’ entrance to C. Take out your High Tide by pressing E and hold your fire button so that it covers both, the garage and spawn.
Even though it shows that there is a gap in the wall at the spawn but when you use this lineup. It actually covers both the choke points completely.
Cove
A Post Plant One-Way


This Cove lineup works best in the post-plant situation.
Hug this corner near A short. Take your Cove out by pressing Q and aim between those two wooden plates, and throw your Cove. You can take out your enemies using this lineup before they get a vision on you.
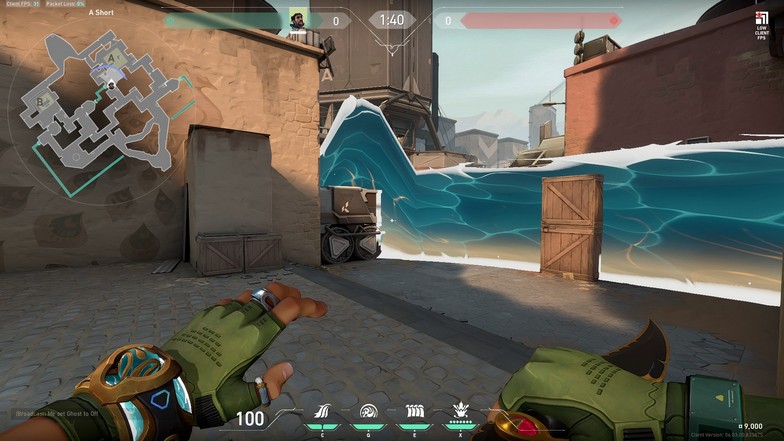
A Short One Way


This lineup works best when you are holding A Short as you can see your enemies entering before they can see you.
Start by hugging this wall between the tower and the defenders’ entrance. Aim at the left side of this wooden plate towards A Short (use picture for reference) and throw the Cove. It will land perfectly above the box on A Short entrance.
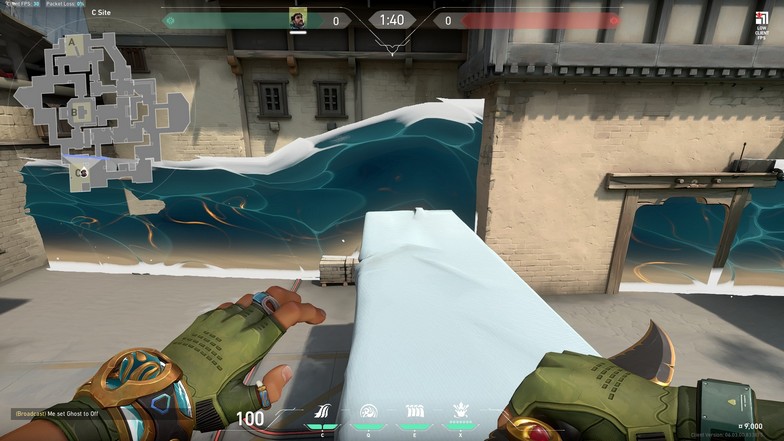
C Entrance from Spawn


Position yourself in the middle of this window at C towards spawn. Aim at the 5th wooden tile from the right side. Jump and throw the Cove mid-air and it will exactly land at the entrance.
Icebox
High Tide
A Default

Start by hugging this generator (box) under A Nest. Take out your High Tide by pressing E. Hold your fire button and curve the tide with your mouse in a way that it cuts A Screens as well as A Rafters.
Tip: You can use your Cascade from spawn towards the A Nest to counter their early push.
A Defending/Post Plant

Hug the extreme corner of A Screens. Take out your High Tide by pressing E and activate it by holding your mouse button and just place it straight so that it blocks off Maze, 410, and Gen.
Mid to B
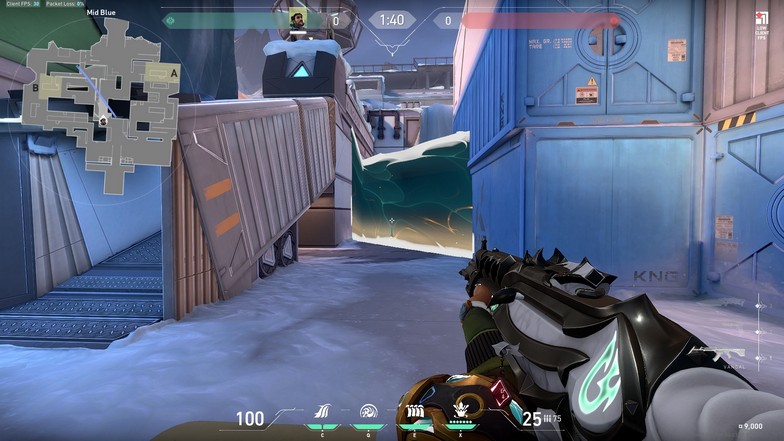
Get close to this blue gen on Mid. Take out your High Tide by pressing E. Activate it by holding your fire button and curve your mouse in a way that it cuts off the Boiler and Kitchen.
This wall gives you complete control over Orange and Snowpile.
Mid to A
Stand next to this blue gen near spawn. Take out your High-Tide and activate it by holding the fire button and aim towards the tube entrance and curve your mouse so that it cuts off under the tube and all the way to the boiler, as shown in the pictures below.
Tip: You can always use your Cascade to take control of Pallet and A Screens.
B Default

You need B Green and B Cubby control to use this lineup. You can always use your Cascade to take control of narrow pathways like this.
Once you get under B Green, stand under this gen and aim towards default. Take out your High Tide and hold your fire button and curve the tide with your mouse in a way that blocks off B default, top site, as well as Snowman.
Cove
A Maze One Way

Hug this corner of A Screen from the A Site. Aim at this corner of the A Nest and throw your Cove. It will land on pipes and help you see your enemies before they get a vision of you while pushing Maze and Gen.

B Entrance One Way

Start by hugging this corner at B default. Line up your aim with this opening at that container and place your aim at the boundary of the container, as shown in the pictures below. Take out your Cove and throw. It will land above the Green and help you see your enemies before they see you.
Bind
Just like Split, Bind has narrow but long pathways where Harbor’s Cascade comes in super handy. You can always use it to make space for your teammates in areas like A Short, A Showers, B Short, and B Long.
High Tide
A Short Default
Go to this corner at A lobby. Take out your High Tide and aim toward the Truck. Hold your fire button and curve the tide from the Truck towards A Lamps. This curve from the truck will create a higher tide that will block off enemy vision from A Heaven.
Showers Default

Go to this extreme corner at Showers. Take out your High Tide by pressing E and activate the tide using your fire button and curve it using your mouse in a way that blocks off the whole site, including A Lamps.
B Default

Stand anywhere near the B Teleporter. Take out your High-Tide and activate it by holding your fire button and curve it in a way that it cuts off B Elbow as well as Spawn entrance.
Cove
A Heaven from A Lobby

Hug this middle brick design. Aim at the bottom of that yellow triangle. Take out your Cove by pressing Q and just simply throw it. It will block off anyone peeking at you from heaven.

Defenders Spawn from A Short


Hug this box near Lab at A Short. Line up your middle HUD line with the middle wooden stick, as shown in the pictures below. Take out your Cove and throw it. It will land exactly at the spawn entrance and block any visions for your enemy.

The smoke isn’t as clear-cut as it should be. Smokes are usually deeper than this, but they could force enemies to push out. Bind’s B Site is very tricky, especially if flanks are coming.
Breeze
Due to the bigger playing area, Breeze gives you a lot of angles and corners to hold from. This is where you can get the most out of Harbor’s High Tide.
High Tide
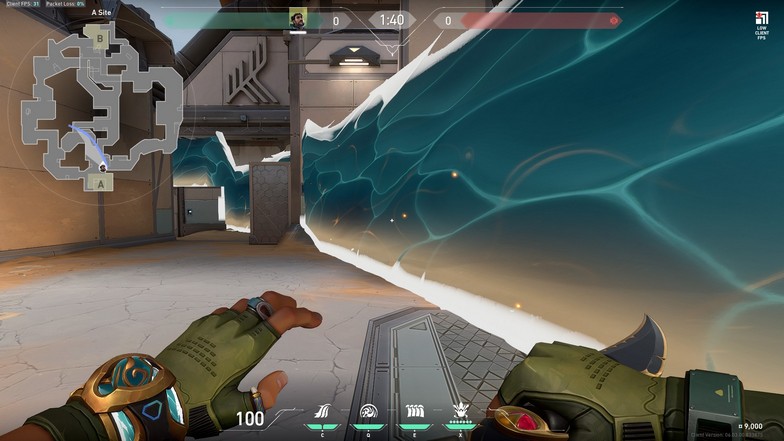
A Default
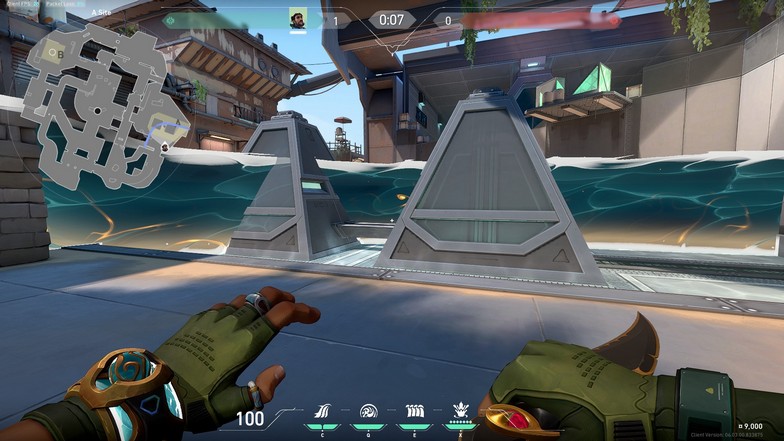
Stand anywhere in the shop. Take out your High Tide by pressing E and hold your fire button to activate it. Curve the tide using your mouse in a way that it cuts off Mid Doors and goes to the right side of the pyramids.
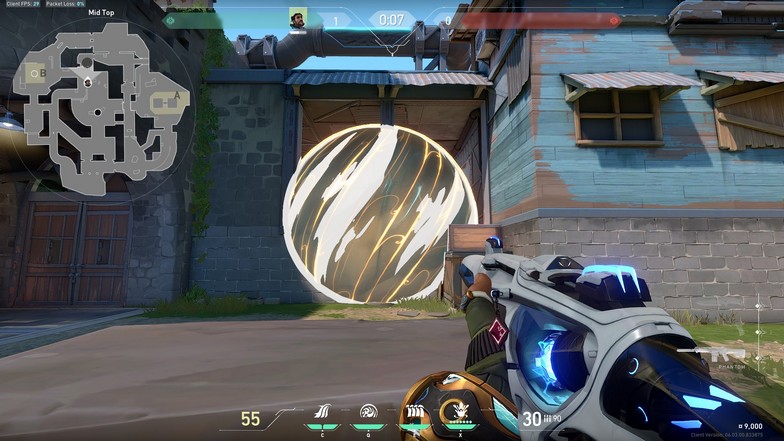
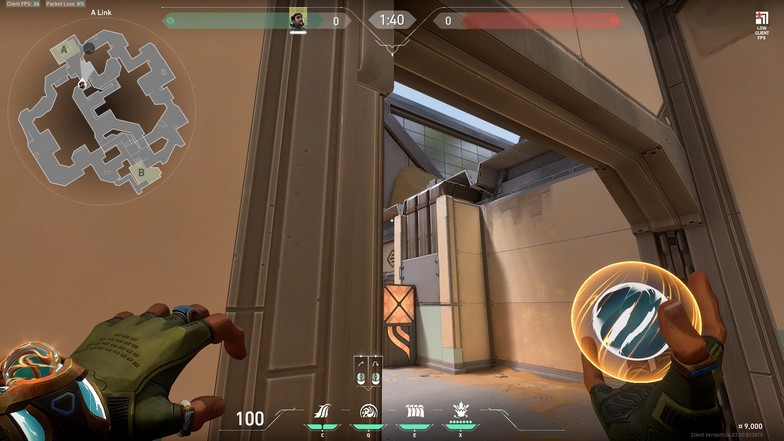
Mid to A

For this lineup, you need Mid Doors control. You can use your cascade to make space for yourself.
Once you reach the doors, hug the left corner and take out your High Tide by pressing E.
Activate the tide using your fire button and curve the tide so that it cuts off Switch, A Backsite, and goes through the Pyramids. This wall will also help your teammates enter the site from A Main.
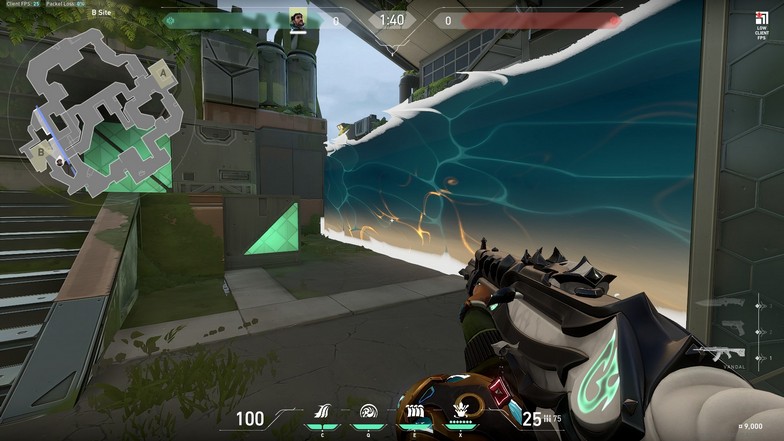
B Default

Stand close to this wall at B Main. Take out your High Tide and activate it. It needs to go straight, cutting off B Tunnels and Defends Arches.
Cove
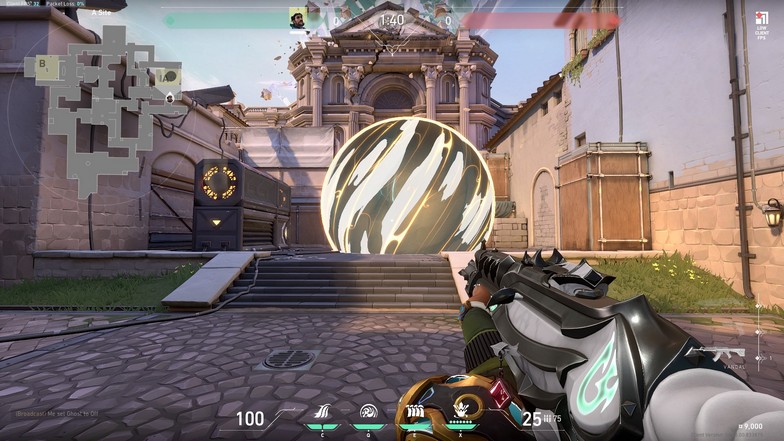
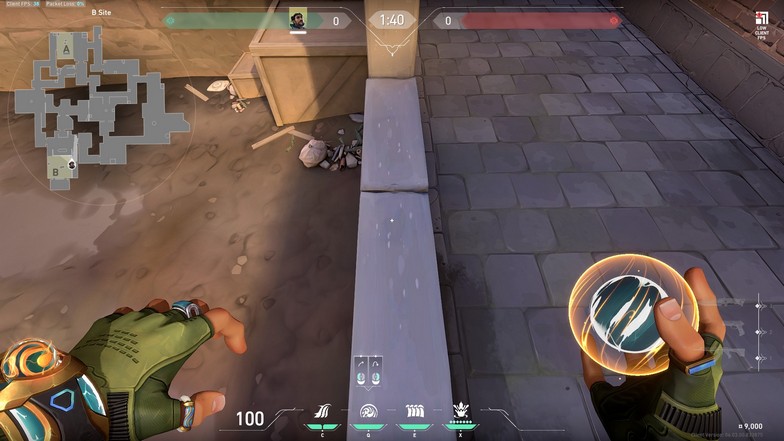
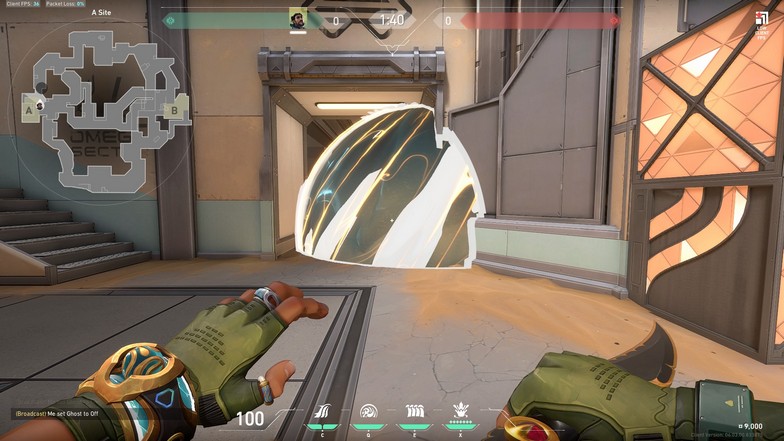
B Site One Way

Stand anywhere under this big block on B Site. Aim anywhere at the edge of it and right-click throw your Cove. Make sure that it lands on top of it, and it will create a one-way for you to hold B main.

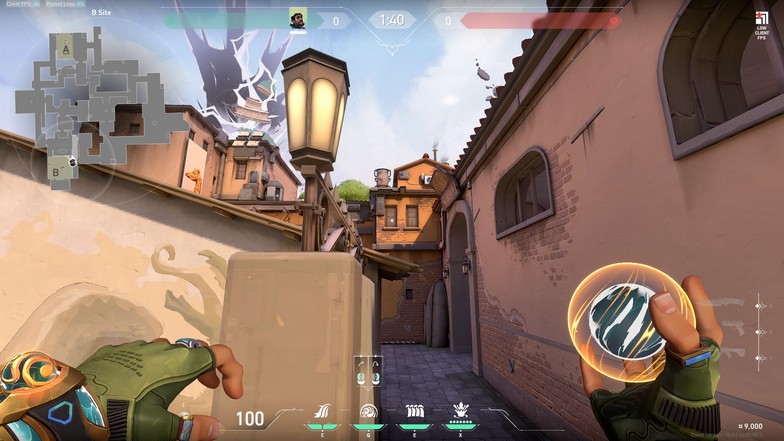
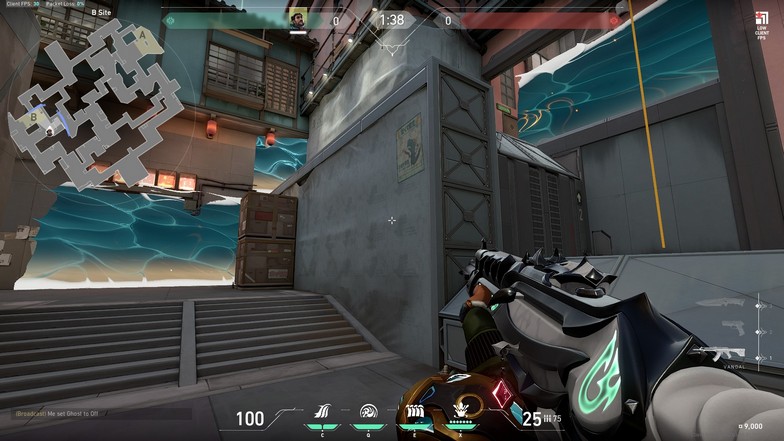
Mid Nest


Stand at this corner at B Elbow. Aim at the corner of that roof above. Take out your Cove by pressing Q. Run and throw it. It will land in the middle of the nest and block off the vision of anyone playing on the Nest.
Fracture
High Tide
A Default
Get to this corner at Attackers Spawn. Take out your High Tide and activate it by holding the fire button. Rotate it with your mouse in a way that it cuts off A Rope, A Rafters, Defenders Spawn, and A Drop.
This wall blocks off all the choke points of A sites whether you are pushing Sands or A Main.
B Default
Stand anywhere near B Main area. Take out your High Tide by pressing E and activate it by holding the fire button and controlling it with your mouse in a way that it cuts off your enemy’s vision from Canteen, Generator, and Arcade.
If you are pushing from Arcade, you can also do a similar wall that cuts off Generator and Canteen.
Cove
A Main from Defenders Spawn
Stand anywhere close to this wall at the Defenders entrance to A. Aim anywhere at the top of the A Main entrance, as shown in the pictures below. Take out your Cove and simply throw it. It will block off anyone peeking at you from A Halls.
Generator from B Main

Stand anywhere at B Main. Aim at this glass wall near B Link. Take out your Cove by pressing Q. Run and throw it. It will block off anyone standing at B Link and behind Generator.

Pearl
High Tide
A Default
Hug this wall at A Restaurant. Take out your High Tide by pressing E. Activate it by holding your fire button and control it with your mouse in a way that it covers A Link and cuts this site in two parts so that no one can peek at you from A Backsite, A Flowers and A Secret. All you need to worry about is the close right angle at the A site.
B Default

Stand next to this wall near B Ramps. Take out your High Tide by pressing E. Activate it by holding your fire button and place it in a way that it cuts off the complete site including B Halls.
Cove
A Link and Flowers from A Main


Hug this corner at A-Main. Aim above that Arch at the bottom of that block up in the air. Take out your Cove and just throw it. It will land at the left side of the site, blocking off A Link and A Flowers vision on you when you are A Main.

B Link One Way

Stand anywhere on the B Tower. Simply aim at the grass right here. Take out your Cove and throw it. It will create a one-way for you as you can see anyone pushing B Site from B Link before they can see you.
B Tower from B Main

Hug this corner at B Main. Line up the bottom of your HUD with that brick as shown in the picture below and just simply throw it. It will land perfectly on the tower.
You can combine this lineup with B Default High Tide and leave your enemies with no angle to peek at you from.
Lotus
High Tide
A Default
Stand at this corner near A Root. Take out your High Tide by pressing E and activate it by holding your fire button and curve it with your mouse in a way that it goes cutting A Stairs and the bombsite in two parts so that it blocks off vision from A Top and A Drop.
A Retake

Hug this pillar at Defenders Spawn. Take out your High Tide and put it in a way that blocks off A Main and A Tree so that you can easily take out enemies present on A Site.
B Default

Positioning does not need to be perfect for this one. Just stand anywhere in B Lobby. Take out your High Tide and activate it by holding your fire button and curve it to cover A Link, B Upper and C Link.
C Default

Stand at this cornet a C Main. Take out your High Tide and activate it by holding your fire button and curve it to block off C Waterfall and C Hall.
Cove
A Root to A Stairs


Lineup yourself with the left leg of this extreme right human-like design. Take out your Cove by pressing Q and aim at that cloud above and throw it. It will land on A Stairs and provide you cover from anyone peeking from there.
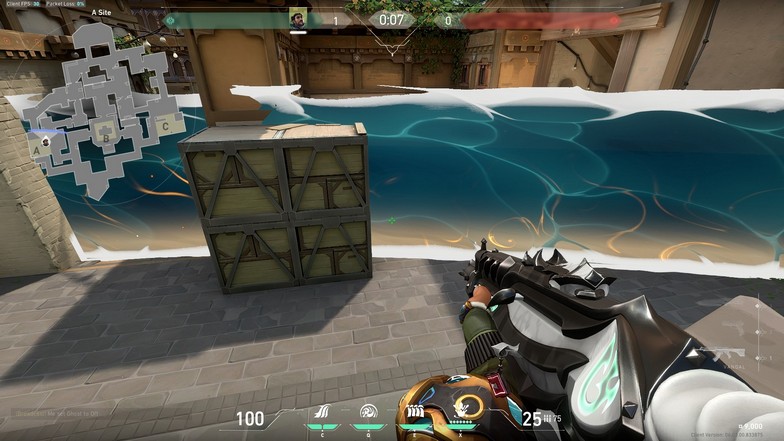
Waterfall Crossing and C Site from C Main
Stand anywhere at the entrance of C Main. Take out your Cove and aim at that pillar. Run and throw it. This Cove will provide cover to your teammates planting and defusing the spike. It also creates a cover if you want to go towards the Bend without worrying about anyone peeking at you from the Waterfalls.

These were the few lineups you must use as a Harbor, but this is not all. You can always get innovative with new ideas and adapt to the situation.
Make unique plays with Harbor’s Abilities. Try combining Harbor’s Cascade with High Tide to create extra space for your teammates.
Make sure that you always clear pathways and take close combats with your Cascade, and you will have a lot of impact as a teammate.


