If you are savvy with a bow or crossbow, you should definitely include a Target in many of your builds.
A target is a useful block that, when hit, will emit a redstone pulse for a short amount of time, making it a good way to activate certain redstone mechanisms and circuitry from afar.
In this article we will teach you how to build a target block, but also how to efficiently use it.
Minecraft Target Recipe
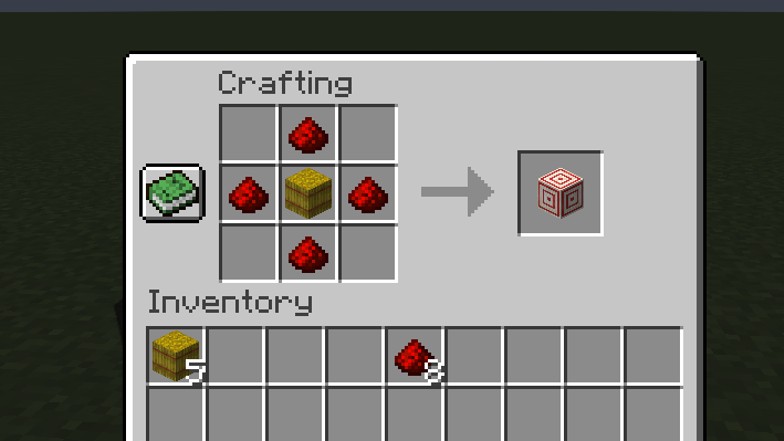
- 1 Hay bale
- 4 Redstone Dust
To make a target you will need to put these ingredients into a crafting table; with the redstone dust surrounding the single haybale in the very center.
This will lend you a single target block.
If you are doing a simple build this may be all you will be needing. Otherwise, think to stock up on plenty of wheat to make your hay bales.
Finding Targets in Minecraft
Other than crafting, targets can actually be found naturally generating in the world of Minecraft, but only in a single location.
They can be found in Ancient Cities, deep underground as part of the structure.
However, Ancient Cities are very rare structures to come across and they are also very dangerous as they are the natural habitat of the Warden.
It is safe to say that it is much better to simply craft them on your own than look for Ancient Cities in order to acquire them.
How Targets Work in Minecraft
The biggest usage targets have is in redstone circuitry as they can be used to make anything from the most simple activatable lights all the way to secret doors, among other and more complex redstone builds.
The target can be hit practically by any projectile in the game.
The first thing that comes to mind is usually an arrow, either from a bow or from a crossbow. However, tridents, snowballs, eggs, splash potions, and even fire charges can activate it, among others.
When placed down you will be able to see that the target block is designed, well, like a target.
It has a center for a bullseye and two outer red lines. The strength of the redstone pulse depends how close to the center you hit the target and with what kind of projectile. Most projectiles will make the pulse last for 0.4 seconds.
Tridents and arrows extend the duration of the redstone pulse to a full second.
The signal itself can be anywhere between 1 or 15 in strength. Obviously, the closer you are to hitting the center the stronger the signal will be.
This redstone signal can then be used to activate various different components.
Changes to the target can also be noticed by observers. So, when a target is hit, an observer can notice this and further activate other redstone circuitry and components.
Target Build Ideas
Now, once you have your target you may need a few ideas on what to build with it and what to use it for.
Of course, the simplest answer to this is to simply use the target for target practice.
You do not need to connect the target to any complicated redstone mechanism in order to simply use it. Placing it on top of a fence post or using it to build a target dummy is a good way to test your aim with long ranged weapons.
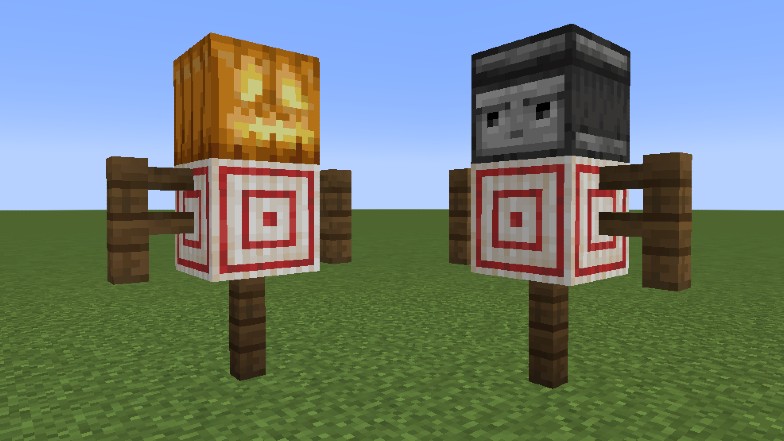
Once you have your aim practiced out then you can attempt to use it in redstone mechanisms.
Activatable Light
The simplest thing to do with targets, other than target dummies, is making an activatable light.
You can choose to do this in several different ways and even expand on it once you get the basics down.
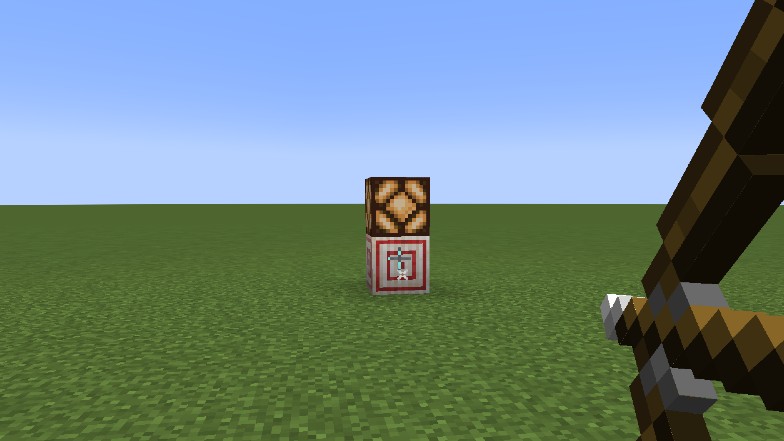
One way of using targets to activate a light is to directly put a redstone lamp on top or next to a target. When you hit the target this will light up the lamp for a few seconds. Additionally, you can put them a bit farther apart and connect them through redstone dust.
The light won’t be staying on for long, unless you expand on the design using redstone repeaters and comparators.
That being said, they can be useful in a multiplayer server to send out light signals to friends.
Secret Doors
We have covered secret doors and passages on a few occasions and this will pretty much follow a very similar design.
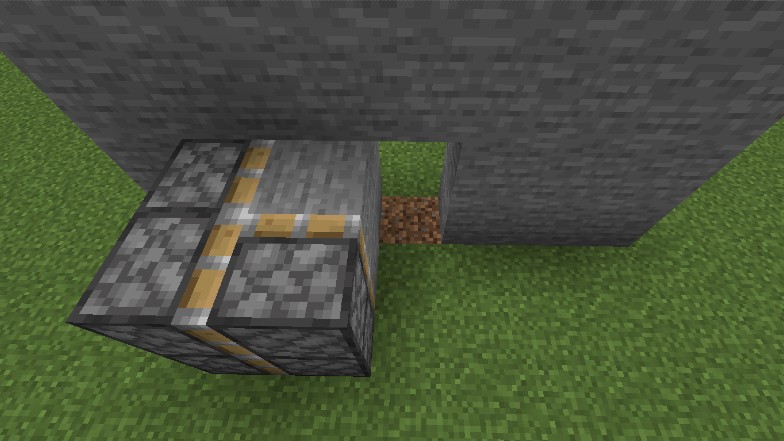
Firstly you will want to build your wall, sticky pistons, and door the same way you would any other automatic secret door.
The design is pretty simple, with the main difference being that we use a target instead of a lever or button, as well as a Redstone pulse extender.
Make sure you have set up your wall and sticky pistons like in the image below before you get working on the redstone circuitry part.
Once you have everything set up, then you can work on the redstone circutry that connects to the target.
For this, the circuitry will be connecting directly to the target and it will be located right behind it, out of view of the shooter, and right above the sticky pistons. You can follow the circuit design from the image below.
Be mindful of the direction the redstone comparators are pointing, as they assist in prolonging the redstone pulse that keeps the door open.
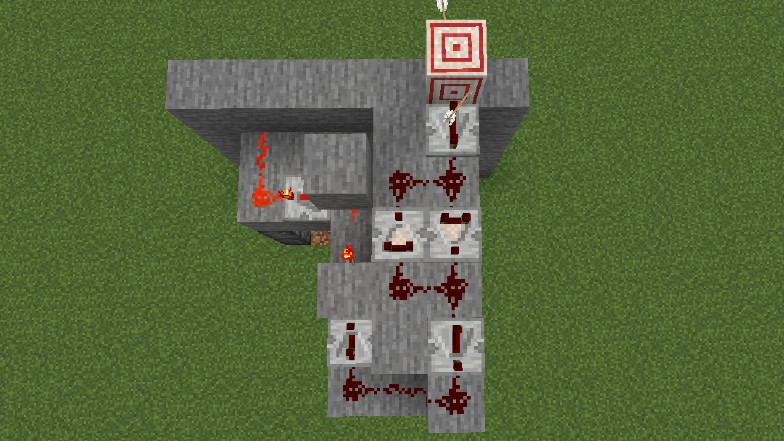
This design will allow for your door to open up when you hit the target.
There will be enough of a delay for you to pass through it without the door shutting itself on you or squishing you into the wall.
A similar process can be used to make hidden staircases.
Advanced Target Practice
If you prefer the simplicity of using buttons and levers to activate your redstone, you can still use the target for its original purpose – and then make it harder.
Once you have mastered shooting a stationary target you can create advanced practice for yourself and your friends.
The goal here is to hit the target while it is moving.
For this design all you will need is two observers facing each other and a sticky piston, on top of which you put your target block.
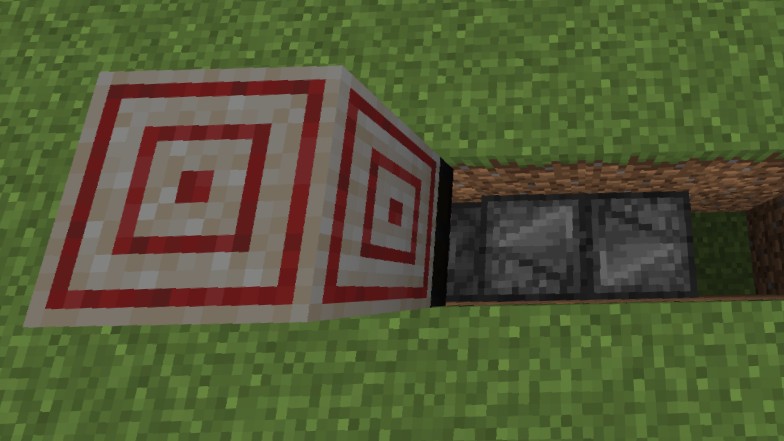
The observers will continuously activate and deactivate the sticky piston, so that once you cover the mechanism with dirt it’ll simply look like the target is jumping in and out of the ground.
It is pretty difficult to hit, but it’s a fun way to practice shooting quick targets for PVP.

