Libraries are amazing additions to many different Minecraft builds.
Whether it is a public library for a village, or your personal library inside your mansion where you can enchant your gear, you can get very creative with a library design.
In this article, I will show you how to build a standalone library for your village.
I’ll show you a library that I built in Minecraft myself and I’ll give you ideas for some designs that you can utilize in your other bigger more creative builds.
Library Building Tips
Before we get started, remember that a library doesn’t always have to be a standalone building. Sometimes it can just be a room inside your already existing build that you decorate appropriately.
If this is something you’re looking for you can scroll down and see how to decorate the inside of a library.
However, if you wish to build a library building, you do not have to worry. There are no set rules for how a library should look like.
A library can be a big blocky building, a tall tower or even a secret underground treasury. You often need to think outside the box to make the most awesome creations possible.
How to Build a Library in Minecraft
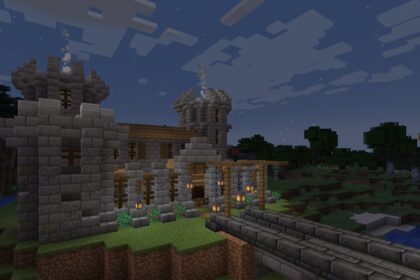
The design showcased in this article is one of my very own. It is a slightly larger design, but can easily fit in with other buildings.
It will have two floors, along with a tower on the back of it, simply for aesthetic purposes. Firstly, we have to prepare its layout.
The first step is to designate an area for our library.
For that, I start off by marking out the area I want to work with and filling in a platform. You will see in its layout there is a bit of elevation differences between the entrance and the inside.

The entrance at the front is 4 by 17 blocks in size, and 2 blocks in height. We will build stairs here leading up to the library, which I marked for myself.
The main floor of the library is just a single block lower than the entrance and it is an almost full square/rectangle area.
On the outside of the walls of the library I included Spruce Logs as beams, which we will work with later when decorating the exterior.
Finally, the tower is 10 by 12 blocks in size. In the image below you can see the exact measurements for each wall of the layout, excluding the Stairs at the front.

The walls will be made out of Stone Bricks and they will be 12 blocks tall, as will all the Spruce Logs that surround the building, save for the tower. The tower will be much taller and will peak over the roof.
There are going to be only 3 windows in this build and all will be located on the very front wall. This will make both the inside and outside look nice and lit up, but we will still have plenty walls left to place our Bookshelves against.
I make the design of the windows and front door of the library using Stone Brick Stairs.
I keep the Spruce Logs near the door shorter, with a Dark Oak Stairs on top. These Stairs connect to Dark Oak Slabs that will circle the entire wall as part of its design. I mimic this at the bottom of each beam.

On the other walls I just continue the pattern of Dark Oak Slabs and Stairs underneath them connecting the Log beams. This helps break up the shape where there are no windows.
The tower will be 21 blocks tall, excluding its roof and all throughout we will simply follow its shape as we build it up, above the roof of the main building. You can make the tower much taller as well if you want it to really loom over the library.
In total this tower ends up having 6 floors, each about 3 blocks apart.
I add some slight variation in the corners using Chiseled Stone Bricks and make sure there are windows on every floor. The details on the windows I make using Stone Brick Stairs again and then I add Dark Oak Slabs in circles around the tower.

The very top floor, which opens up to the roof, has a variation in its design. I narrow it down by 2 blocks and fence it in. Then I build the roof above it.
The bottom floor of the tower will be only for Enchanting, while the other floors can only be accessed through the loft, which we will build later.
If you want ideas on how to make the tower look more interesting from the outside and need inspiration for a cool roof, you can try following some of our Watchtower build designs.

Building the Interior
Decorating a library interior is the most important part of the library. Knowing where and how to place down the Bookshelves and other furniture will make all the difference between an accidental maze and a cozy reading place.
We will start with the bottom floor and the center of our building.
When entering the library there will be a small platform and a step leading down toward the center and main part of the library.
Every library, of course, needs a reception desk where you sign in and check out your books.
For this we will make a desk using a mix of various blocks such as a: Lecter, Cartography Table, Jukebox, Dark Oak Slabs, and Gates. All of these are surrounded and decorated more with Trapdoors and then potted plants on top.
This is actually pretty simple and it will not take up much space from the surrounding area. This allows enough space to put down a Carpet that paths the way around to the tower room behind the desk.

The Bookshelves we will place so that they basically wrap around the room, along the walls, giving us a cozy feeling.
A safe tip is always to have at least some number of Bookshelves resting against the walls, but make sure they never cover up your windows. This is why we only included a few in this design.
Try to not place the Bookshelves in only straight lines or just against the walls. Create squares using Bookshelves or even L and ‘zigzag’ shapes that close in various rows together.
In some Bookshelves I left openings where I will build a reading desk using Dark Oak Slabs and a block of Stairs. Most of the Bookshelves also have Trapdoors on their sides and Stairs or Slabs on top to make them feel more like actual framed Bookshelves.

On the right side from the entrance, we will build a 1 block wide staircase leading up to the second floor. The second floor will be a loft, with plenty of Bookshelves along the walls.
The loft will be built using Spruce Slabs and it will be much more narrow than the lower floor. Because this is a bigger design, we can make the loft wrap around the walls and form a shape and fence it in for safety.
The loft is 4 blocks in width on each side.

The Bookshelves on the loft I mostly keep close to the walls. I do however add a slightly different design to the decoration around them to make them feel bigger and less empty.
Just as I did on the bottom floor, I also add the Blue Carpet that wraps around the whole of the loft, leading to the Bookshelves and a few other desks.
For lighting I include one large chandelier made from Froglights and Dark Oak Signs in the very middle to keep the area bright. I add a few more, either hidden under Carpets or in corners. Where I can I place Candles or Lanterns on the desks just to avoid Mobs spawning.
Finally, the part of the loft which connects to the front wall and windows will not be covered in Bookshelves. This is a perfect spot to make a seating and reading area which we will make using Dark Oak Stairs.

The different rooms and floors inside the library’s tower you can use however you want. Make this private study areas and nooks or simply store a bunch of Bookshelves inside.
You can even include a proper storage area filled with Chests and Barrels for some of your personal stuff and fighting Gear.
Library With Enchantment Table
A library is the perfect place to put down your Enchantment Table. It is a place full of Bookshelves, so an Enchanting area is the perfect addition as a center piece or a secret in the very back of your library.
Because we have a whole tower, this is where I decided to put down my Enchantment Table. There are all kinds of designs for an Enchanting room you can come up with.
Basically all that will be needed are the Bookshelves surrounding the Table and then everything else is simply decorations that you put down according to your needs. Remember that to fully power an Enchantment Table you need the maximum number of 15 Bookshelves surrounding it.

I also include additional Bookshelves to make the area seem fuller and a bigger study desk for any scholar that comes by.
There are also some Chests where the Lapis Lazuli and Enchanted Books can be stored.

Looking for what kind of facility to build next for your base or city? You can get some ideas in our Minecraft village building tutorial where we talk about village layout, building design, and much more.